---
title: "How to Build a Serverless, SEO-friendly React blog | Netlify"
description: "Realize the speed, agility and performance of a scalable, composable web architecture with Netlify. Explore the composable web platform now!"
source: "https://www.netlify.com/blog/2017/09/26/how-to-build-a-serverless-seo-friendly-react-blog/"
last_updated: "2026-07-10T14:00:46.000Z"
---
_Welcome and thank you to our guest author, Roger Jin, Senior Software Engineer at ButterCMS._
Serverless application architectures are gaining in popularity and it’s no mystery why. Developers are able to build and iterate on products faster when they have less infrastructure to maintain and don’t need to worry about server maintenance, outages, and scaling bottlenecks.
In this tutorial we are going to show you how to build a serverless, SEO-friendly, CMS-powered blog using React, ButterCMS, and Netlify. The finished code for this tutorial is [available on GitHub](https://github.com/ButterCMS/netlify-react-blog-tutorial).
[ButterCMS](https://buttercms.com) is a proprietary API-based CMS and content API that lets you build CMS-powered apps using [any programming language](https://buttercms.com/docs/). Butter lets you manage content using their dashboard and integrate it into your frontend of choice with their API – you can think of Butter as similar to Netlify CMS except that your content is managed in an external API rather than stored in Git.
## Getting Started
We’ll use the [Create React App](https://github.com/facebookincubator/create-react-app) starter kit.
Install Create React App:
```
npm install -g create-react-app
```
Then create the boilerplate for our app:
```
create-react-app react-serverless-blogcd react-serverless-blognpm start
```
## Creating Routes
Our blog needs two screens: one for listing all posts and another for displaying individual posts. Create `BlogHome.js` and `BlogPost.js` components in the `src` directory:
```
import React, { Component } from 'react';
class BlogHome extends Component { render() { return (
); }}
export default BlogPost;
```
Create React App doesn’t offer routing out-of-the-box so we’ll add react-router:
```
npm install react-router@3.0.3 --save
```
In the source folder, create a new file called `routes.js`. We’ll create routes for the blog home page with and without page parameters, as well as the individual post page:
```
import React from 'react';import { Router, IndexRoute, Route } from 'react-router';
import App from './App';import BlogHome from './BlogHome';import BlogPost from './BlogPost';
const Routes = (props) => ( );
export default Routes;
```
Next, we’ll update `index.js` so it uses our routes when initializing the application:
```
import React from 'react';import ReactDOM from 'react-dom';import { browserHistory } from 'react-router';
import Routes from './routes';
ReactDOM.render( , document.getElementById('root'));
```
And finally, we’ll update `App.js` so it nests child components specified in our routes:
```
import React, { Component } from 'react';
class App extends Component { render() { return (
My blog
{this.props.children}
); }}
export default App;
```
## Building the blog
Next we’ll slide in ButterCMS to bring our blog to life. ButterCMS provides an API that lets you easily fetch blog posts, categories, tags, and authors.
First we’ll install the [ButterCMS JS client](https://github.com/ButterCMS/buttercms-js):
```
npm install buttercms --save
```
We’ll then update ‘BlogHome’ to fetch posts from ButterCMS and render them. Use the API token in the example below or get your own by [signing into ButterCMS with GitHub](https://buttercms.com).
```
import React, { Component } from 'react';import { Link } from 'react-router'import Butter from 'buttercms'
const butter = Butter('de55d3f93789d4c5c26fb07445b680e8bca843bd');
class BlogHome extends Component {
constructor(props) { super(props);
this.state = { loaded: false }; }
fetchPosts(page) { butter.post.list({page: page, page_size: 10}).then((resp) => { this.setState({ loaded: true, resp: resp.data }) }); }
componentWillMount() { let page = this.props.params.page || 1;
this.fetchPosts(page) }
componentWillReceiveProps(nextProps) { this.setState({loaded: false});
let page = nextProps.params.page || 1;
this.fetchPosts(page) }
render() { if (this.state.loaded) { const { next_page, previous_page } = this.state.resp.meta;
return (
{this.state.resp.data.map((post) => { return (
{post.title}
) })}
{previous_page && Prev}
{next_page && Next}
); } else { return (
Loading...
) } }}
export default BlogHome;
```
Next we’ll update `BlogPost.js` to fetch and display posts based on the route:
```
import React, { Component } from 'react';import Butter from 'buttercms'
const butter = Butter('de55d3f93789d4c5c26fb07445b680e8bca843bd');
class BlogPost extends Component {
constructor(props) { super(props);
this.state = { loaded: false }; }
componentWillMount() { let slug = this.props.params.slug;
butter.post.retrieve(slug).then((resp) => { this.setState({ loaded: true, post: resp.data.data }) }); }
render() { if (this.state.loaded) { const post = this.state.post;
return (
{post.title}
); } else { return (
Loading...
); } }}
export default BlogPost;
```
## Head Elements
Our blog is working but our post pages don’t have properly set HTML titles or meta tags. To fix this, we’ll use [React Helmet](https://github.com/nfl/react-helmet).
First, install the package:
```
npm install --save react-helmet
```
Import the `Helmet` module in our `BlogPost` and use it in our `render()` method to set HTML tags that should be in the `.
```
{post.seo_title}
```
Here’s what the complete code for the component looks like. Inspect the DOM to verify that tags are getting set correctly.
```
import React, { Component } from 'react';import Butter from 'buttercms'import { Helmet } from "react-helmet";
const butter = Butter('de55d3f93789d4c5c26fb07445b680e8bca843bd');
class BlogPost extends Component {
constructor(props) { super(props);
this.state = { loaded: false }; }
componentWillMount() { let slug = this.props.params.slug;
butter.post.retrieve(slug).then((resp) => { this.setState({ loaded: true, post: resp.data.data }) }); }
render() { if (this.state.loaded) { const post = this.state.post;
return (
{post.seo_title}
{post.title}
); } else { return (
Loading...
); } }}
export default BlogPost;
```
## Prerendering
Our blog is set up, but crawlers from search engines and social networks don’t always execute JavaScript so our blog has terrible SEO.
There are a number of ways to address this, including setting up server-side rendering and pre-rendering services like Prerender.io. But these options all require setting up and maintaining a Node.js server. Luckly, [Netlify](https://netlify.com) offers built-in prerendering which allows us to keep our code “serverless” while still making sure our blog is optimized for crawlers.
## Deploying to Netlify
Before deploying to Netlify we’ll create a production build of our app:
```
yarn installyarn run build
```
Check your `build` directory to verify that the production build was created successfully. To upload your site on Netlify, drag the `build` folder onto Netlify’s dashboard.

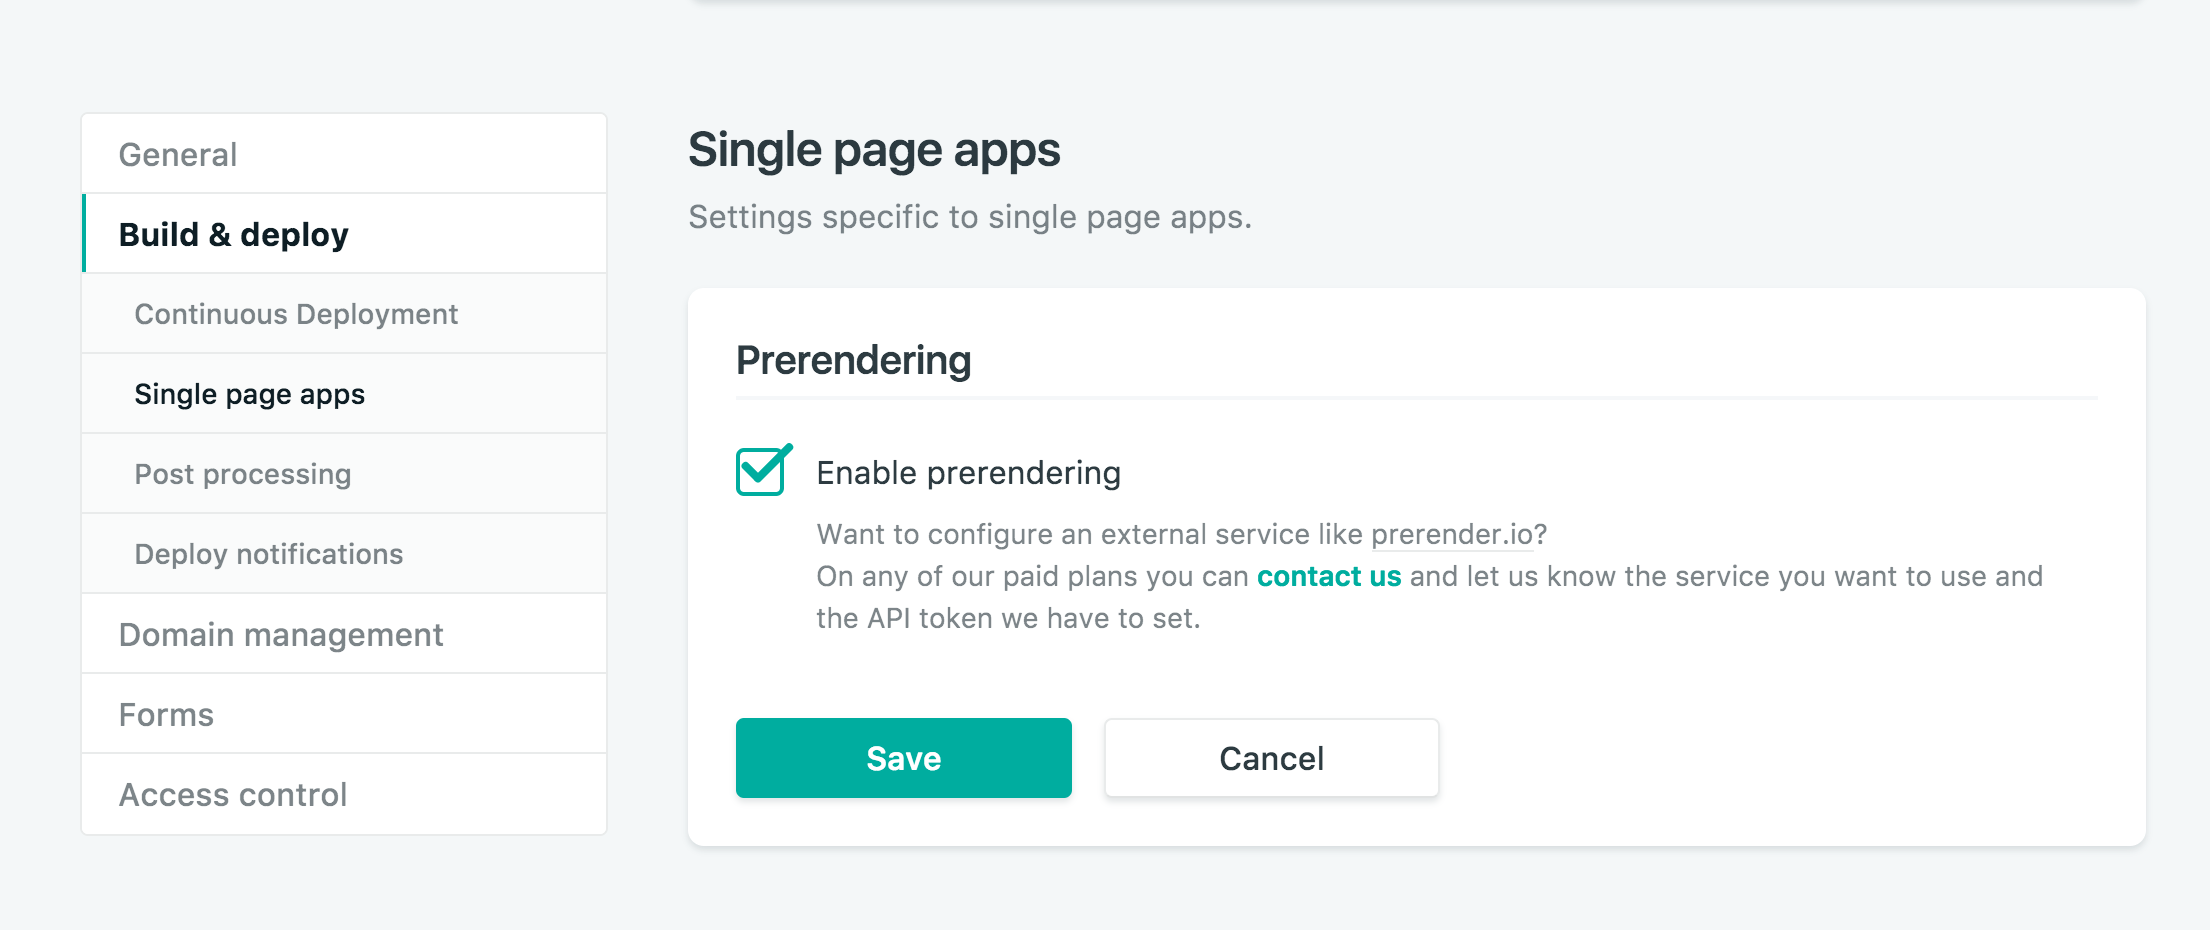
Prerendering can be enabled from your app settings.
Your blog will work when its loaded from the homepage, but if you try to load a post directly, you’ll get a 404 page:

Remember that our app is serverless? To fix the 404 error we need to create a URL rewrite rule that servers up `index.html` no matter what URL the browser requests.
To do this we’ll create a `_redirects` file in our `build` directory with the following line:
```
/* /index.html 200
```
Re-upload the contents of your `build` directory, and all your pages should load. Check out our [live example](https://react-serverless-blog.netlify.com).
To make sure this file gets redirected each time we build our app, we can update our `build` script in `package.json`:
```
"build": "react-scripts build && echo '/* /index.html 200' > build/_redirects"
```
## Wrap Up
That’s it! We’ve built a SEO-friendly serverless blog using React, Netlify, and ButterCMS. With our serverless approach we can now get back to building software without having to ever worry about server maintenance, outages, or scaling bottlenecks.
I hope you enjoyed this tutorial. If you have any questions about setting up your ButterCMS-powered React app reach out to me at [roger@buttercms.com](mailto:roger@buttercms.com) and I’ll definitely reply!
### Share
- [X (fka Twitter)](https://twitter.com/intent/tweet?text=How to Build a Serverless, SEO-friendly React blog&url=https://www.netlify.com/blog/2017/09/26/how-to-build-a-serverless-seo-friendly-react-blog//)
- [LinkedIn](https://www.linkedin.com/shareArticle?mini=true&url=https%3A%2F%2Fwww.netlify.com%2Fblog%2F2017%2F09%2F26%2Fhow-to-build-a-serverless-seo-friendly-react-blog%2F%2F)
- [Facebook](https://www.facebook.com/sharer.php?u=https://www.netlify.com/blog/2017/09/26/how-to-build-a-serverless-seo-friendly-react-blog//)
- [Bluesky](https://bsky.app/intent/compose?text=How to Build a Serverless, SEO-friendly React blog+https://www.netlify.com/blog/2017/09/26/how-to-build-a-serverless-seo-friendly-react-blog//)
* * *
### Tags
- [popular](/blog/tags/popular/)
- [Serverless](/blog/tags/serverless/)
- [CMS](/blog/tags/cms/)
- [ButterCMS](/blog/tags/buttercms/)
- [how-to](/blog/tags/how-to/)
- [Tutorial](/blog/tags/tutorial/)
- [React](/blog/tags/react/)
## Keep reading

Guides & Tutorials May 15, 2026
[
### How to build a real-time AI chatbot in minutes with Netlify Agent Runners (no backend)
](/blog/how-to-build-a-real-time-ai-chatbot-in-minutes-with-netlify-agent-runners-no-backend)
- 
Nahrin Jalal

Guides & Tutorials May 15, 2026
[
### Tracking AI search traffic: how to use Netlify Log Drains to maximize AEO
](/blog/tracking-ai-search-traffic)
- 
Nahrin Jalal
## Recent posts
News & Announcements June 25, 2026
[
### Netlify Functions, designed for Agent Experience
](/blog/netlify-functions-designed-for-agent-experience)
- 
Eduardo Bouças
News & Announcements June 24, 2026
[
### How we measure Netlify’s Agent Experience
](/blog/how-we-measure-netlify-agent-experience)
- 
Sean Roberts
Guides & Tutorials May 15, 2026
[
### How to build a real-time AI chatbot in minutes with Netlify Agent Runners (no backend)
](/blog/how-to-build-a-real-time-ai-chatbot-in-minutes-with-netlify-agent-runners-no-backend)
- 
Nahrin Jalal
### How do the best dev and marketing teams work together?
[Access the report](https://www.netlify.com/reports/2024-leadership-trend-report/access/)