Guides & Tutorials
Creating and Editing Files with Angular Schematics
Welcome to the journey of creating Netlify schematics for Angular projects. If this is your first post, I'm very happy to have you :). Also, you can find more information about the Netlify schematics project in the other posts in this series:
- Part 1: Creating Netlify Schematics: Where we go over what the Netlify schematics are and how to add them to your Angular project.
- Part 3: Testing and Publishing Angular Schematics: Where, wouldn't you know it, we talk about how we tested and published the schematics we built.
In this post that you're looking at right now, part two of this series, we are going to do a few things:
- generate a blank schematic using the schematic CLI
- add
ng-addfunctionality - build out a schema for configuration information
- create two configuration files
- edit or create a
.gitignorefile
Let's go!
Generating a Schematic
The Schematics CLI tool will help us create a schematics skeleton, manage, and test the schematics. To create a basic schematic skeleton and name it we'll run this command:
schematics blank --name=my-schematicThat schematics command will create this file structure:
|- .gitignore
|- .npmignore
|- README.md
|- package.json
|- package-lock.json
|- tsconfig.json
|- src
  |- collections.json
  |- <schematic-name>
    |- index.ts
    |- index_spec.ts
🐙 Go to this commit on the Netlify schematics repo to check out what's in these files.
Setting Up ng add Functionality
The collection.json file has all the information about the schematic. It first points to a schema setup that lives inside the project. Then it has a schematics object where we'll add the different schematics we create. The schematics CLI skeleton project will list the schematic name (if given one), a default description, and a factory that will point to a function inside the project's index.ts file.
For this project I want to utilize the ng add functionality so the user will be able to write ng add netlify-schematics to install and run these schematics in their project. To do this I renamed the schematic from the project name to ng-add like so:
{
  "$schema": "../node_modules/@angular-devkit/schematics/collection-schema.json",
  "schematics": {
    "ng-add": {
      "description": "An ✨ awesome Netlify addition to your 💯 NG project.",
      "factory": "./netlify-schematics/index#netlifySchematics"
    }
  }
}
🐙 You can check out the changes to the collection.json file in this commit.
Making the Schema
Since we know what information we need to gather from the user in order to create the configuration files, we can create a schema file to hold those variables. To break it down here are the two files we are going to make and the information we need in each:
netlify.toml– is the Netlify configuration file that will need to include the build command and the path to the built project.netlifyConfig.json– is a file that will hold the user's Netlify information including their API ID, Personal Access Token, and project name.
The schema file is where we can define variables or enumerated data types using the TypeScript interface. This file will live inside the schematics directory and be named schema.json (you can name it whatever you like as long as you reference it correctly in your collection.json file). So, in the Netlify schematics project the path is src/netlify-schematics/schema.json.
Here's a snippet of the netlify-schematics schema (you can check out the whole file here:
{
  "$schema": "http://json-schema.org/schema",
  "id": "NetlifySchematicsNgAdd",
  "title": "ng add schematic",
  "type": "object",
  "description": "Creates Netlify config files and edits the gitignore file 🔒",
  "properties": {
    "command": {
      "type": "string",
      "description": "Default build command.",
      "x-prompt": "What is 🧱 your project's build command? (maybe `ng build --prod`)"
    },
    "publish": {
      "type": "string",
      "description": "The project directory.",
      "x-prompt": "What 🗂 directory holds you built project? (maybe `dist/project-name`)"
    },
    ...
  }
}
Let's break each of part of this down.
$schema– this keyword declares that this JSON is a schematic and declares the JSON schema format this schema is written against.id– an identifying name.title– a human-readable description.type– the form in which the properties will be delivered, in this case my properties are an object (this is common).description– another descriptor for more details of what this code does.
properties
This properties object is going to get its own section because it needs its own set of bullets 😁. This is an object defining the available options for the schematic.
type– is the data type of this value.description– describes what this property is or is used for.x-prompt– this is where user interaction comes into play, you can learn more in the docs but basically, for this schematic, we're going to use the short form and just ask the user the question listed here and use their answer as this properties value.
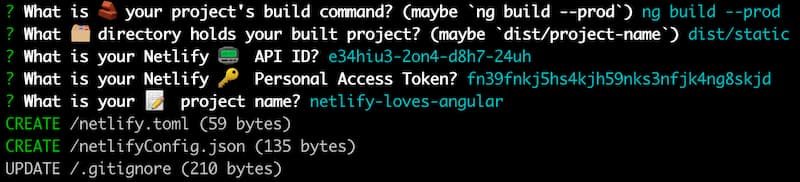
Here is a screen capture to show you what the prompts will look like:
Creating a New File
With all the user information we need we can now create the files to hold that information. Inside of the src/<schematic-name>/index.ts file is where we do the tree manipulation to edit the project that runs these schematics.
To recap, for the v1 of this schematic we'll add a Netlify config file, netlify.toml, and a file that will contain more sensitive project and account information, netlifyConfg.json. Since we don't want that sensitive data to see the light of day we'll also add it to the .gitignore file if it exists or create a .gitignore file listing the netlifyConfig.json file.
At the top of the file, options is already passed in from when we generated this schematic. It is referencing our schema thanks to SchematicContext. Each schematic runs in a context which is an object that provides access to utility functions and metadata, here, that's SchematicContext.
import { Rule, SchematicContext, Tree } from "@angular-devkit/schematics";

export function netlifySchematics(options: any): Rule {
  return (tree: Tree, _context: SchematicContext) => {
  ...
The next step is to create variables that will hold the data for each file. This will make the file creation process look much cleaner.
const netlifyConfigData = `[build]\n  publish = "${options.publish}"\n  command = "${options.command}"`;
const privateNetlifyConfigData = {
  apiId: options.apiId,
  accessToken: options.accessToken,
  projectName: options.projectName
};
For the file creations we'll be using tree.create() which transforms the existing tree into a tree that now has that file.
tree.create("/netlify.toml", netlifyConfigData);
tree.create(
  "/netlifyConfig.json",
  JSON.stringify(privateNetlifyConfigData, null, 2)
);
Inside tree.create() we pass two parameters: a string filename and the contents we want in the file. For the first config file we just pass the variable we created (netlifyConfigData) and for the second we pass the stringified version of privateNetlifyConfigData.
🐙 You can check out the full index.ts file for netlify-schematics here.
Checking And Editing A File
We want to add the file with the sensitive information to the project's .gitigore file so it won't be pushed up to the user's git repository in case it's public. First, we'll check if the .gitignore file is inside the users's tree using the tree.exist() function, passing in the file name. If it doesn't, we immediately make one with the netlifyConfig.json file as the content. Then we return the tree since we're done changing things with this schematic.
if (!tree.exists("/.gitignore")) {
  tree.create("/.gitignore", "netlifyConfig.json");
  return tree;
}
If it does exist we create a variable called gitIgnoreBuffer and assign the contents of the .gitignore file. To do this we'll use the tree.read() function passing in the file name (like we did with tree.exist). If the buffer isn't empty we'll make yet another variable called newGitIgnore. This variable will be assigned to the a stringified version of gitIgnoreBuffer, a new line, plus the name of the file we want to start ignoring, netlifyConfig.json. The last step of this process is to use tree.overwrite() passing in the file we're overwriting, .gitignore, and what we're overwriting with, newGitIgnore. Now that we're done with that we can return tree since we have nothing left to change.
That was a lot of words! Here's what the code looks like:
let gitIgnoreBuffer = tree.read("/.gitignore");
if (gitIgnoreBuffer != null) {
  let newGitIgnore = `${gitIgnoreBuffer.toString()}\nnetlifyConfig.json`;
  tree.overwrite("/.gitignore", newGitIgnore);
}
return tree;
🐙 Here's a link to the index.ts file in full.
Function Recap
That was a lot of functions so I just want to write them here for my own future reference. Oh, I mean, obvioulsy you're welcome to them too 😘.
tree.create("filename", content): to create a new file in the treetree.exists("filename"): check if a file existstree.read("filename"): read the contents of a filetree.overwrite("filename", "new content"): change the contents of a file with the provided content
Try It Out
To see how this works we first need to build out the project by running the command:
ng run buildOnce it's built we can use the schematics CLI to walk through how the schematic works.
schematics .:ng-add --dry-run=falseYou can learn more about this command in the next post on how to test and publish schematics. After running the schematic we'll have the two new files and an edit to the .gitignore file. Yay!

You've Got Files
Now you know how to add and edit files with schematics. Remember, with great power comes great testing. That's how the quote goes, right? Anyhoo, to check out how to test what we've created so far you can mosey on over to the next post I made covering just that! Have something that you wish this schematic did for your Angular project? Let's chat about it in the Netlify Community. In the meantime, happy coding! 👩🏻💻


