---
title: "Learn to Add Apple Pay and Google Pay to React Websites"
description: "Use the browser’s Payment Request API to quickly accept payments on your React sites! Stripe makes it fast to integrate Apple Pay & Google Pay."
source: "https://www.netlify.com/blog/2020/05/21/learn-to-add-apple-pay-and-google-pay-to-react-websites/"
last_updated: "2026-07-10T16:01:39.000Z"
---
Modern browser APIs, like the [Payment Request API](https://developer.mozilla.org/en-US/docs/Web/API/Payment_Request_API), allow you to access payment credentials stored in your customer’s digital wallets like Apple Pay, Google Pay, or even Chrome.
Stripe provides a [Payment Request Button Element](https://stripe.com/docs/stripe-js/elements/payment-request-button#react) that securely tokenizes these stored credentials for a convenient checkout experience on mobile devices.
In this tutorial, we’ll learn how to **add support for the Payment Request API to your site quickly using Stripe and React!**
- [Try the demo](https://react-elements-netlify-serverless.netlify.com) to see the Payment Request API in action
- [View the source code on GitHub](https://github.com/stripe-samples/react-elements-netlify-serverless)
- [Watch the _Learn With Jason_ episode](https://www.learnwithjason.dev/add-apple-pay-google-pay-to-jamstack-sites)
## Set up a new React project
To scaffold a new React project we use `create-react-app`:
```
npx create-react-app my-appcd my-app
```
You can of course use other toolchains like Gatsby or Next.js as well. See the React docs for a [list of recommendations](https://reactjs.org/docs/create-a-new-react-app.html#recommended-toolchains).
### Install additional dependencies
To make use of Stripe Elements in React, install both [`@stripe/stripe-js`](https://stripe.com/docs/stripe-js) and [`@stripe/react-stripe-js`](https://stripe.com/docs/stripe-js/react):
```
npm install --save @stripe/react-stripe-js @stripe/stripe-js
```
To communicate with the Stripe API from our Netlify function, install the `stripe` module as well:
```
npm install --save stripe
```
In our [demo application](https://github.com/stripe-samples/react-elements-netlify-serverless) we’re additionally using the [`use-shopping-cart` library](https://use-shopping-cart.netlify.app/), which isn’t a required dependency, but makes managing your shopping cart logic a lot easier by handling the client-side logic for managing what’s in the cart, subtotals, and Stripe Checkout session creation.
## Create a new Netlify site using the command line
The “create-react-app” tool has already initialized a git repository for us. Let’s commit the recent changes and push it to a [new GitHub repository](https://help.github.com/en/github/creating-cloning-and-archiving-repositories/creating-a-new-repository?algolia-query=create%20new%20repo).
```
# HEADS UP! don’t forget to change this to use your own username and repo!git remote add origin git@github.com:username/repo.git
git commit -a -m "Add Stripe dependencies."git push origin master
```
Now that our project is on GitHub, we can set up Netlify to automatically build the and publish the site whenever changes are pushed to GitHub.
```
# initialize this site as a Netlify sitentl init
```
Follow the prompts to create a new site in your Netlify account that will auto-deploy when changes are pushed to the GitHub repo.
For your “create-react-app” use the following build command and directory:
> Your build command: `npm run build`
>
> Directory to deploy: `build`
## Use Netlify environment variables for local development
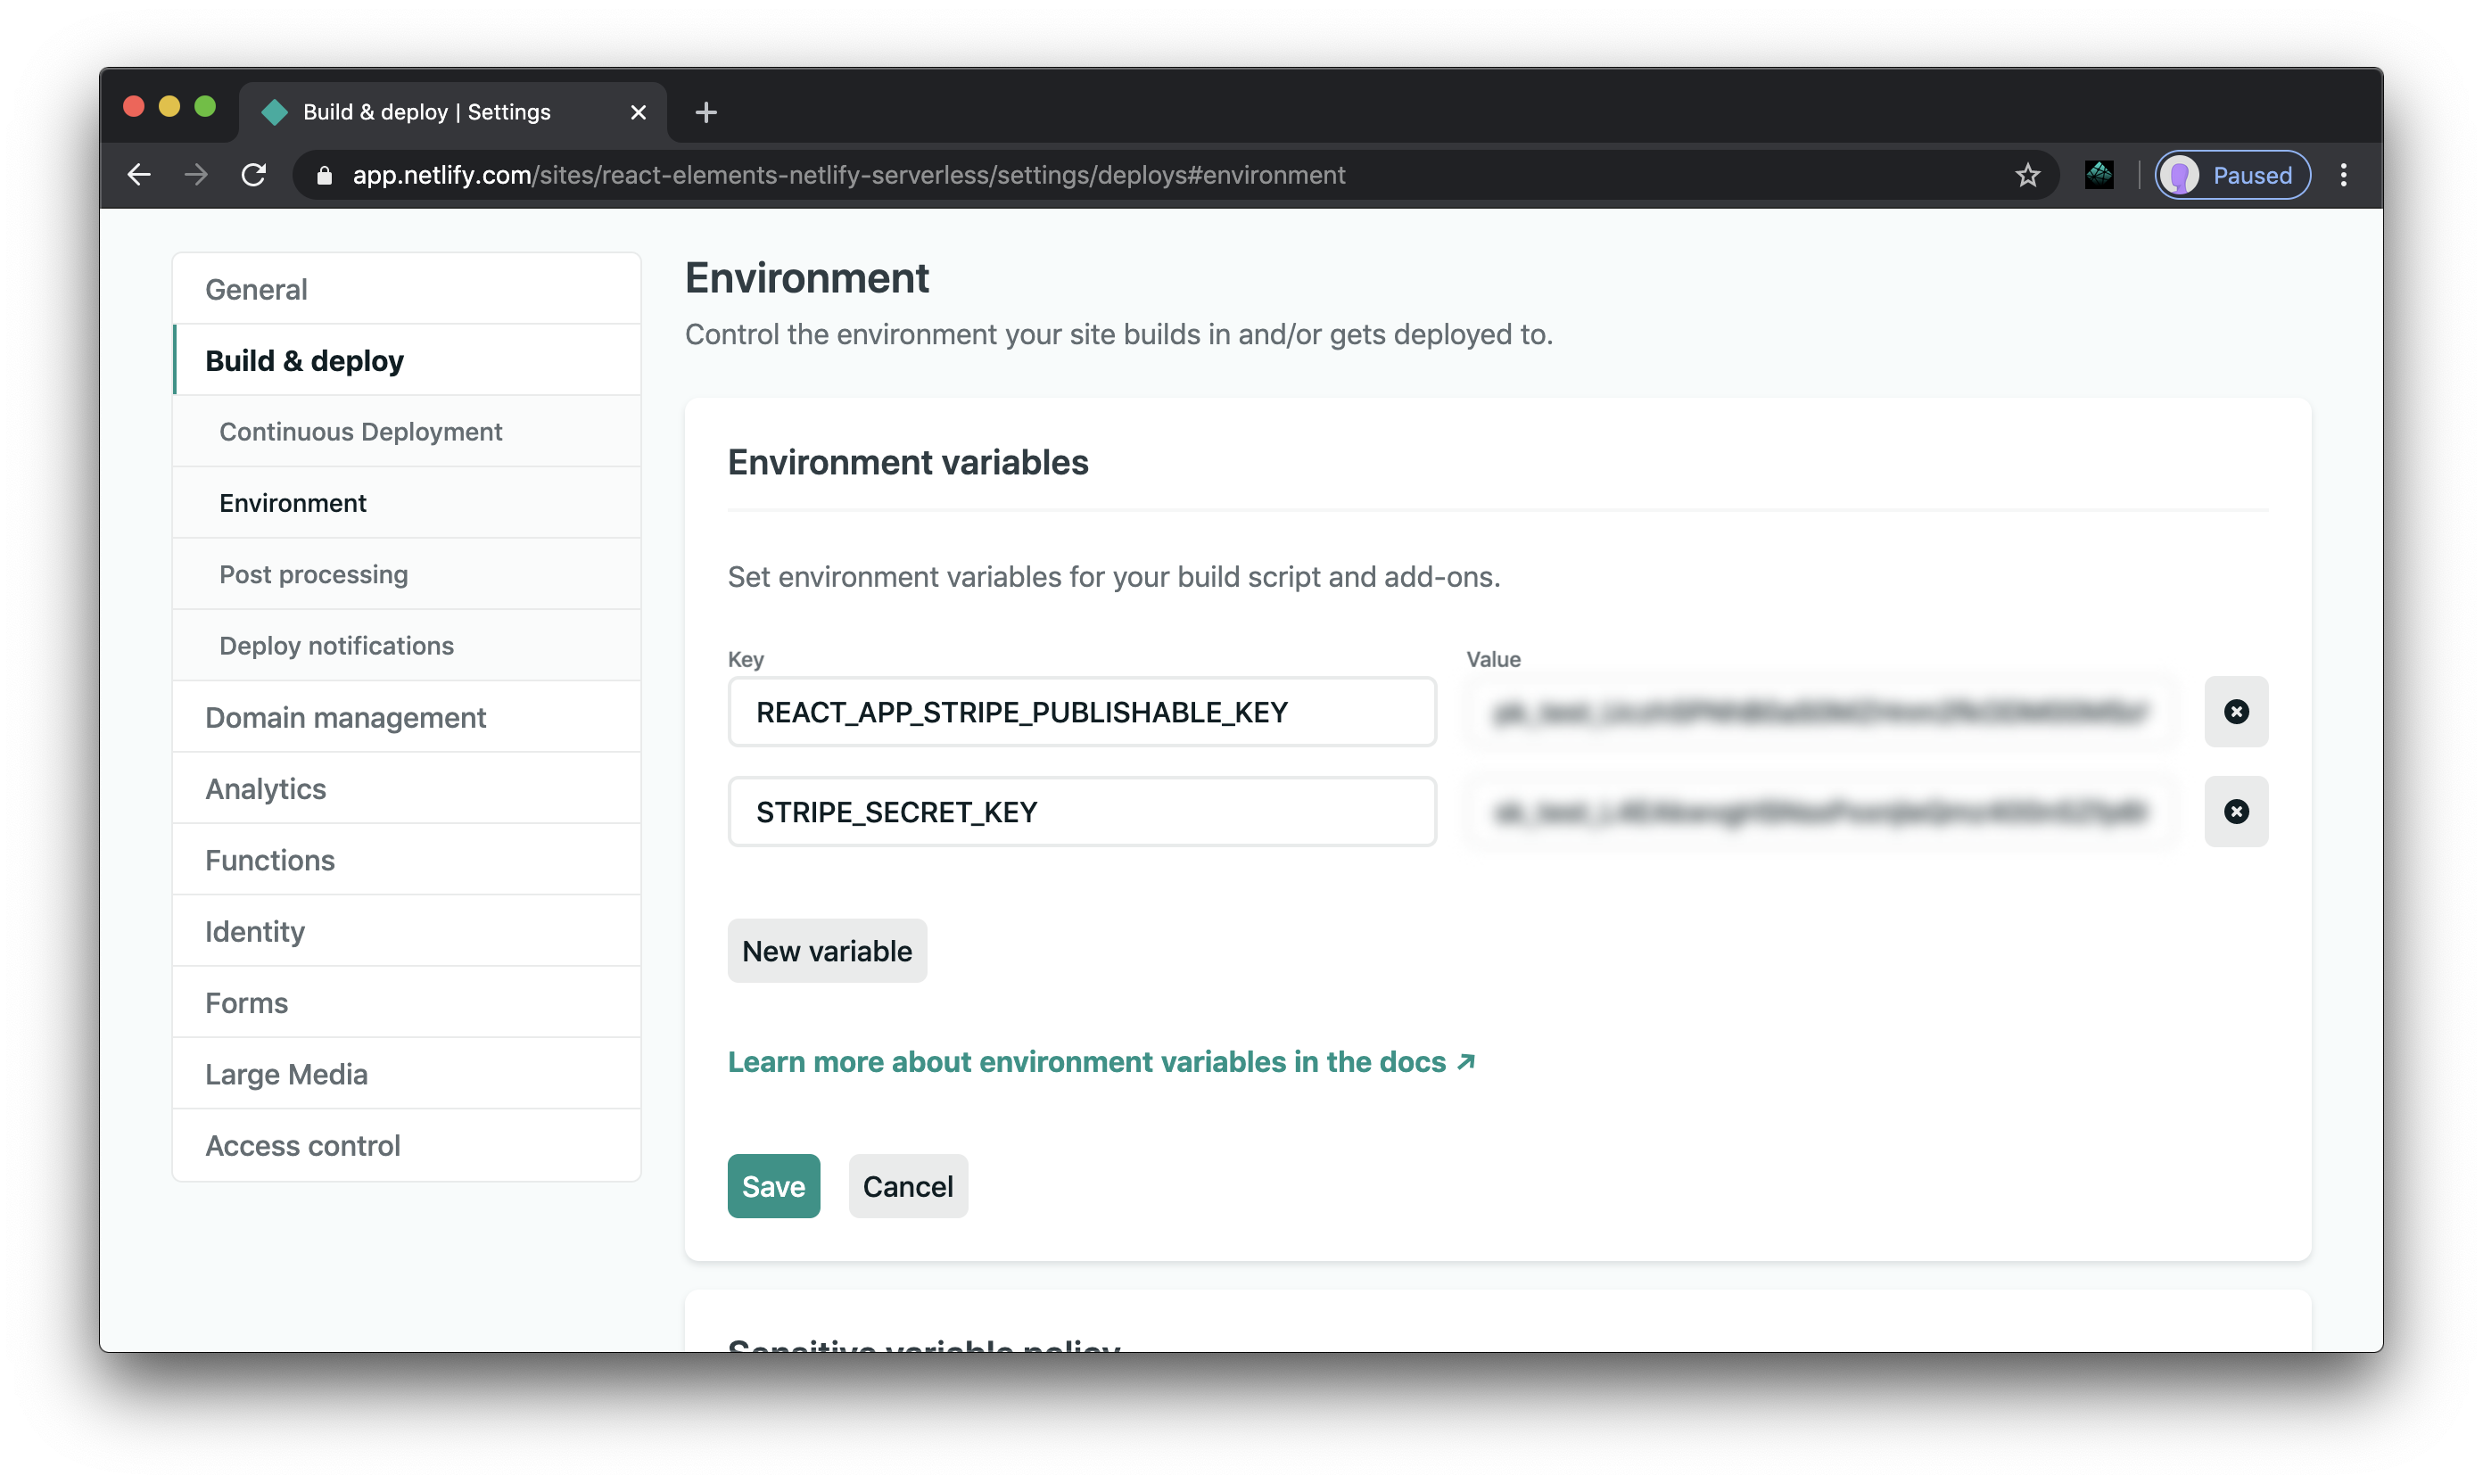
You can find detailed instructions on how to set up environment variables in [this tutorial](/blog/2020/04/13/learn-how-to-accept-money-on-jamstack-sites-in-38-minutes/#use-netlify-environment-variables-for-local-development?utm_source=blog&utm_medium=stripe-pi-jl&utm_campaign=devex).
Add `REACT_APP_STRIPE_PUBLISHABLE_KEY` and `STRIPE_SECRET_KEY` from your [Stripe Dashboard](https://dashboard.stripe.com/apikeys).
After saving, go to the command line and run `ntl dev` to see the environment variables injected locally. They’ll be printed in the CLI output near the top.
## Add Stripe.js and Elements to your page
To use Element components, wrap the root of your React app in an Elements provider. Call `loadStripe` with your publishable key and pass the returned `Promise` to the `Elements` provider.
```
import { Elements } from '@stripe/react-stripe-js';import { loadStripe } from '@stripe/stripe-js';
const stripePromise = loadStripe(process.env.REACT_APP_STRIPE_PUBLISHABLE_KEY);
ReactDOM.render( , document.getElementById('root'));
```
## Create a Payment Request object
The Payment Request object is used to communicate the payment details to the digital wallet. We can only create the payment request once Stripe.js has loaded. Therefore we need to wrap it into a `useEffect` hook with `stripe` as a dependency.
```
import React, { useState, useEffect } from 'react';import { PaymentRequestButtonElement, useStripe,} from '@stripe/react-stripe-js';
const App = () => { const stripe = useStripe(); const [paymentRequest, setPaymentRequest] = useState(null);
useEffect(() => { if (stripe) { const pr = stripe.paymentRequest({ country: 'US', currency: 'usd', total: { label: 'Demo total', amount: 1350, }, requestPayerName: true, requestPayerEmail: true, requestShipping: true, shippingOptions: [ { id: 'standard-global', label: 'Global shipping', detail: 'Arrives in 5 to 7 days', amount: 350, }, ], }); } }, [stripe]);
// Use a traditional checkout form. return 'Insert your form or button component here.';};
```
The parameters `requestPayerName`, `requestPayerEmail`, `requestShipping` allow you to collect stored billing and shipping details which can speed up the checkout process significantly.
## Check if a digital wallet is available and render the button
The payment request object provides a `canMakePayment` method that allows you check whether the customer has a digital wallet set up. Use this to decide whether to show the fast checkout option or if none available show a “proceed to checkout” button.
```
import React, { useState, useEffect } from 'react'; import { PaymentRequestButtonElement, useStripe, } from '@stripe/react-stripe-js';
const App = () => { const stripe = useStripe(); const [paymentRequest, setPaymentRequest] = useState(null);
useEffect(() => { if (stripe) { const pr = stripe.paymentRequest({ country: 'US', currency: 'usd', total: { label: 'Demo total', amount: 1350, }, requestPayerName: true, requestPayerEmail: true, requestShipping: true, shippingOptions: [ { id: 'standard-global', label: 'Global shipping', detail: 'Arrives in 5 to 7 days', amount: 350, }, ], });+ // Check the availability of the Payment Request API first.+ pr.canMakePayment().then((result) => {+ if (result) {+ pr.on('paymentmethod', handlePaymentMethodReceived);+ setPaymentRequest(pr);+ }+ }); } }, [stripe]);
+ if (paymentRequest) {+ return ;+ }
// Use a traditional checkout form. return 'Insert your form or button component here.'; };
```
> **Heads up!** The Payment Request API [requires pages to be served securely](https://stripe.com/docs/stripe-js/elements/payment-request-button#react-prerequisites), meaning the button will only be visible when the site is served over HTTPS. [SSL is enabled automatically for Netlify sites](https://docs.netlify.com/domains-https/https-ssl/?utm_source=blog&utm_medium=payment-request-stripe-jl&utm_campaign=devex), so for this tutorial things will Just Work™.
## Process the payment details from your customer’s wallet
When the customer clicks the wallet button, a native payment screen is shown where they can select their stored payment credentials as well as contact and shipping information. Their sensitive payment information is securely send to Stripe and exchanged for a paymentmethod token.
Once this process is finished our `handlePaymentMethodReceived` will be called that we’ve subscribed via the `on-paymentmethod` [event handler](https://stripe.com/docs/js/payment_request/events/on_paymentmethod).
```
const handlePaymentMethodReceived = async (event) => { // Send the payment details to our function. const paymentDetails = { payment_method: event.paymentMethod.id, shipping: { name: event.shippingAddress.recipient, phone: event.shippingAddress.phone, address: { line1: event.shippingAddress.addressLine[0], city: event.shippingAddress.city, postal_code: event.shippingAddress.postalCode, state: event.shippingAddress.region, country: event.shippingAddress.country, }, }, }; const response = await fetch('/.netlify/functions/create-payment-intent', { method: 'post', headers: { 'Content-Type': 'application/json', }, body: JSON.stringify({ paymentDetails }), }).then((res) => { return res.json(); }); if (response.error) { // Report to the browser that the payment failed. console.log(response.error); event.complete('fail'); } else { // Report to the browser that the confirmation was successful, prompting // it to close the browser payment method collection interface. event.complete('success'); // Let Stripe.js handle the rest of the payment flow, including 3D Secure if needed. const { error, paymentIntent } = await stripe.confirmCardPayment( response.paymentIntent.client_secret ); if (error) { console.log(error); return; } if (paymentIntent.status === 'succeeded') { history.push('/success'); } else { console.warn( `Unexpected status: ${paymentIntent.status} for ${paymentIntent}` ); } }};
```
## Charge the payment details in a Netlify function
To charge the customers payment method token, we need to create a payment intent server-side. In your project root, create a new folder called `functions` and in it create a new file called `create-payment-intent.js`.
In our `handlePaymentMethodReceived` method from above we send a POST request to this function with the payment details from the customer’s wallet.
```
const stripe = require('stripe')(process.env.STRIPE_SECRET_KEY);
exports.handler = async (event) => { try { const { paymentDetails } = JSON.parse(event.body);
const paymentIntent = await stripe.paymentIntents.create({ amount: 1350, currency: 'usd', ...paymentDetails, confirm: true, });
return { statusCode: 200, body: JSON.stringify({ paymentIntent }), }; } catch (error) { console.log({ error });
return { statusCode: 400, body: JSON.stringify({ error }), }; }};
```
### Tell Netlify where functions are stored
For Netlify to deploy our serverless functions, we need to tell it where they’re located. To do this, we need to modify `netlify.toml` with a functions setting and add our functions directory as the value:
```
[build] command = "yarn build" publish = "build" functions = "functions"
```
Once we’ve saved our updated config, we can start the server with `ntl dev`, which will automatically serve both our React app and our functions.
## Automate fulfillment with webhook events
Stripe sends webhook events for successful payments which we can use to automate our fulfillment process. See this [detailed guide](https://www.netlify.com/blog/2020/04/22/automate-order-fulfillment-wstripe-webhooks-and-netlify-functions/?utm_source=blog&utm_medium=stripe-pi-jl&utm_campaign=devex) on how to do this. The demo source code also includes a [webhook handler function](https://github.com/stripe-samples/react-elements-netlify-serverless/blob/master/functions/webhooks.js) for your reference.
## What to do next
Want to take your Jamstack and Stripe sites even further? Check out [all the articles we’ve written about e-commerce on the Jamstack](https://www.netlify.com/blog/tags/e-commerce/?utm_source=blog&utm_medium=stripe-pi-jl&utm_campaign=devex)!
### Share
- [X (fka Twitter)](https://twitter.com/intent/tweet?text=Learn to Add Apple Pay and Google Pay to React Websites
&url=https://www.netlify.com/blog/2020/05/21/learn-to-add-apple-pay-and-google-pay-to-react-websites//)
- [LinkedIn](https://www.linkedin.com/shareArticle?mini=true&url=https%3A%2F%2Fwww.netlify.com%2Fblog%2F2020%2F05%2F21%2Flearn-to-add-apple-pay-and-google-pay-to-react-websites%2F%2F)
- [Facebook](https://www.facebook.com/sharer.php?u=https://www.netlify.com/blog/2020/05/21/learn-to-add-apple-pay-and-google-pay-to-react-websites//)
- [Bluesky](https://bsky.app/intent/compose?text=Learn to Add Apple Pay and Google Pay to React Websites
+https://www.netlify.com/blog/2020/05/21/learn-to-add-apple-pay-and-google-pay-to-react-websites//)
* * *
### Tags
- [Stripe](/blog/tags/Stripe/)
- [Tutorial](/blog/tags/tutorial/)
- [E-commerce](/blog/tags/e-commerce/)
## Keep reading

Guides & Tutorials April 13, 2020
[
### Learn How to Accept Money on Jamstack Sites in 38 Minutes
](/blog/2020/04/13/learn-how-to-accept-money-on-jamstack-sites-in-38-minutes)
- 
Jason Lengstorf
- 
Thor 雷神

Guides & Tutorials May 15, 2026
[
### How to build a real-time AI chatbot in minutes with Netlify Agent Runners (no backend)
](/blog/how-to-build-a-real-time-ai-chatbot-in-minutes-with-netlify-agent-runners-no-backend)
- 
Nahrin Jalal
## Recent posts
News & Announcements June 25, 2026
[
### Netlify Functions, designed for Agent Experience
](/blog/netlify-functions-designed-for-agent-experience)
- 
Eduardo Bouças
News & Announcements June 24, 2026
[
### How we measure Netlify’s Agent Experience
](/blog/how-we-measure-netlify-agent-experience)
- 
Sean Roberts
Guides & Tutorials May 15, 2026
[
### How to build a real-time AI chatbot in minutes with Netlify Agent Runners (no backend)
](/blog/how-to-build-a-real-time-ai-chatbot-in-minutes-with-netlify-agent-runners-no-backend)
- 
Nahrin Jalal

### How do the best dev and marketing teams work together?
[Access the report](https://www.netlify.com/reports/2024-leadership-trend-report/access/)