---
title: "Learn to Add Playful Animated SVG Reactions to a Gatsby Blog"
description: "Let your users tell you how they feel! Avoid the hassle of comment moderation without removing interactivity with this fun, open source slider!"
source: "https://www.netlify.com/blog/2020/07/16/add-playful-animated-svg-reactions-to-a-gatsby-blog/"
last_updated: "2026-07-11T03:41:46.000Z"
---
Well hey there 👋
In this blog post I’m going to discuss how to add user reactions to your Gatsby blog posts using a fun, open-source React UI component called [react-svg-bubble-slider](https://react-svg-bubble-slider.netlify.app/).
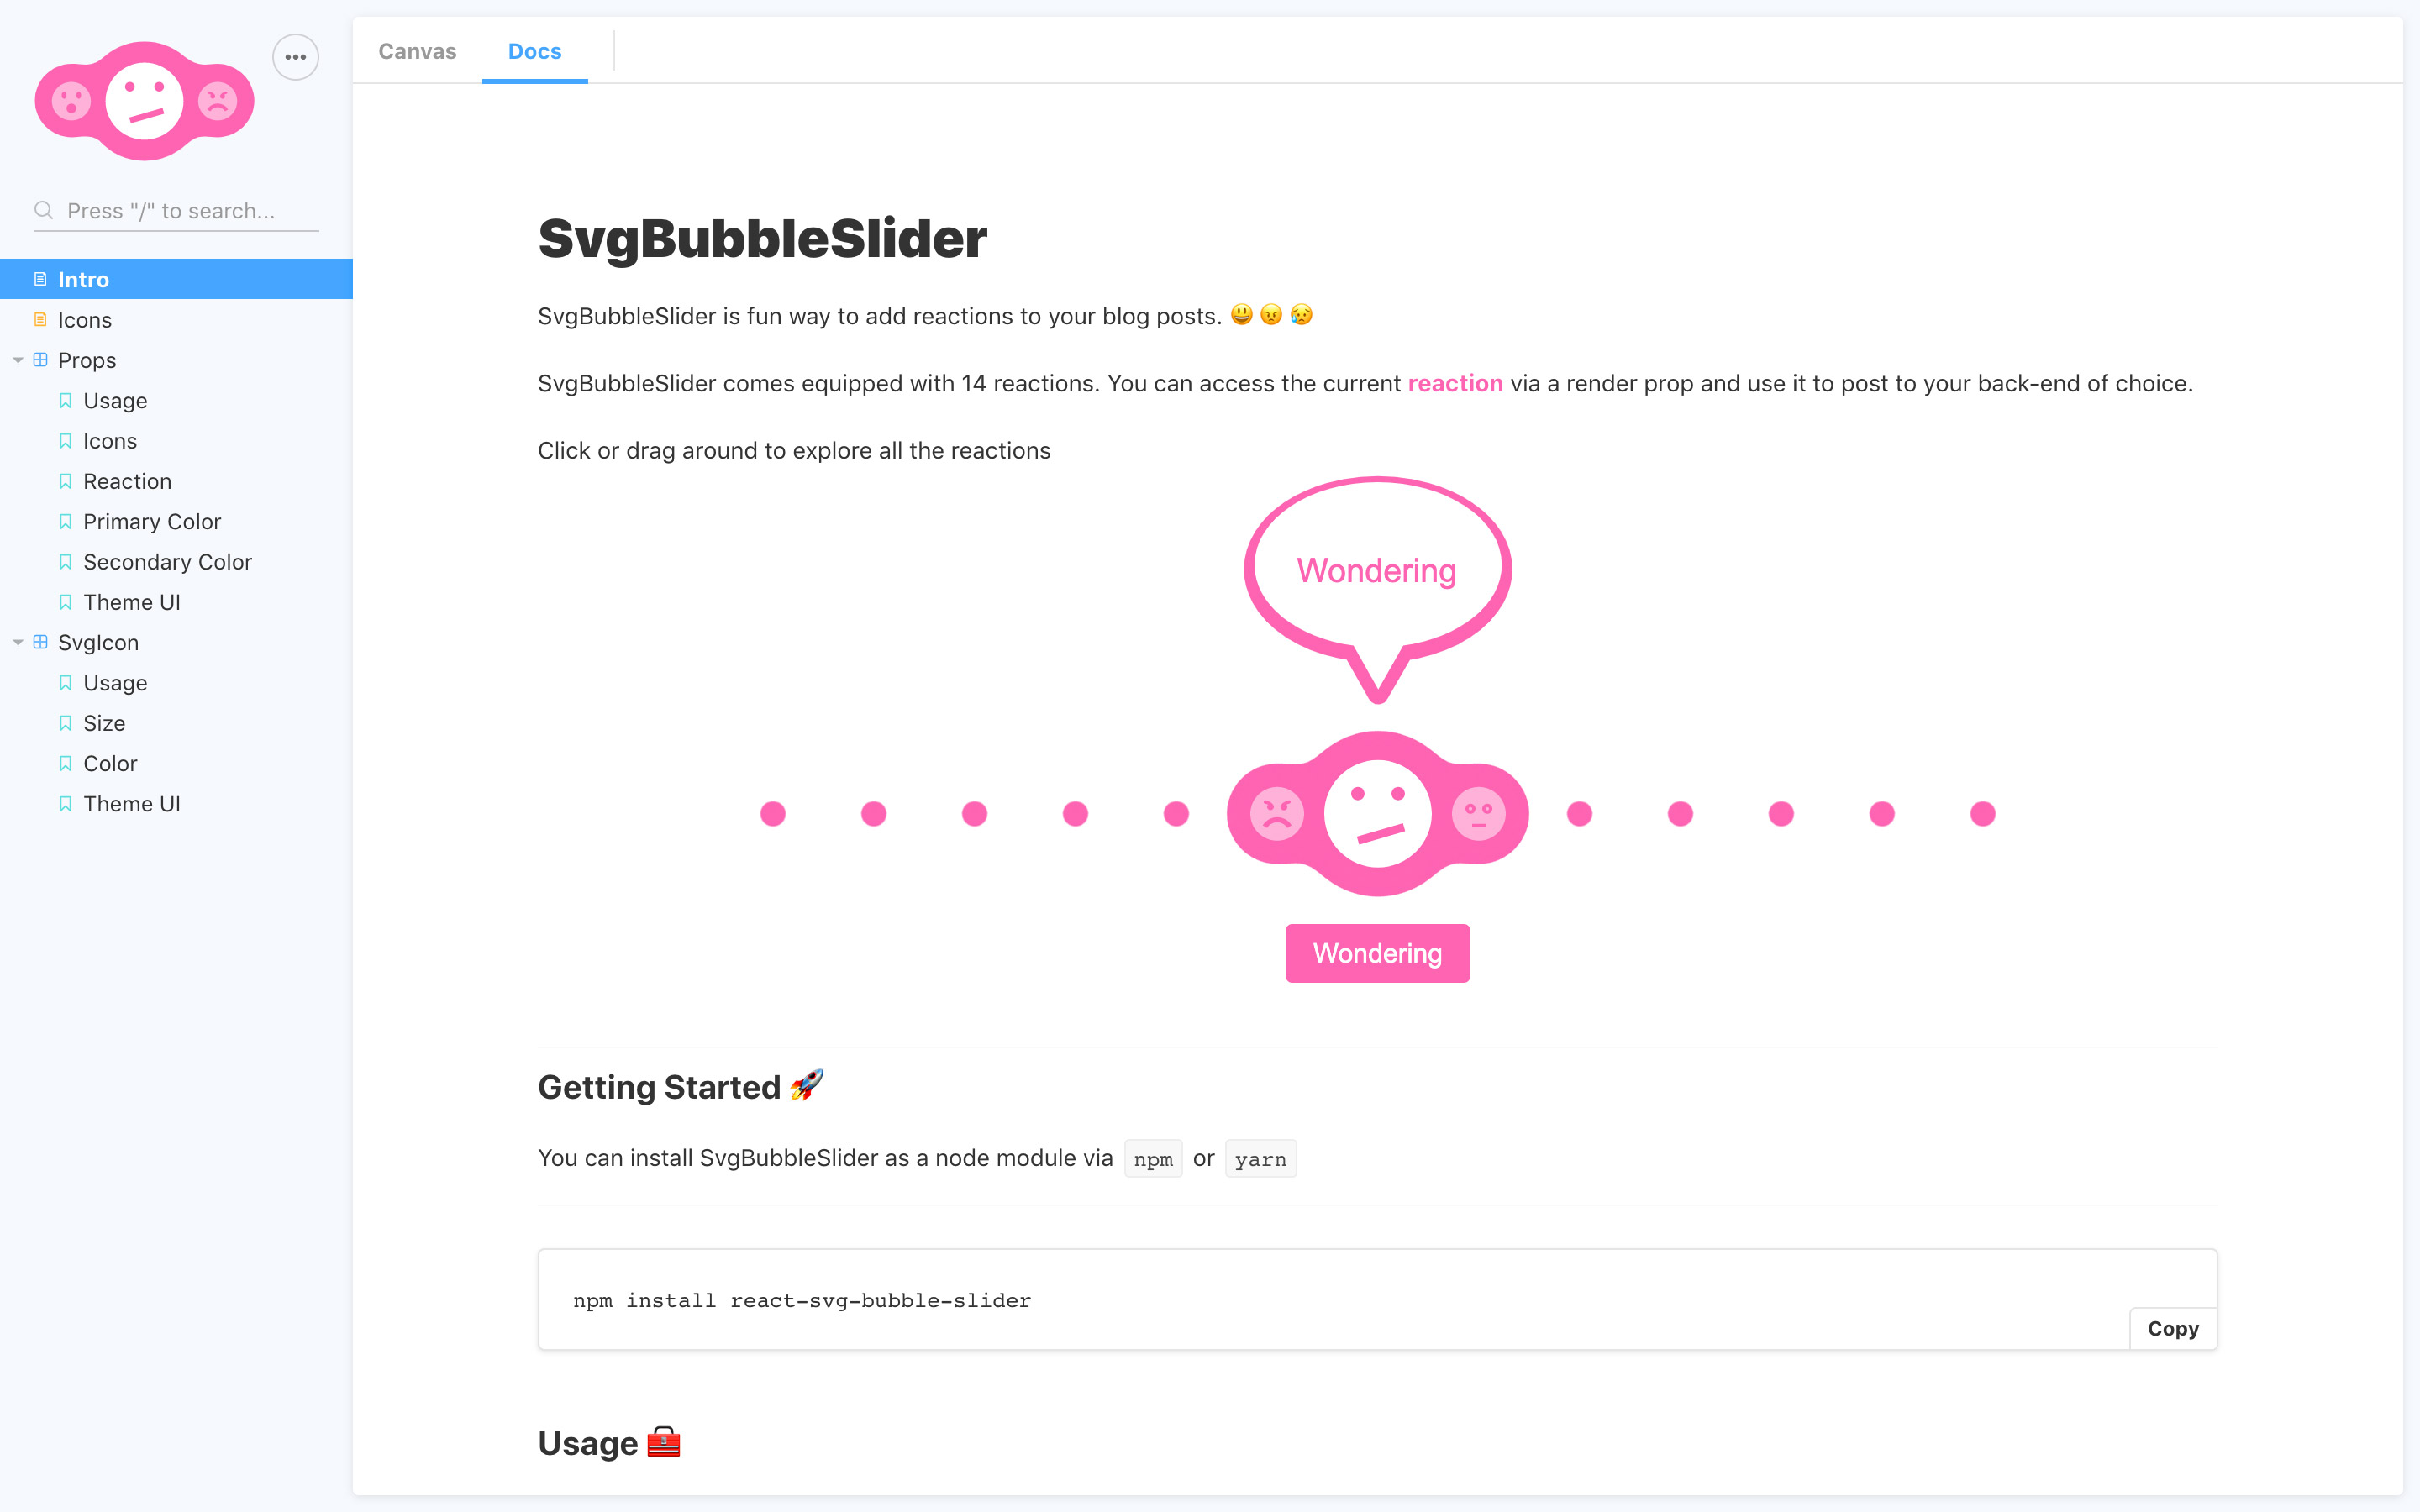
## Demo
If you’re a keen bean and would like to see a fully finished demo blog I’ve created an example of how [react-svg-bubble-slider](https://react-svg-bubble-slider.netlify.app/) could be used to add reactions to a Gatsby blog, using [Fauna](https://fauna.com/) for the backend and [Netlify Functions](https://www.netlify.com/products/functions/) and [apollo-server-lambda](https://www.apollographql.com/docs/apollo-server/v1/servers/lambda/) to handle the data requests.
- Demo Blog: [https://netlify-reactions.netlify.app/](https://netlify-reactions.netlify.app/)
- Source Code: [https://github.com/PaulieScanlon/netlify-reactions](https://github.com/PaulieScanlon/netlify-reactions)
## Why Reactions?
You’re probably familiar with reactions from social media platforms such as Twitter, Instagram, et al., but I rarely see reactions in blog posts. A common approach in blogs is to [implement comments](https://css-tricks.com/roll-your-own-comments-with-gatsby-and-faunadb/), but there are additional complications involved when allowing users to write whatever they want and post it to your backend.
When you expose an input, you’re giving the reader the opportunity to write _anything_ — it’s only a matter of time before someone writes something rude. You probably don’t want your blog posts peppered with expletives, so you need to set up a moderation queue to review comments and approve or delete them.
Adding reactions removes this extra overhead because you’re only allowing readers to choose from a pre-approved set of reactions. It’s still interactive, but no moderation is required!
When I started to think about reactions I was struggling to think of a fun and original way to present the options to the reader. I toyed around with the “heart”, “thumbs up” / “thumbs down” approach for a while but wasn’t really excited by it, until I saw [this tweet from Chris Gannon](https://twitter.com/ChrisGannon/status/1261209022662918144).
> Today’s interactive animation from 2016 is Emoji Bubble Slider. It’s dynamically built and the emojis are ‘glued’ together using the goo filter effect. I have licensed this a surprising number of times! [#animationAtHome](https://twitter.com/hashtag/animationAtHome?src=hash&ref_src=twsrc%5Etfw) [pic.twitter.com/vW9OlLkYWw](https://t.co/vW9OlLkYWw)
>
> — Chris Gannon (@ChrisGannon) [May 15, 2020](https://twitter.com/ChrisGannon/status/1261209022662918144?ref_src=twsrc%5Etfw)
As soon as I saw Chris’s SVG Bubble Slider, I knew it would make a perfect way to expose a pre-defined set of reactions to allow readers to leave their reactions on a blog post.
I explained the idea to Chris and he was on board. However this can _only_ be used on free projects. If you want to use it for a commercial project, you’ll need to talk to Chris about a license.
This post will broadly explain the steps required to add [react-svg-bubble-slider](https://react-svg-bubble-slider.netlify.app/) to a Gatsby blog, but you could similarly add this to any React application.
## Get Started
To get started, install the package via `npm` (or `yarn`).
```
npm install react-svg-bubble-slider
```
You’ll then need to locate your “posts” layout. In this Gatsby project this is saved in `src/layouts/post-layout.js`. You’ll need to import `SvgBubbleSlider` to the template or layout responsible for handling your posts.
Once you’ve decided which layout you’ll be amending, import `SvgBubbleSlider` and add it to the component’s returned JSX.
post-layout.js
```
import React from 'react'import { SvgBubbleSlider } from 'react-svg-bubble-slider'
const PostLayout = () => { return (
)}
export default PostLayout
```
By default `SvgBubbleSlider` displays 14 reactions. This is because I wanted to honor Chris Gannon’s original [SVG Bubble Slider](https://codepen.io/chrisgannon/pen/GZNgLw/), but in a real project you may want to use a restricted set of reactions.
To modify the icons your implementation of `SvgBubbleSlider` displays you can use the `icons` prop and pass in only the icons you wish to use.
Here’s an example:
post-layout.js
```
import React from 'react'import { SvgBubbleSlider } from "react-svg-bubble-slider"
const ICONS_TO_USE = ["angry", "sad", "neutral", "smile", "happy", "cool"]
const PostLayout = () => {
return (
)}
export default PostLayout
```
There are a couple caveats when using the `icons` prop:
1. You’ll need at least three icons. This is to ensure there are icons to “slide” between.
2. The icon names must be from the 14 icons included in the package. Check the [docs](https://react-svg-bubble-slider.netlify.app/?path=/docs/icons--page) for available icon names.
## Get the current reaction
Now that you’ve got the icons configured, you’ll need to get the current reaction, show the reader the current reaction, and then provide a way for the reader to post the current reaction to your backend of choice.
You can access the [current reaction via a render prop](https://react-svg-bubble-slider.netlify.app/?path=/docs/svgbubbleslider--reaction) which you can pass on to a button.
post-layout.js
```
{% raw %} import React from 'react' import { SvgBubbleSlider } from 'react-svg-bubble-slider'
const ICONS_TO_USE = ["angry", "sad", "neutral", "smile", "happy", "cool"]
const PostLayout = () => { return (
- + + {({ reaction }) => (+ + +
+ )}+ ) }
export default PostLayout{% endraw %}
```
Now that you have a method to access the current reaction, you can do something useful with it. In this example, I’ll show you how to increment the reaction count each time the button has been clicked and store it in React’s local state.
In reality, you’ll need to store this data in your backend of choice, but to get you started this will at least show how the React side of things could work.
Import `useState` so you can store the count value in React’s local state, then set an initial shape of the data along with a initial value for the counts.
post-layout.js
```
{% raw %}- import React from 'react'+ import React { useState } from 'react' import { SvgBubbleSlider } from "react-svg-bubble-slider"
const ICONS_TO_USE = ["angry", "sad", "neutral", "smile", "happy", "cool"]
const PostLayout = () => {
+ const [stateReactions, setStateReactions] = useState(+ ICONS_TO_USE.map((name) => {+ return {+ name: name,+ count: 0,+ }+ })+ )
return (
{({ reaction }) => (
)}
) }
export default PostLayout{% endraw %}
```
If you pop in a `console.log(stateReactions)` you should see an array of objects like the below:
```
[ { name: "angry", count: 0, }, { name: "sad", count: 0, }, { name: "neutral", count: 0, }, { name: "smile", count: 0, }, { name: "happy", count: 0, }, { name: "cool", count: 0, },]
```
We’re now going to surface the icons and their corresponding counts by mapping over the array shown above and returning an `SvgIcon` and its count value.
post-layout.js
```
{% raw %} import React { useState } from 'react'- import { SvgBubbleSlider } from "react-svg-bubble-slider"+ import { SvgBubbleSlider, SvgIcon } from "react-svg-bubble-slider"
const ICONS_TO_USE = ["angry", "sad", "neutral", "smile", "happy", "cool"]
const PostLayout = () => { const [stateReactions, setStateReactions] = useState( ICONS_TO_USE.map((name) => { return { name: name, count: 0, } }) )
return (
+ )+ })}+ ) }
export default PostLayout{% endraw %}
```
The last step is to handle the user interaction when the button is clicked.
For this you’ll need to pass the current reaction name to a function and then update it’s count value in local state.
Inside the `handleReaction` you’ll map over the current state values and on each iteration check if the reaction name matches the `currentReaction`. If so, increment the count value; if not, return the reaction object untouched.
This operation updates state using `setStateReactions` and each time an update occurs the JSX will re-render. You should see the increased count value appear under the corresponding `SvgIcon`.
post-layout.js
```
{% raw %} import React { useState } from 'react' import { SvgBubbleSlider, SvgIcon } from "react-svg-bubble-slider"
const ICONS_TO_USE = ["angry", "sad", "neutral", "smile", "happy", "cool"]
const PostLayout = () => {
const [stateReactions, setStateReactions] = useState( ICONS_TO_USE.map((name) => { return { name: name, count: 0, } }) )
+ const handleReaction = (currentReaction) => {+ setStateReactions(+ stateReactions.map((reaction) =>+ reaction.name === currentReaction+ ? {+ ...reaction,+ count: (reaction.count += 1),+ }+ : reaction+ )+ )+ }
return (
) }
export default PostLayout{% endraw %}
```
Remember: this example only stores the count values in local state. If you refresh your browser, all values are reset. In a real example these count values will need to be stored in a database.
In the [demo application](https://github.com/PaulieScanlon/netlify-reactions) I’ve used FaunaDB to store reaction counts. If you’d like to learn Fauna, [Chris Biscardi](https://twitter.com/chrisbiscardi) has an excellent [guide to Fauna](https://egghead.io/playlists/the-complete-guide-to-faunadb-74bef44b) that walks through everything you’ll need to get up and running.
If you’re using **react-svg-bubble-slider** in your project I’d love to hear from you [on Twitter (@PaulieScanlon)!](https://twitter.com/PaulieScanlon)!
## What to do next
- [Try the demo](https://netlify-reactions.netlify.app/posts/2020/05/post-five/)
- [See the source code](https://github.com/PaulieScanlon/netlify-reactions)
- [Learn more about Gatsby](https://www.netlify.com/blog/2020/06/25/gatsby-101-features-benefits-and-trade-offs/?utm_source=blog&utm_medium=svg-bubble-slider-jl&utm_campaign=devex)
- [Learn more about Fauna](https://egghead.io/playlists/the-complete-guide-to-faunadb-74bef44b)
### Share
- [X (fka Twitter)](https://twitter.com/intent/tweet?text=Add Playful Animated SVG Reactions to a Gatsby Blog
&url=https://www.netlify.com/blog/2020/07/16/add-playful-animated-svg-reactions-to-a-gatsby-blog//)
- [LinkedIn](https://www.linkedin.com/shareArticle?mini=true&url=https%3A%2F%2Fwww.netlify.com%2Fblog%2F2020%2F07%2F16%2Fadd-playful-animated-svg-reactions-to-a-gatsby-blog%2F%2F)
- [Facebook](https://www.facebook.com/sharer.php?u=https://www.netlify.com/blog/2020/07/16/add-playful-animated-svg-reactions-to-a-gatsby-blog//)
- [Bluesky](https://bsky.app/intent/compose?text=Add Playful Animated SVG Reactions to a Gatsby Blog
+https://www.netlify.com/blog/2020/07/16/add-playful-animated-svg-reactions-to-a-gatsby-blog//)
* * *
### Tags
- [Gatsby](/blog/tags/gatsby/)
- [React](/blog/tags/react/)
- [gsap](/blog/tags/gsap/)
## Keep reading

Guides & Tutorials May 15, 2026
[
### How to build a real-time AI chatbot in minutes with Netlify Agent Runners (no backend)
](/blog/how-to-build-a-real-time-ai-chatbot-in-minutes-with-netlify-agent-runners-no-backend)
- 
Nahrin Jalal

Guides & Tutorials May 15, 2026
[
### Tracking AI search traffic: how to use Netlify Log Drains to maximize AEO
](/blog/tracking-ai-search-traffic)
- 
Nahrin Jalal
## Recent posts
News & Announcements June 25, 2026
[
### Netlify Functions, designed for Agent Experience
](/blog/netlify-functions-designed-for-agent-experience)
- 
Eduardo Bouças
News & Announcements June 24, 2026
[
### How we measure Netlify’s Agent Experience
](/blog/how-we-measure-netlify-agent-experience)
- 
Sean Roberts
Guides & Tutorials May 15, 2026
[
### How to build a real-time AI chatbot in minutes with Netlify Agent Runners (no backend)
](/blog/how-to-build-a-real-time-ai-chatbot-in-minutes-with-netlify-agent-runners-no-backend)
- 
Nahrin Jalal

### How do the best dev and marketing teams work together?
[Access the report](https://www.netlify.com/reports/2024-leadership-trend-report/access/)