---
title: "How to use Tailwind CSS with Remix | Netlify"
description: "All you need to know about styling your Remix application with Tailwind CSS in this step by step guide."
source: "https://www.netlify.com/blog/how-to-use-tailwind-css-with-remix/"
last_updated: "2026-07-11T23:04:45.000Z"
---
Tailwind CSS has become a very popular option for styling applications. It uses atomic utility classes that are preconfigured with good defaults to get started easily. Remix is a JavaScript framework that aims to make creating a production ready application easier than ever. It uses React for the UI layer. Using [Remix](https://remix.run) and [Tailwind CSS](https://tailwindcss.com/) together is a really powerful option to get your applications built quickly. To get started with Tailwind CSS in a fresh Remix application, we’ll run the following commands to create the Remix app or skip directly to the [Tailwind setup](#setting-up-tailwind-css). If you prefer video content, there is also a [video tutorial](#video-tutorial).
## Setting up Remix
1. Run the command to start the CLI.
```
npx create-remix@latest
```
2. Name your project and select “Just the basics”.

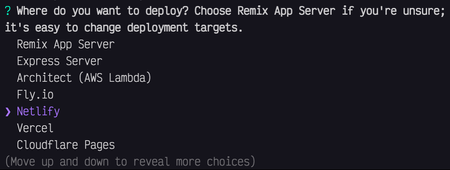
3. Select Netlify from the list of deployment targets.
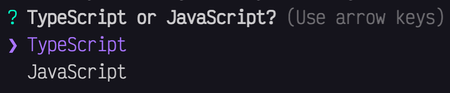
4. Use either TypeScript or JavaScript, it’s your choice.
5. Run `npm install` by hitting Y.

6. Now your Remix project is set up. You can open it in your favorite code editor and start setting up Tailwind CSS.
## Setting up Tailwind CSS
1. Install the required packages for Tailwind.
```
npm install -D tailwindcss postcss autoprefixer concurrently
```
2. Run the command to initialize Tailwind, this will generate a `tailwind.config.js` file in the root of your project.
```
npx tailwindcss init
```
3. Open the newly created `tailwind.config.js` file and add the file paths to the content section.
tailwind.config.js
```
/** @type {import('tailwindcss').Config} */module.exports = { content: [ "./app/**/*.{js,ts,jsx,tsx}", ], theme: { extend: {}, }, plugins: [],}
```
4. Replace the scripts in the `package.json` with the new Tailwind scripts. These add two scripts to generate the Tailwind CSS files and updates the `build` and `dev` scripts to use the new CSS scripts. The path to the CSS files can be configured as needed, but by default it puts the initial file in the root `styles/app.css` file and the generated output goes to `app/styles/app.css`.
package.json
```
{ "scripts": { "build": "npm run build:css && remix build", "build:css": "tailwindcss -m -i ./styles/app.css -o app/styles/app.css", "dev": "concurrently \"npm run dev:css\" \"remix dev\"", "dev:css": "tailwindcss -w -i ./styles/app.css -o app/styles/app.css" }}
```
5. Where you set the path of your CSS to or the default location `styles/app.css`, create the initial location for the CSS. From the root of your project, run the following commands.
```
mkdir stylestouch styles/app.css
```
6. Add the `@tailwind` directives to the newly created `app.css` file.
```
@tailwind base;@tailwind components;@tailwind utilities;
```
7. Run `npm run dev` to generate the output CSS file in `app/styles/app.css`.
8. Import the generated CSS file into the `app/root.tsx` file.
```
import styles from "./styles/app.css"
export function links() { return [{ rel: "stylesheet", href: styles }]}
```
> One thing I ran into that I wanted to note here. Make sure your Remix app includes the `` component from `@remix-run/react` inside your `app/root.tsx` file or the links will not be added.
```
import { Links } from "@remix-run/react";import styles from "./styles/app.css"{/* ... */}export function links() { return [{ rel: "stylesheet", href: styles }]}{/* ... */}export default function Root() { return ( {/* ... */} {/* ... */} );}
```
9. Now you are setup to start using Tailwind classes inside of your components. Try it in the `app/routes/index.tsx` file. Remove the inline style from the wrapper `div` element and add in the Tailwind classes, `className="font-sans leading-5 m-4"`. And give the `h1` some styles, `className="text-3xl font-bold text-teal-600"`. Make sure your dev server is running, `npm run dev`, and open [localhost://3000](http://localhost:3000/) to see your Tailwind styles applied.
```
export default function Index() { return ( );}
```

## K-Pop Stack
Another option with Tailwind CSS already preconfigured is the [K-Pop Stack](https://www.netlify.com/blog/deploy-your-remix-supabase-app-today/). Netlify’s templates team has created this stack that is already configured with Tailwind and it uses Supabase for the database.
[](https://kpop-stack.netlify.app/)
## Video Tutorial
### Share
- [X (fka Twitter)](https://twitter.com/intent/tweet?text=How to use Tailwind CSS with Remix&url=https://www.netlify.com/blog/how-to-use-tailwind-css-with-remix/)
- [LinkedIn](https://www.linkedin.com/shareArticle?mini=true&url=https%3A%2F%2Fwww.netlify.com%2Fblog%2Fhow-to-use-tailwind-css-with-remix%2F)
- [Facebook](https://www.facebook.com/sharer.php?u=https://www.netlify.com/blog/how-to-use-tailwind-css-with-remix/)
- [Bluesky](https://bsky.app/intent/compose?text=How to use Tailwind CSS with Remix+https://www.netlify.com/blog/how-to-use-tailwind-css-with-remix/)
* * *
### Tags
- [CSS](/blog/tags/css/)
- [remix](/blog/tags/remix/)
- [Tailwind](/blog/tags/tailwind/)
## Keep reading

Guides & Tutorials May 15, 2026
[
### How to build a real-time AI chatbot in minutes with Netlify Agent Runners (no backend)
](/blog/how-to-build-a-real-time-ai-chatbot-in-minutes-with-netlify-agent-runners-no-backend)
- 
Nahrin Jalal

Guides & Tutorials May 15, 2026
[
### Tracking AI search traffic: how to use Netlify Log Drains to maximize AEO
](/blog/tracking-ai-search-traffic)
- 
Nahrin Jalal
## Recent posts
News & Announcements June 25, 2026
[
### Netlify Functions, designed for Agent Experience
](/blog/netlify-functions-designed-for-agent-experience)
- 
Eduardo Bouças
News & Announcements June 24, 2026
[
### How we measure Netlify’s Agent Experience
](/blog/how-we-measure-netlify-agent-experience)
- 
Sean Roberts
Guides & Tutorials May 15, 2026
[
### How to build a real-time AI chatbot in minutes with Netlify Agent Runners (no backend)
](/blog/how-to-build-a-real-time-ai-chatbot-in-minutes-with-netlify-agent-runners-no-backend)
- 
Nahrin Jalal

### How do the best dev and marketing teams work together?
[Access the report](https://www.netlify.com/reports/2024-leadership-trend-report/access/)