Posts tagged "Agent-runners"
-
We’ve improved the Netlify CLI’s Agent Experience to make it the fastest way for both developers and AI agents to go from idea to deployed site. Here’s what’s new.
Create a new project from a prompt
The
netlify createcommand now builds you a new site from scratch, triggering Agent Runners:netlify create "a landing page for a SaaS product with a waitlist signup"This single command will:
- Create a new Netlify project for you
- Deploy it to a live URL
- Pull down the code so you can start iterating locally
Prefer to build with GitHub? The Netlify CLI can also create a new GitHub repo and automatically hook it up to your new Netlify project, no manual setup required.
Deploy without an account
Need to spin up something quick without creating an account first or signing in? The new
--allow-anonymousflag lets you deploy without a Netlify account:netlify deploy --allow-anonymousThis will create the project, deploy it to a live URL, and let you claim the project within an hour. This is especially useful for AI agents that need to create temporary projects without requiring Netlify credentials upfront.
Better agent experience throughout
We’ve resolved the major issues agents commonly hit with the CLI. The CLI is now a more predictable integration point whether you’re building with an AI coding assistant or orchestrating your own agents.
Install or update the Netlify CLI to try it out:
npm install -g netlify-cli@latest -
You can now deploy sites to Netlify directly from OpenAI Codex using the Netlify plugin in the Codex plugin directory.
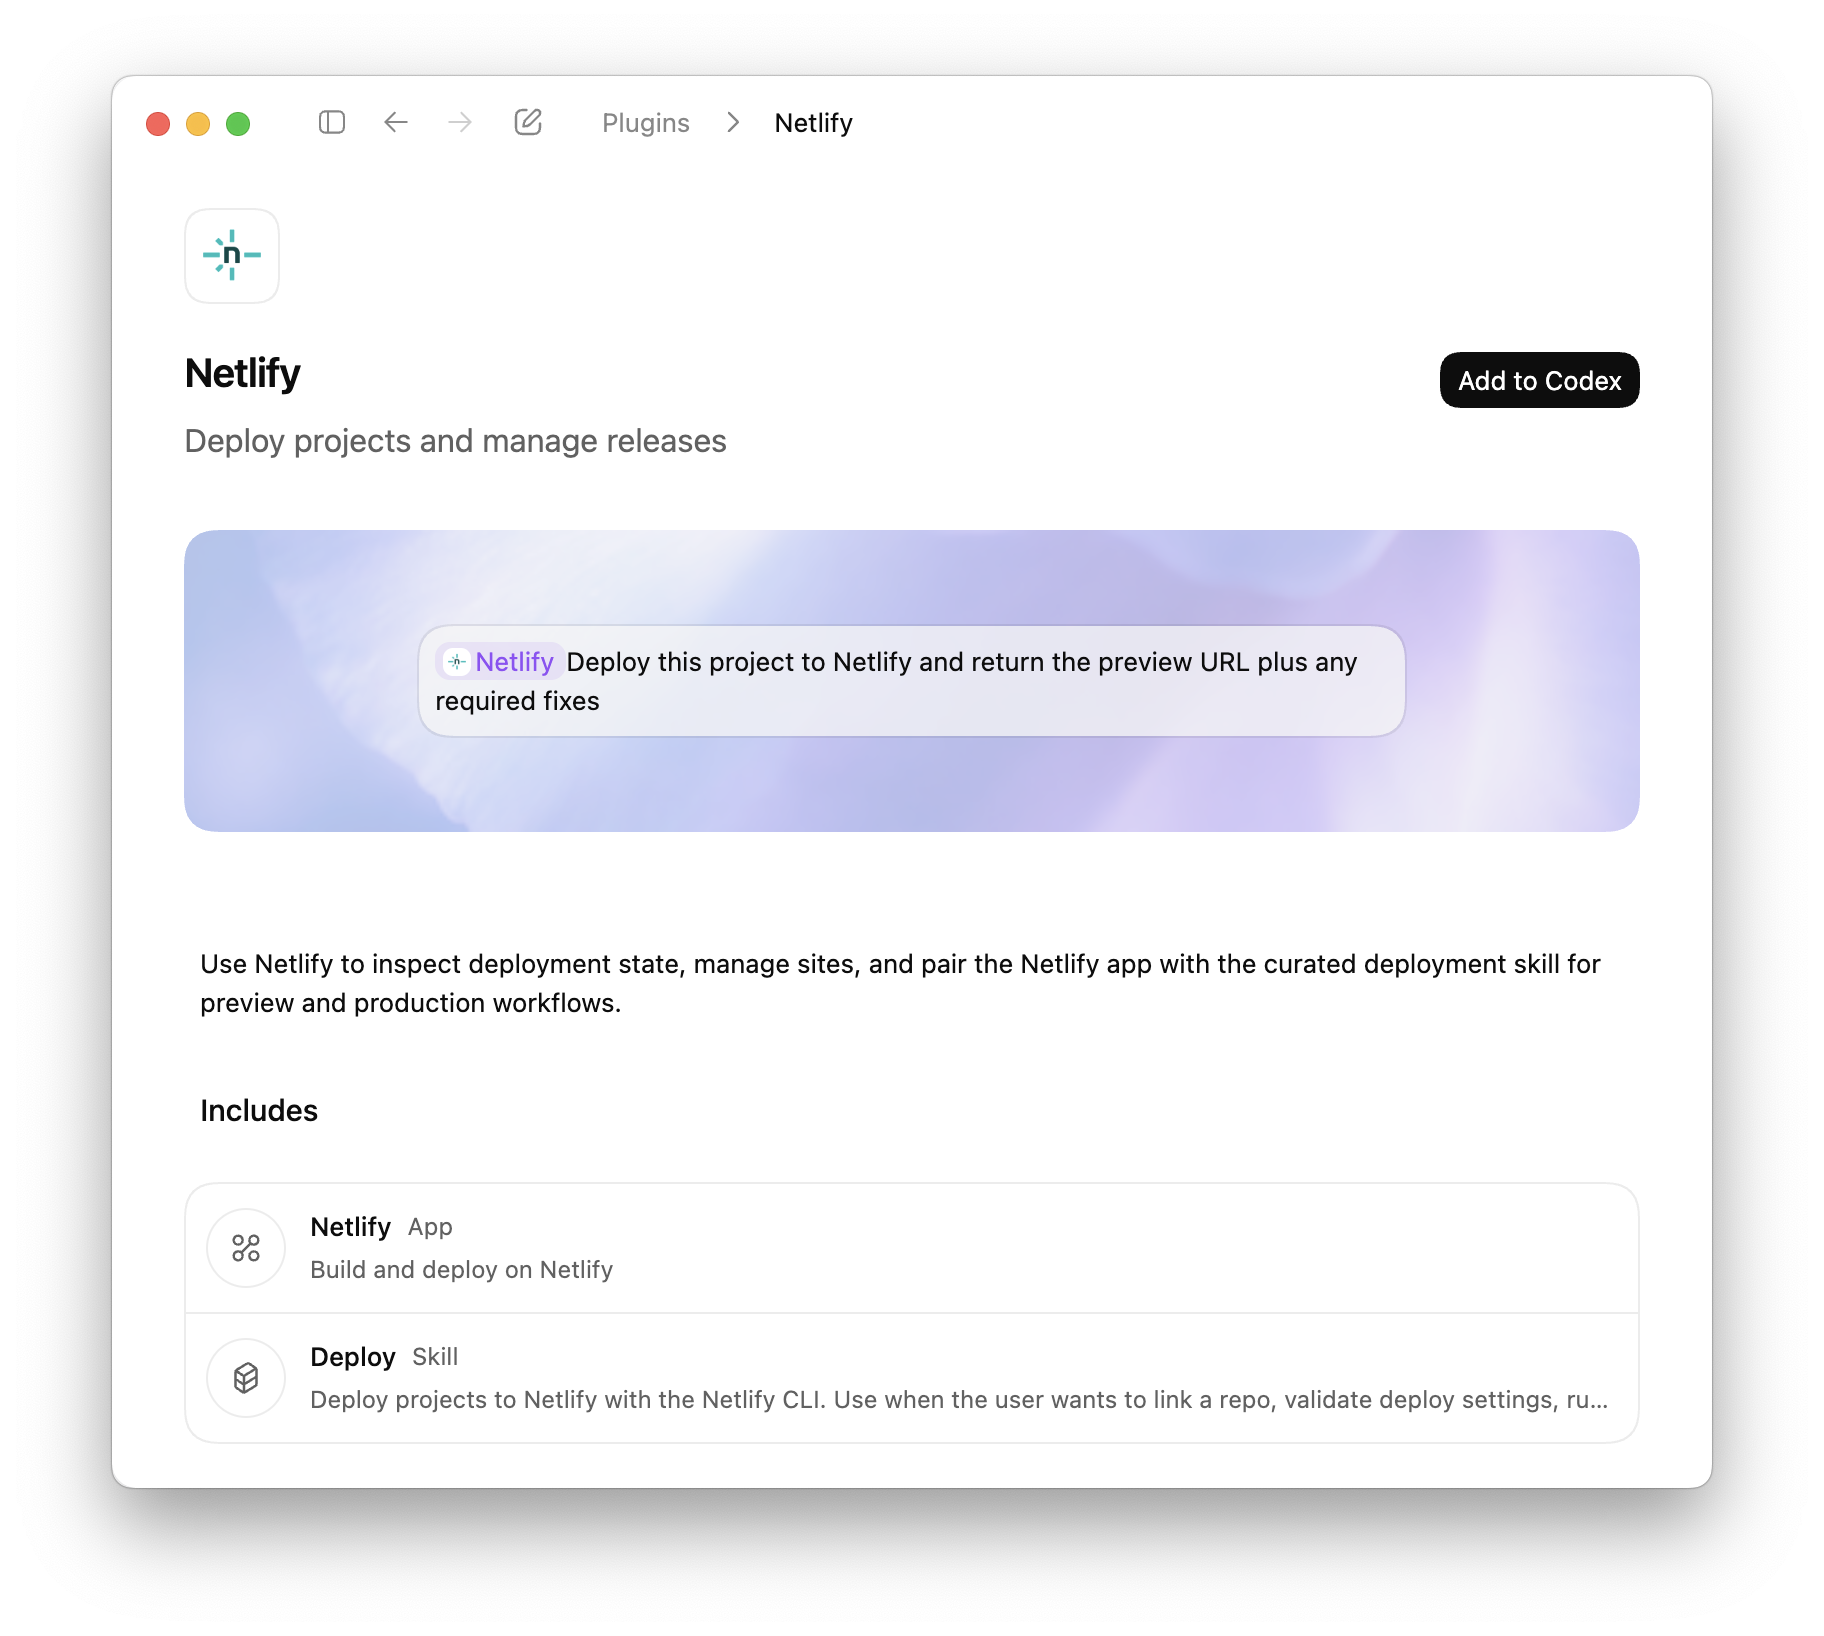
Codex plugins extend Codex with apps, skills, and MCP servers, to access external tools, data, and workflows directly from your coding environment. With the Netlify plugin, Codex can create projects, configure settings, and deploy without leaving the coding workflow.
What you can do
Deploy directly from Codex
- Deploy projects using the Netlify CLI workflow
- Generate preview URLs automatically
- Deploy to production when ready
- Validate build configuration before deployment
Manage your projects
- Create new projects
- Install extensions
- Manage environment variables
- Configure visitor access controls
- Manage forms
- Update project settings
Review and fix deployments
- Inspect deploy status
- Retrieve build logs
- Identify configuration issues
- Iterate on fixes within Codex
Codex is also available through Agent Runners, where you can prompt AI agents against your live project and deploy changes directly from the Netlify Dashboard.
The Netlify plugin for Codex is available now in the Codex plugin directory.
-
To help you and your agents build more effectively, we’re introducing reusable Prompt Templates available directly from within Netlify.
Browse a curated collection of reusable prompts for common Netlify workflows: accessibility audits, A/B testing with Edge Functions, and more. Each template uses variable placeholders so you can adapt it to your project without starting from scratch.
Prompt Templates live directly in your project’s agent runs dashboard. From there you can:
- Browse public prompt templates
- Customize and save your own versions of any template for your team
- Submit templates back to the community to share what is working for you
Learn more about managing Prompt Templates for your team.
-
Team Owners can now set a credit limit on AI inference usage to keep Agent Runners and AI Gateway costs within budget.
When your team’s usage hits the credit cap you define, active agent runs stop, new agent runs are blocked, and continued AI Gateway usage is paused to help you keep more of your credit balance.
This is especially useful for teams actively using AI features who want predictable monthly costs without manually watching the meter. Set it once, and Netlify enforces it automatically across your entire team.
Learn more in our docs on limiting AI features.
Agent run credits tracking
You can also track how much each agent run task costs on your agent runs page, shown next to how long the agent took to run the task.
Learn more about AI inference usage and how credits work.
-
OpenAI’s GPT-5.4 and GPT-5.4 Pro models are now available through Netlify’s AI Gateway and Agent Runners with zero configuration required.
Use the OpenAI SDK directly in your Netlify Functions without managing API keys or authentication. The AI Gateway handles everything automatically. Here’s an example using the GPT-5.4 model:
import OpenAI from 'openai';export default async () => {const openai = new OpenAI();const response = await openai.responses.create({model: 'gpt-5.4',input: 'Give a concise explanation of how AI works.',});return Response.json(response);};GPT-5.4 and GPT-5.4 Pro are available for all Function types and Agent Runners. You get automatic access to Netlify’s caching, rate limiting, and authentication infrastructure.
Learn more in the AI Gateway documentation and Agent Runners documentation.
-
Starting today, all completed agent runs show a screenshot of your Deploy Preview. This makes it easier to quickly see the result of an agent run and keep track of agent run sessions without opening the full preview.
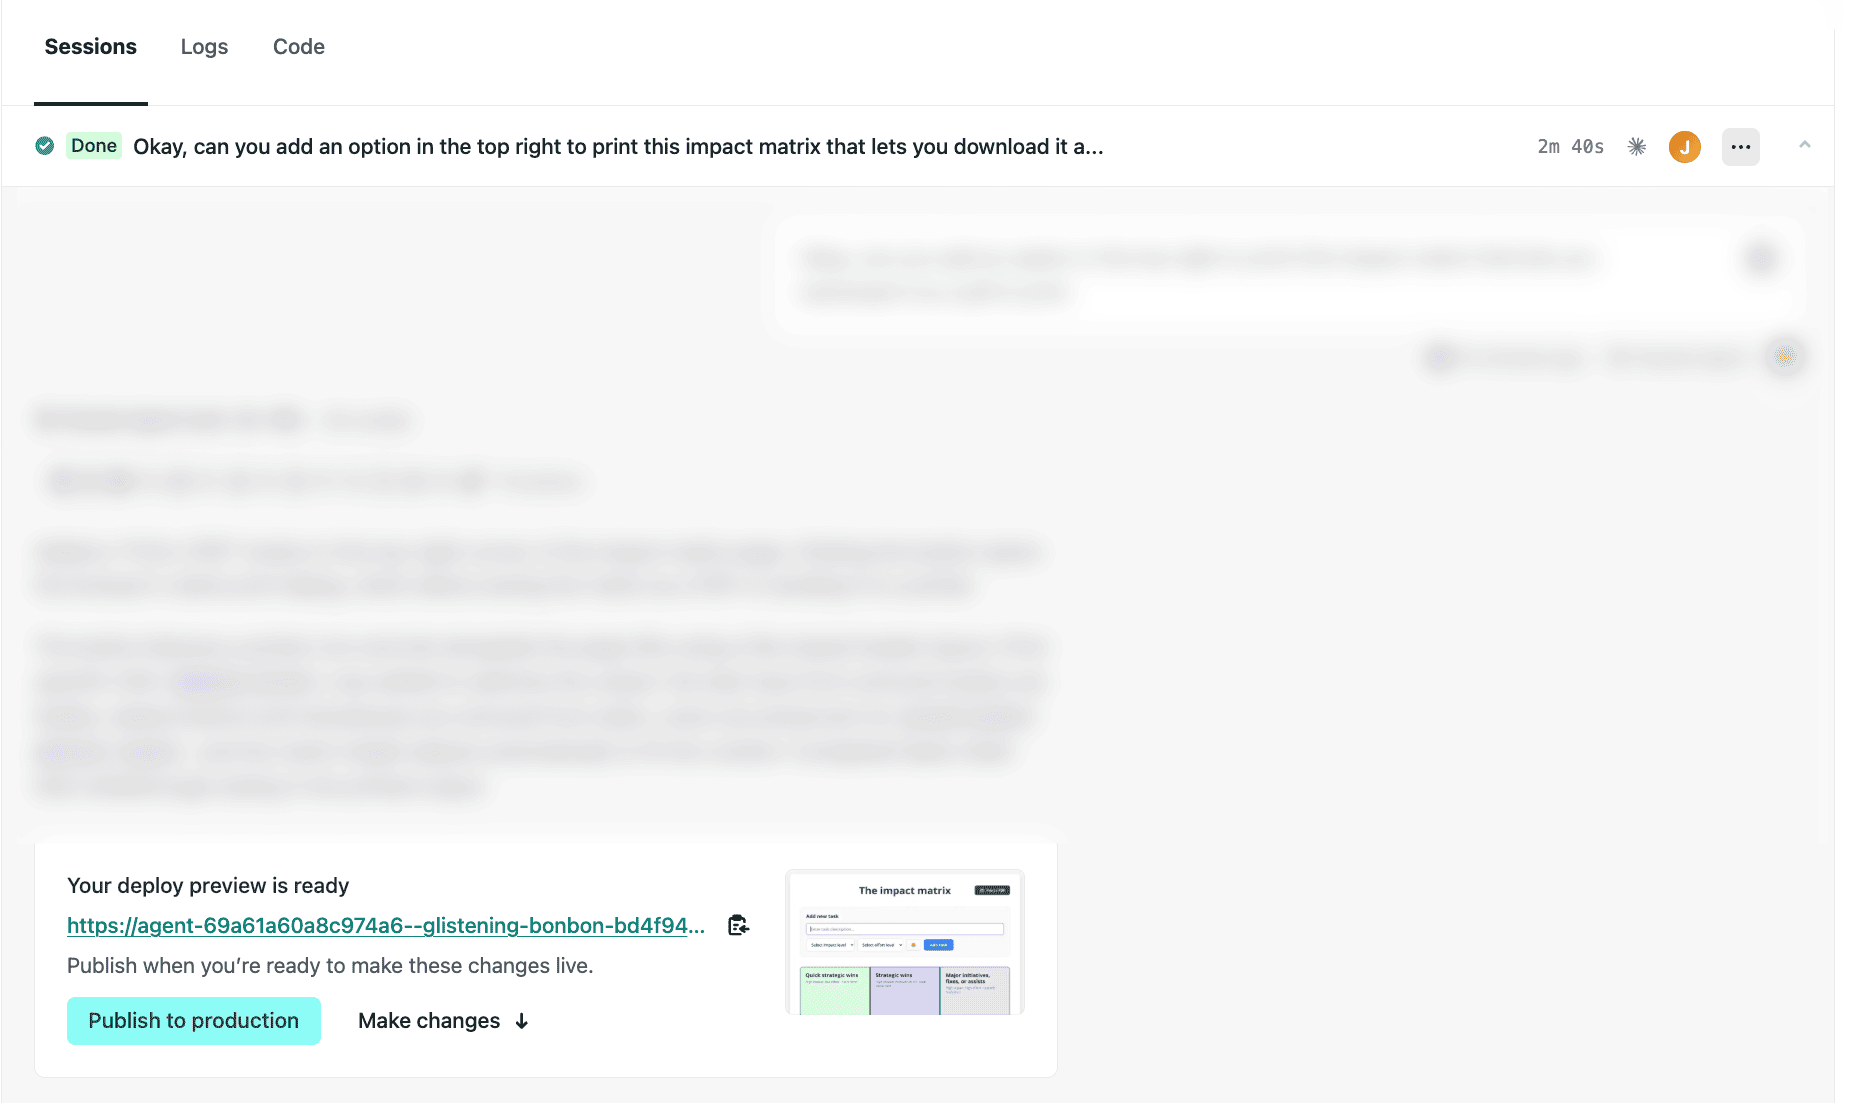
Test it out today:
- Go to your Netlify project dashboard.
- On the left, select Agent runs, then choose an existing agent run or start a new one by entering a prompt and selecting Run task.
- At the bottom of your agent run sessions, you’ll find a screenshot of your Deploy Preview. The screenshot is taken from the main page of your project.
Note: If you’ve set up private deploys or password protection, the screenshot will show a sign-in page instead. Learn more about Password protection.
Learn more about getting started with Agent Runners.
-
Linear users can now launch Netlify Agent Runners directly from any Linear issue, allowing you to seamlessly share context with your AI agent of choice. If you have your Linear issue synced with related Slack messages, this context will also be included in your agent run prompt.
Before starting your agent run, you can review and edit your prompt. Next, you can choose which AI agent to use — Claude Code, Google Gemini, or OpenAI Codex. Netlify Agent Runners doesn’t lock you into using a single AI agent so you can pick the agent that fits the task best.
To start an agent run from Linear:
- Go to a Linear issue where you want to trigger an agent run.
- In the top right corner, select Configure coding tools….
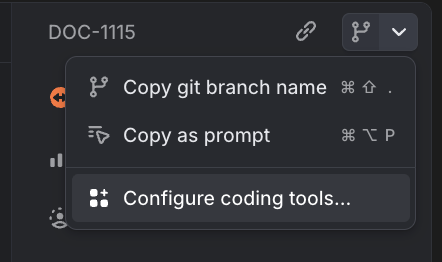
- Toggle Netlify Agent Runners on.
- Go back to the issue and in the top right corner, select Open in Netlify Agent Runners.

- Review the prompt and choose your AI agent.
- To start the agent run, select Run task.
Once you’ve enabled this integration from your personal Linear preference settings, any Linear issue you open in your workspace will give you the option to open with Netlify Agent Runners.
Now your entire team can save time and seamlessly share context between Linear and Netlify Agent Runners while keeping this work clearly tracked across Linear and Netlify. Learn more about Agent Runners.
-
Anthropic’s Claude Sonnet 4.6 model is now available through Netlify’s AI Gateway and Agent Runners with zero configuration required.
Use the Anthropic SDK directly in your Netlify Functions without managing API keys or authentication. The AI Gateway handles everything automatically. Here’s an example using the Claude Sonnet 4.6 model:
import Anthropic from '@anthropic-ai/sdk';export default async () => {const anthropic = new Anthropic();const response = await anthropic.messages.create({model: 'claude-sonnet-4-6',max_tokens: 4096,messages: [{role: 'user',content: 'How can AI improve my coding?'}]});return Response.json(response);};Claude Sonnet 4.6 is available for all Function types and Agent Runners. You get automatic access to Netlify’s caching, rate limiting, and authentication infrastructure.
Learn more in the AI Gateway documentation and Agent Runners documentation.
-
You can now sync changes from different agent runs in the Netlify dashboard. This is especially helpful if you use Netlify Drop to publish or update your project and don’t use Git workflows to sychronize versions of your project.
Syncing changes helps you and your whole team build and publish faster.
How it works
For example, let’s say you used Netlify Drop to publish your project without setting up a Git workflow.
Next, you decide to use Agent Runners to add a new landing page.
You also start an agent run to update your project’s footer and publish the new footer.
Your agent run for the new landing page doesn’t include the footer changes yet. To get these updates, start a sync run from the Agent Runners dashboard. This will apply all new updates from the live production version of your project.
Now when you publish your landing page updates, you’ll get the updated footer as well.
Syncing changes with Agent Runners enables smoother shipping with several agent runs and with multiple team members working on the same project.