Finding a modern toolset to create truly fast, secure and dynamic sites has been an endless search. With JAMstack and the Serverless approach, we have just that. JAMstack sites are fast and secure by nature, and while they are static, 90% of the features that once required a custom backend can now be done entirely on the frontend or are available as APIs and external services. And that missing 10%? Enter Serverless.
Let me get give a few examples of what can be achieved entirely by the browser or APIs nowadays:
- You want to make your content searchable? For smaller projects you can do it on purely on the frontend using something like lunr. There are also lots of search-as-a-service providers available, such as Algolia.
- You need to add login to your site? Got it. There’s Auth0… and some hosting providers (such as Netlify) provide proxies to oAuth providers.
- Comments? Disqus, Facebook Comment and many others.
- Form processing? Again, already covered by major hosting providers (see our documentation on form-handling for an example).
The list goes on and on, but you get my point here.
Still, sometimes we do need to write custom backend functionality — but having to provision, manage and scale servers feels kinda counterintuitive in the face of the simplicity of JAMstack. That’s why I was very interested and intrigued by Amazon’s Lambda since it was released two years ago.
Usually, you would take a whole server where you can run your backend codebase, this can mean a lot of wasted space (and money). However, with AWS Lambda you write and host individual functions. These functions run on-demand: the environment is provisioned automatically when it’s needed and shut down after execution. You don’t have to manage servers, you are charged only by the time your functions actually run and the service scales as much as you need with no complications.
Together with recent competitors in the same space, such as Microsoft Azure functions and Google Cloud functions, AWS Lambda represents a new type of backend computing that is being called “Serverless” (because there’s no need to maintain a server).
The Serverless Framework:
Setting up AWS Lambdas with the required authorizations and services require a lot of boilerplate and specific knowledge of the whole AWS ecosystem. Besides that, in it’s current form, there are a few rough edges around working with Lambdas directly on AWS panel (no support for content versioning, for example).
For these reasons, a lot of tools around AWS lambdas were created in the last two years, most notably the Serverless Framework – an open-source, command line tool and standard syntax to build serverless projects. (Tell me about confusing names: Serverless Framework for Serverless Projects…)
In this two-part tutorial, we will use the Serverless Framework to create Lambda functions to use on the site of a fictitious craft beer company — The “SLS Beer”. The SLS Beer site is a JAMstack project that presents the different types of beers produced by the company. Our job will be creating lambda functions to allow the site visitors to rate the beers (we will also display average ratings).
In this first part we will install and configure the Serverless Framework command line interface, setup an AWS account and create a sample Lambda function with an URL.
Serverless — Download & Setup:
To setup the Serverless command line you will need to have node.js and npm in place. for more information in how to install them, consult https://nodejs.org/.
To install Serverless 1.0 globally, use npm:
npm install -g serverless@^1.0.0The Serverless command line will need access to your AWS account in order to create and setup all the services we want automatically. Let’s setup an AWS account:
AWS Account Setup:
-
Log into AWS panel (aws.amazon.com). If this is your first time, you can create a new account which will provide you some services (including Lambda) for free on the first year (up to a certain limit on usage.).
-
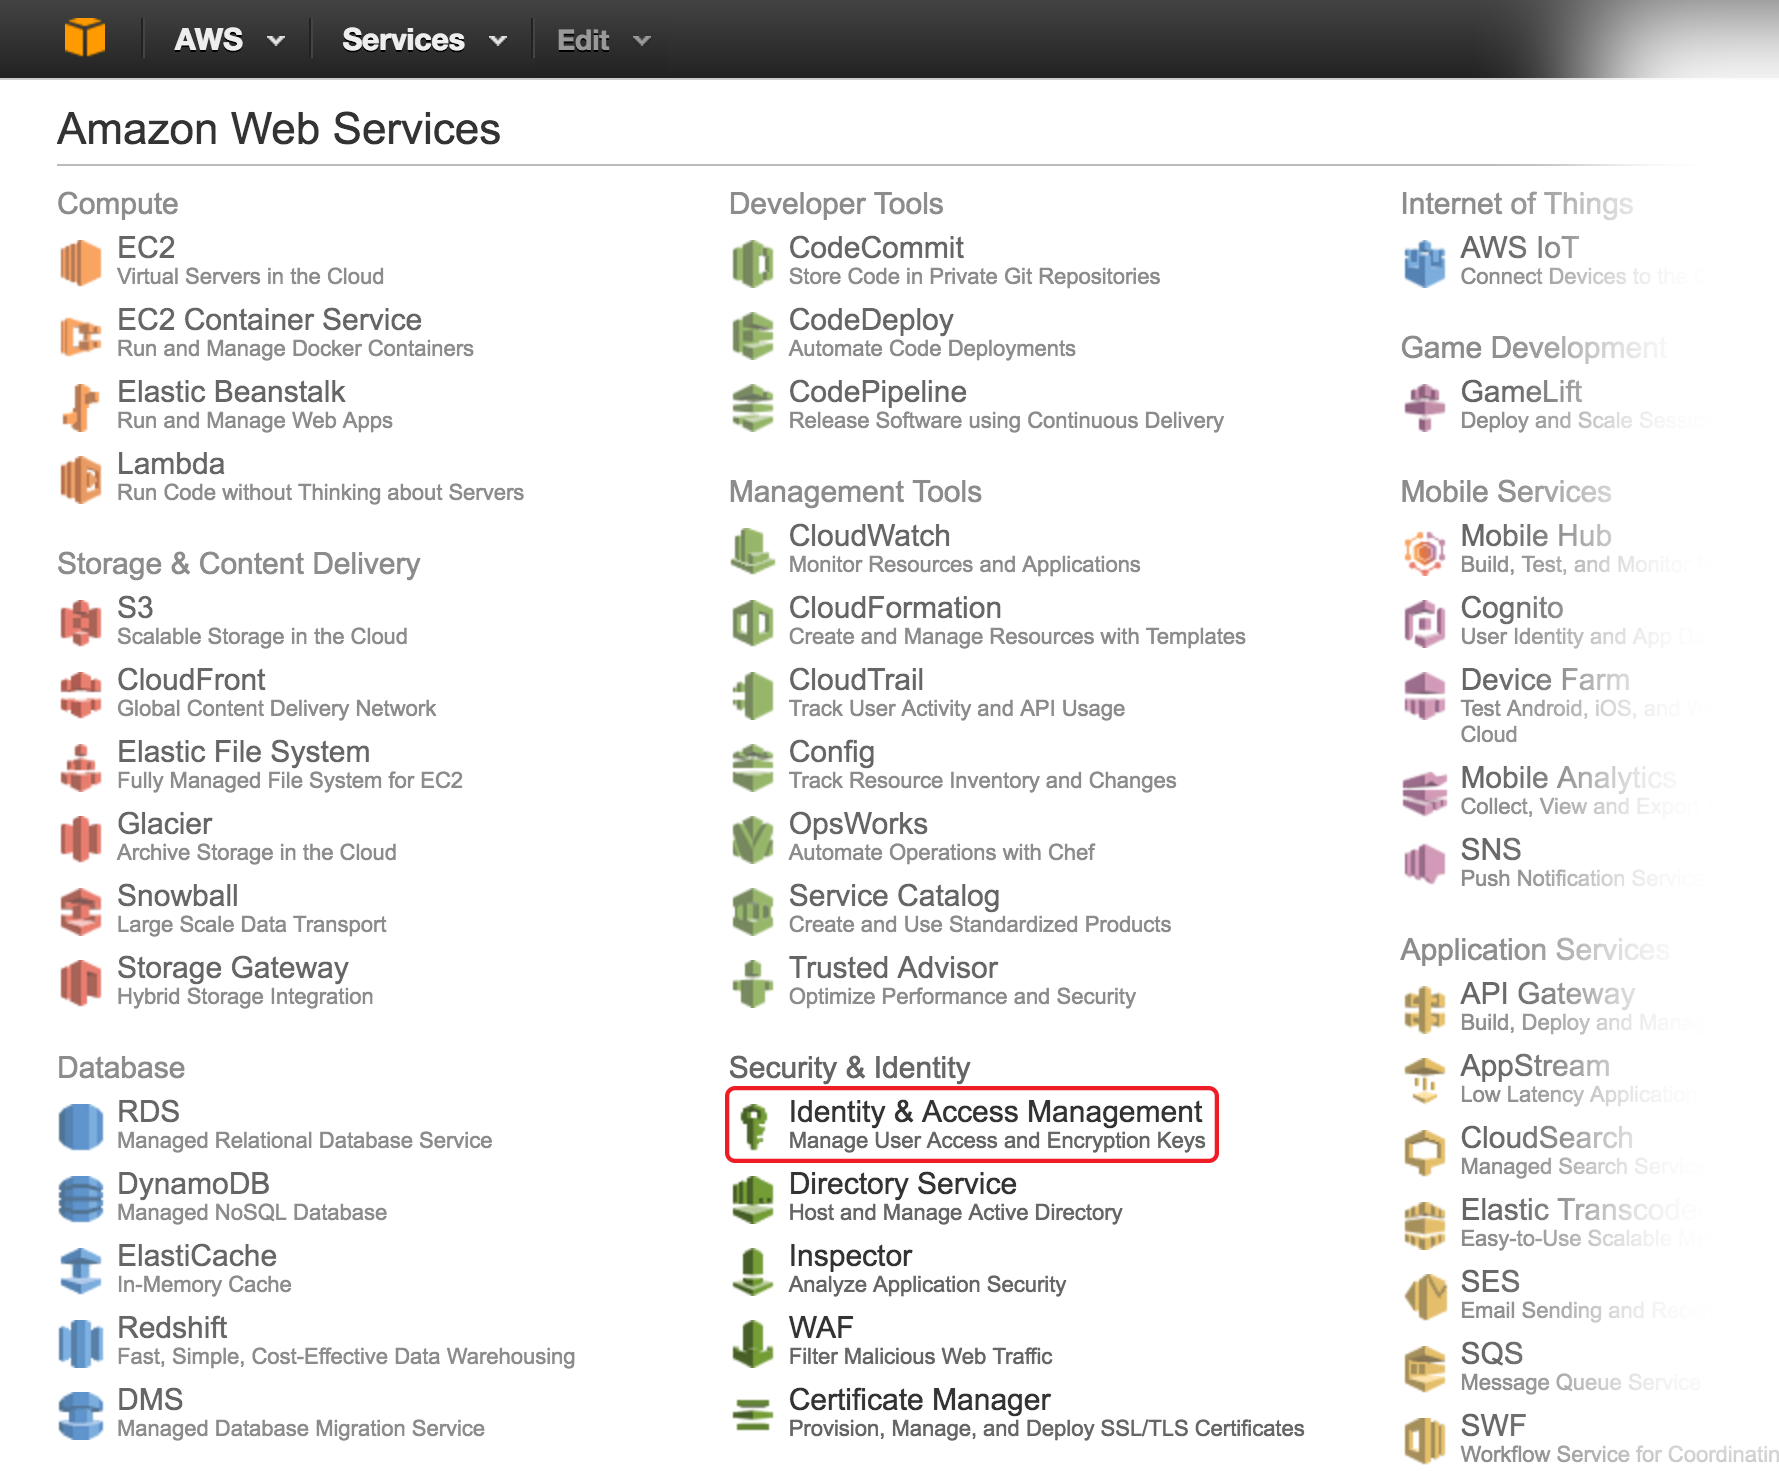
In the panel, click on the “Identity and Access Management” icon.
-
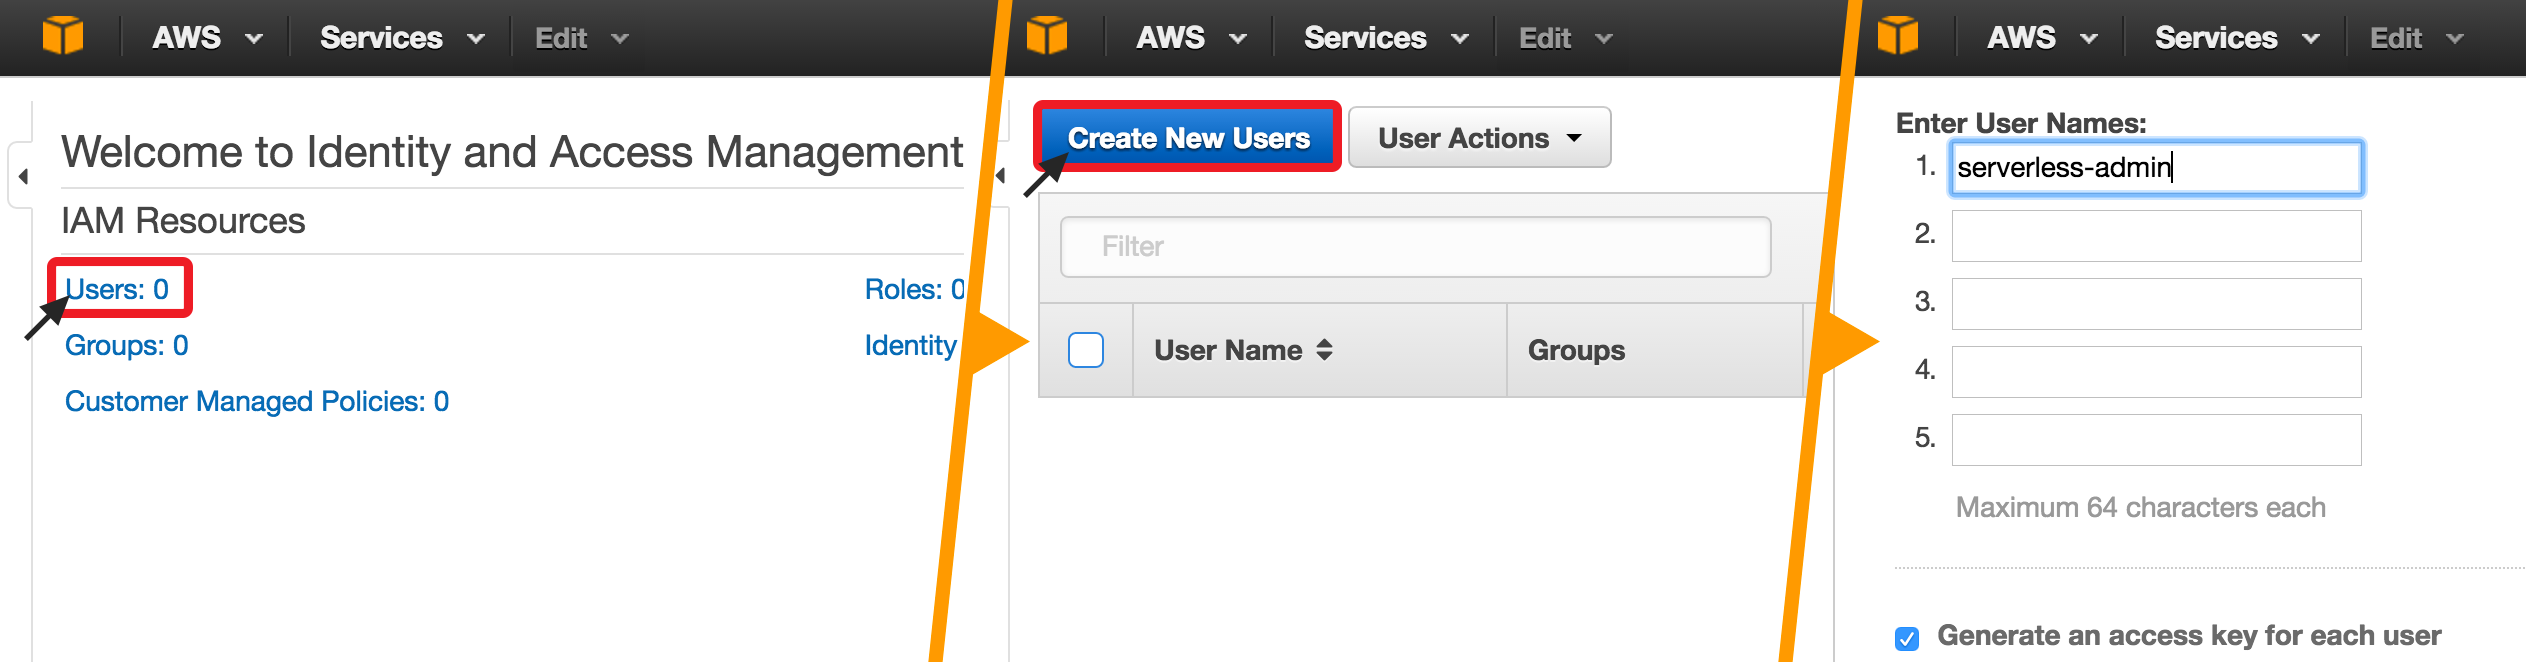
Now you will create a new user for the Serverless Framework. Click in “Users” then, on the next screen, click on “Create New Users”. Finally, add a user named “serverless-admin” (make sure to keep the “generate access key” option checked)
-
The next screen presents you with the access key credentials for the serverless user. Copy both the “Access Key ID” and “Secret Access Key” values. You will need to provide this information for your Serverless Framework installation.
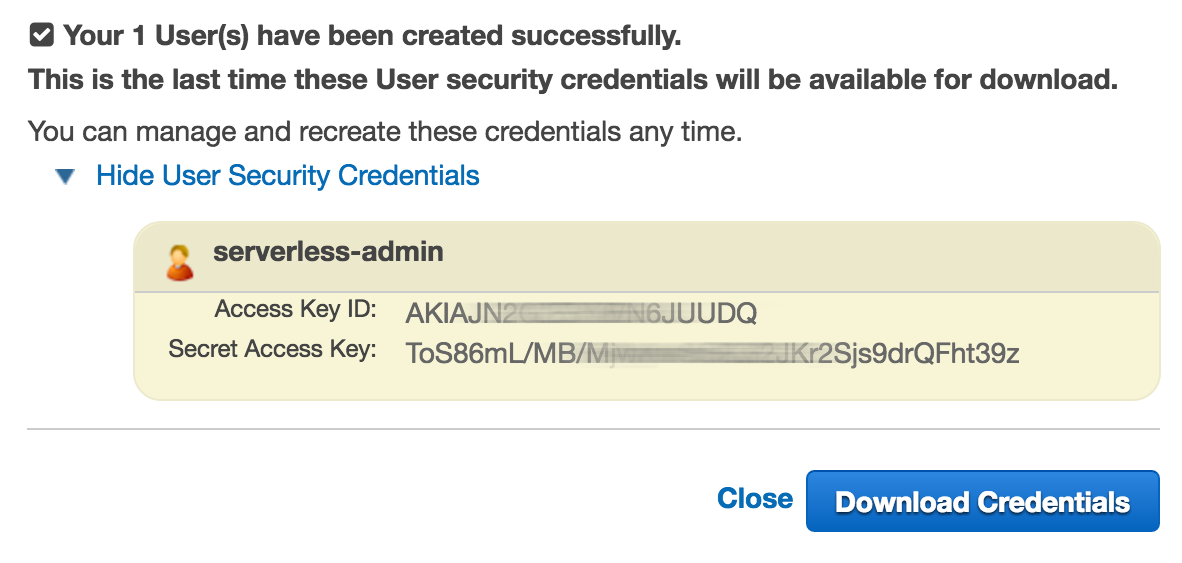
Don’t forget to copy or download the serverless-admin credentials.
The user is now created, but for security reasons it doesn’t have access to any AWS services by default — you will need to take a few more steps to add the appropriate permissions for the serverless-user:
- Back in the list of users, click on “serverless-admin” user, then, on the next screen, Click “Attach Policy”. Finally, choose “Administrator Access” and click “Attach Policy”.
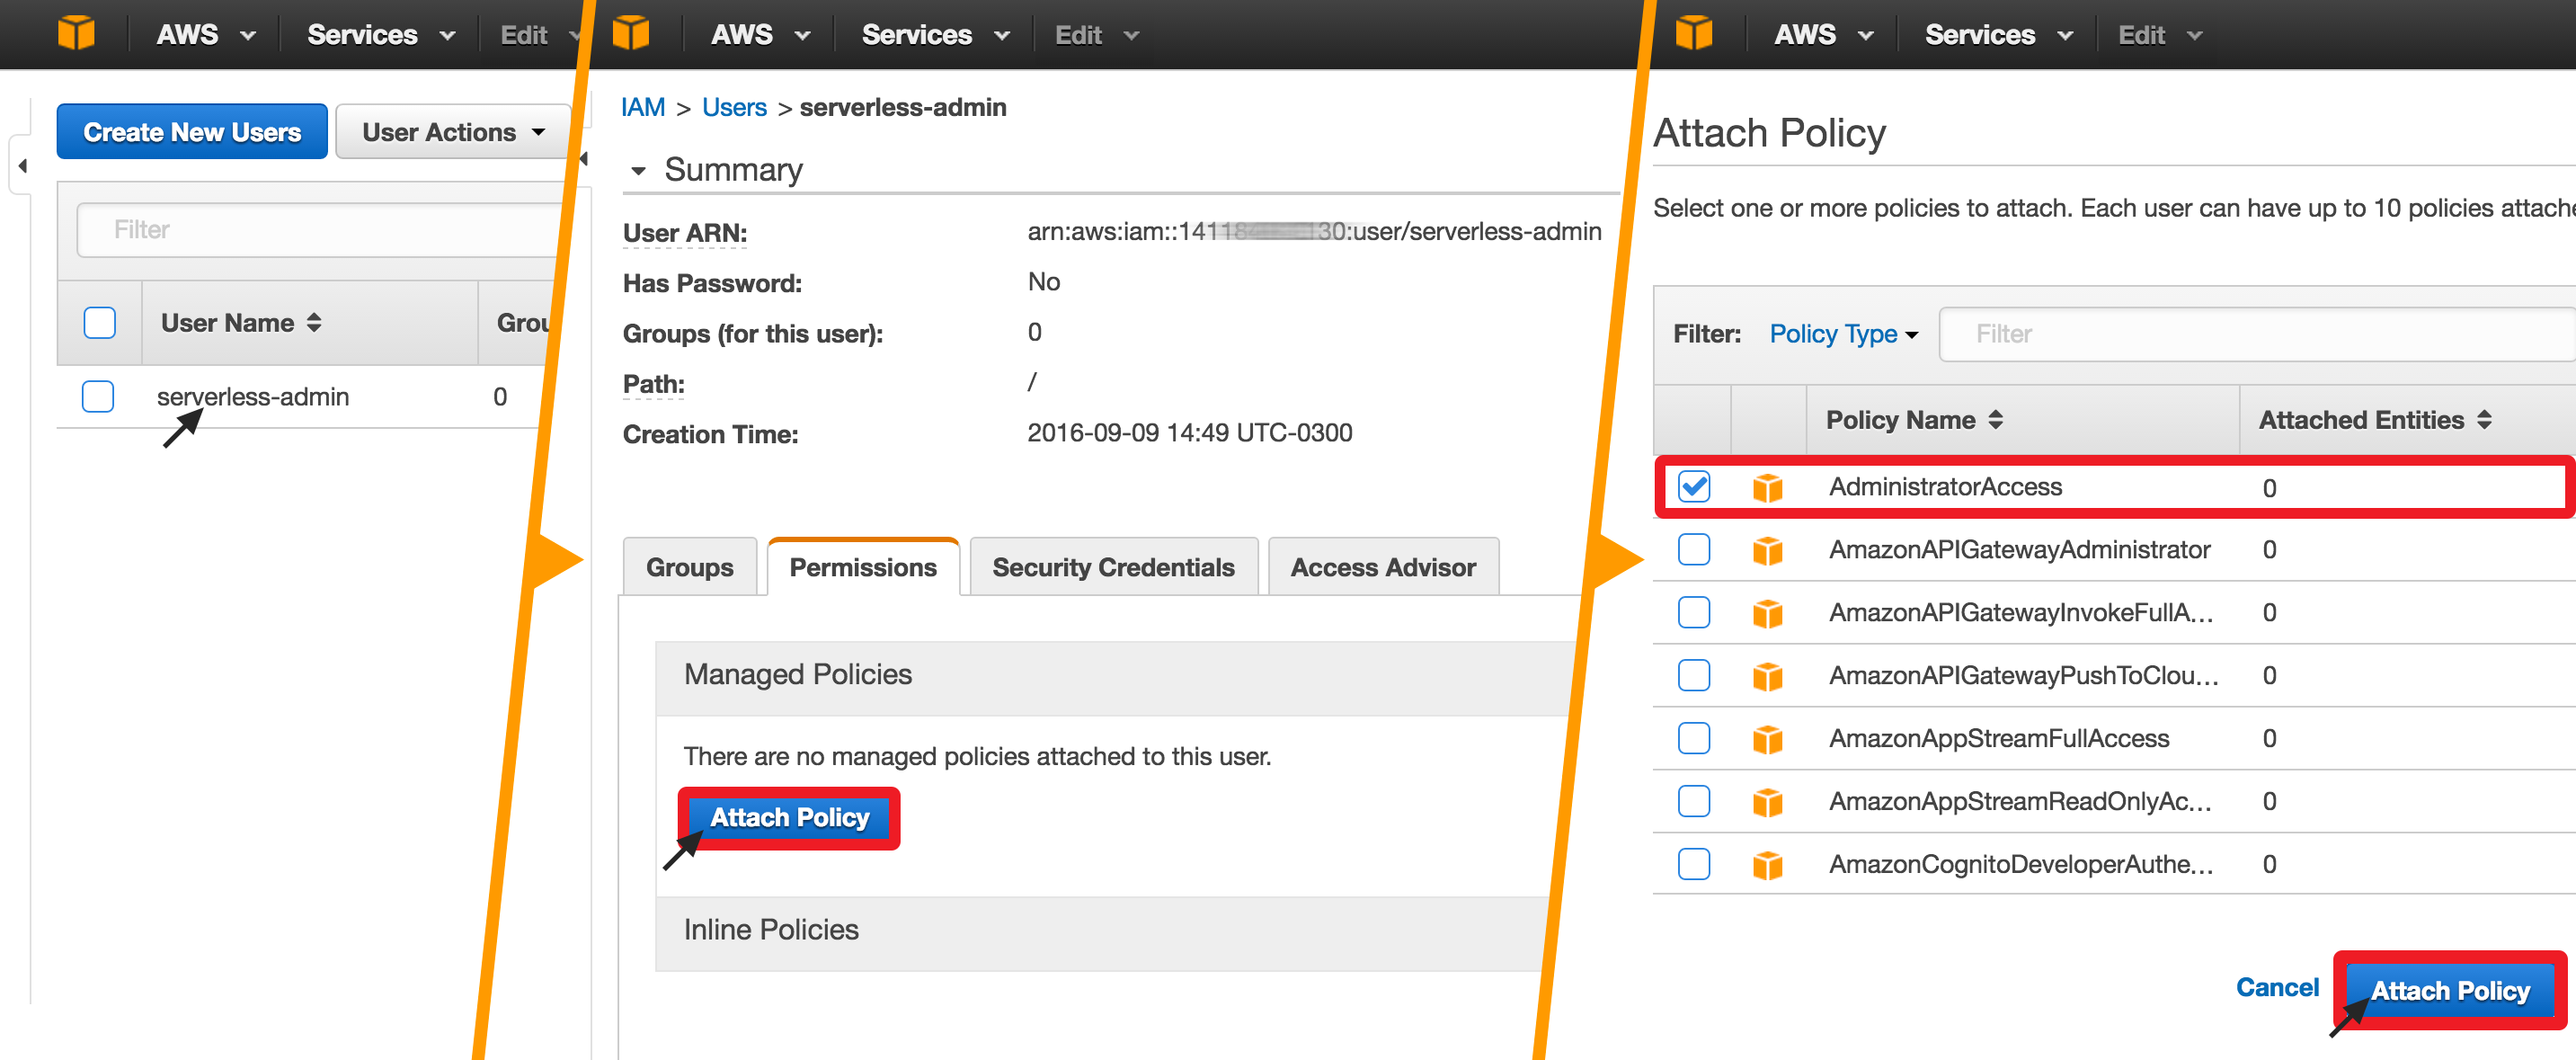
That’s it. You have just created a user with the appropriate permissions for the Serverless Framework. Next, let’s make sure the user’s credentials can be found by the Serverless command line interface:
Last step: providing the serverless-admin credentials for the Serverless Framework The serverless command will look for your AWS credentials file in the “.aws” folder in your user directory:
~/.aws/credentialsYou can either create this file yourself or install the aws cli (which will ask you for the credentials and will generate this file and folders for you). To keep it simpler and not depend on another tool, let’s create the files ourselves, using the terminal.
-
Open terminal
-
Go to your user directory:
cd ~ -
Create an .aws folder (notice the obligatory dot in the beginning:
mkdir .aws -
Next, go to the recently created directory and create a new, empty
credentialsfile:cd .awstouch credentials -
Open the credentials file in your favorite editor and fill with the information you copied before. It should look like this:
[default]aws_access_key_id = AKIAJH34HGJJGHUUDKaws_secret_access_key = toS86mL/Mb/Mja76eg67897feKr2Sjs9drQFht39zNow you’re ready to go. If you need to review these steps (from installation to setting up the account and creating the credentials file), the Serverless team posted a video guide covering them on youtube (the video covers the Beta version of the framework, but the steps are the same).
Creating a Serverless Project
Now that the Serverless command line interface is installed and the AWS user account is setup, you are ready to create new serverless projects.
You can create a new serverless project with the command:
serverless create --template PROVIDER-LANG --path project/project_nameProjects are always based on a template, which specifies the provider and the language used. The Serverless Framework aims to be a complete, provider-agnostic solution (which means it can work with Amazon Lambda, Azure functions, Google Cloud Functions etc. Right now, though, only Amazon Lambdas are fully supported. Regarding Languages, AWS Lambda supports three: JavaScript (NodeJS), Python, and Java.
So, to create our beer-rating project on AWS using Node, the command is:
serverless create --template aws-nodejs --path beer-ratingAnd the result would be something like this:
Serverless: Creating new Serverless service...Serverless: Creating the service in "/Users/cassiozen/Documents/beer-rating"
 _______                             __|   _   .-----.----.--.--.-----.----|  .-----.-----.-----.|   |___|  -__|   _|  |  |  -__|   _|  |  -__|__ --|__ --||____   |_____|__|  \___/|_____|__| |__|_____|_____|_____||   |   |             The Serverless Application Framework|       |                           serverless.com, v1.0.2 -------'
Serverless: Successfully created service with template: "aws-nodejs"
The anatomy of a Serverless Project
The “serverless create” command will generate a new folder with three files:
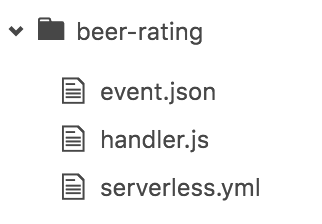
serverless.yml → This is the configuration file for the project. It’s in this file that you will specify all the Lambda functions you want to create, as well as any associated events to trigger them (e.g. HTTP requests). You can also use this file to automatically create and provision other AWS services that you might want to use with Lambda (for example, s3 file buckets or dynamodb tables).
handler.js → This is where you actually define your JavaScript functions. Remember that Lambda runs a NodeJS environment, so you are not restricted to writing all of your code in this single file.
event.json → This file contains event data, but we won’t touch it for now.
Say Hello to your first function
By default, the project scaffolded by the serverless create command contains a sample “Hello” function. The function itself is defined in handler.js and it’s configuration are on serverless.yaml.
The hello function on handler.js:
module.exports.hello = (event, context, callback) => {  const response = {    statusCode: 200,    body: JSON.stringify({      message: 'Go Serverless v1.0! Your function executed successfully!',      input: event,    }),  };
  callback(null, response);};
Notice that all our custom functions will follow the same pattern: An exported, named function which accepts three parameters (event, context and callback). The function does any desired computations and, when done, invokes the callback function with either an error or a response object (containing a statusCode and an optional body).
The hello function configuration on serverless.yaml:
functions: hello: handler: handler.hello# you can add any of the following events# events:# - http:# path: users/create# method: get# - schedule: rate(10 minutes)# - s3: ${env.BUCKET}Here, the functions array contains a list of function names and handlers. Each function can also be associated with events to trigger them — a lambda function can be invoked by an URL (in a traditional REST fashion), by a scheduler or by a myriad of other kinds of actions, such as by saving a file on an S3 bucket.
The example hello function is not associated with any event, so let’s create an URL to access it. If we want to respond to GET on beer/hello, the configuration will be:
functions: hello: handler: handler.hello events: - http: path: beer/hello method: getDeploy & Run
Our project is ready to be deployed. Simply run:
serverless deployIn the first time you run the “deploy” command, the Serverless framework will actually provision all of the necessary AWS services, configurations and authorizations, so this may take several minutes. When complete, you should see something like this:
Serverless: Creating Stack...Serverless: Checking Stack create progress........Serverless: Packaging service...Serverless: Uploading...Serverless: Updating Stack...Serverless: Checking Stack update progress...............Serverless: Stack update finished...
Service Informationservice: beer-ratingstage: devregion: us-east-1endpoints:  GET - https://jfg33khb23.execute-api.us-east-1.amazonaws.com/dev/beer/hellofunctions:  beer-rating-dev-hello: arn:aws:lambda:us-east-1:11350:function:beer-rating-dev-hello
Observe that the serverless creates an URL (line 18 on the sample output above) to invoke our function. If you opening it on the browser you will see the returned JSON:

On the second part of this tutorial we will further investigate how Lambda functions are defined, how to setup a DynamoDB database to store ratings for our sample project and deploy two custom functions.
References: