The Netlify Command Line Interface makes it easier and faster to write, test, review code locally. Here’s a list of the Netlify CLI commands I used in my everyday activities to speed up development time.
To use the Netlify CLI, you must have it installed on your computer. You can run
npm install netlify-cli -gon your terminal to install it globally.
All the Netlify CLI commands start with netlify, however, there is a shorthand for it which is ntl. This means that running netlify init will have the same result as running ntl init.
Netlify login
You need to be logged into your Netlify account to gain access to the CLI commands. The fastest way to log in to your Netlify account from the terminal is to run the ntl login command. It will pop up a browser window to authenticate your credentials, after which you can effectively run any commands on your Netlify sites.

Netlify init
I’ve found this to be the best way to kick off a new project with continuous deployment out of the box. With the ntl init command, you can immediately bootstrap a new project or add Netlify CI to an existing project in seconds.

Netlify Dev
The ntl dev command allows you to quickly run a local dev server for your applications. It works across all frameworks and good old HTML pages. In one command you will have a live site available on the browser to experiment and visualize your projects. As your site grows, and you add more complexity, ntl dev can process Netlify redirect rules and proxies allowing you to test complex functionalities locally.

Netlify deploy
Let’s say you just finished developing your new site and it’s time to ship it to the world. Ideally, I would recommend pushing your site to a Git repository to enjoy the benefits of Netlify’s CI workflow. However, you can quickly deploy a site directly from the command line by running ntl deploy. If you add the --prod flag to this command, your site will be deployed as a production-ready site, otherwise, it’ll be deployed as a draft.

Netlify watch
What happens when you deploy a site? Netlify starts the process of building and deploying the site. You can use the netlify watch command to monitor the deployment process and know when the deployment is finished.

Netlify link
Running the netlify link command will connect your project to a site already deployed on Netlify. This will give you access to environment variables or any other configurations added to the site from the Netlify UI.

Netlify switch
If you’re logged into more than one Netlify account, this command will be very handy for you. It will immediately switch your logged-in accounts from one to the other. This is very handy for me seeing as I’m logging into different Netlify team accounts.

Netlify status
I like this command particularly because it gives me all the information I need to know about the site I’m currently working on. This includes details about the currently signed-in user and the site URL on Netlify.

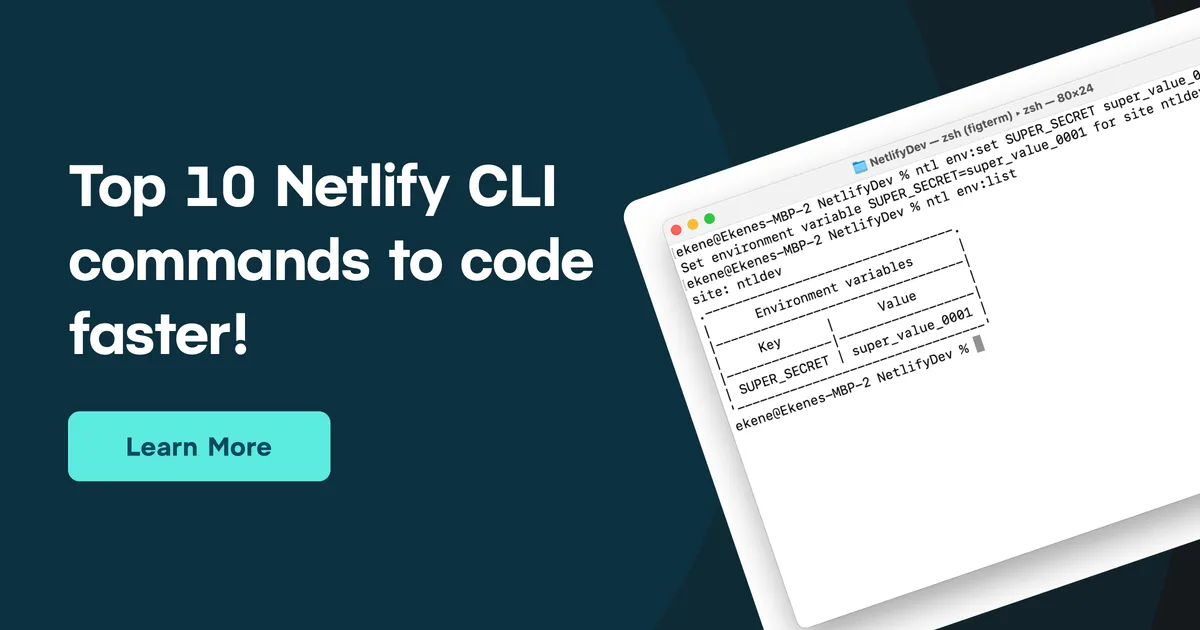
Netlify env:set
Managing environment variables are particularly challenging when working from multiple environments. With this command, you can immediately create environment variables for your Netlify site from the command line. And with your local site linked to Netlify, the environment variables set locally will be picked up by Netlify when your site is building:

You can also use the list subcommand to see a list of all the environment variables available on your site and their values.

Netlify functions
What about serverless functions on Netlify? Yes, you can create those from the CLI too! Run netlify functions:create and follow the prompts to create a Netlify function by giving it a name, selecting a language (TypeScript, JavaScript, or Go), and choosing a template for it (or not).

Subcommands like :invoke :list and :serve will allow you to directly invoke a local function, list all your functions, or serve functions locally.
And that’s it. I’ve found that using these commands helps me move faster and avoid routine and repetitive tasks. If you’d like to learn more about any of these commands, feel free to browse through the documentation. I hope they help you speed up dev time as you start to use it for your projects.