Serverless is a term we hear a lot in this industry, but what does serverless really mean? Serverless doesn’t really mean you don’t have servers, it’s more like servers as a service. Instead of owning and maintaining your own servers, you let a service do the work for you. You can focus on the business needs and developing a better quality application instead of worrying about the infrastructure and maintenance of a traditional server.
Serverless functions give developers superpowers and enables them to do things that would not otherwise have been possible. —Jason Lengstorf
Serverless Functions on Netlify
Serverless functions, branded as Netlify Functions when running on Netlify, are a way to deploy server-side code as API endpoints. These will spin up automatically when triggered by an event, handle and process server ran code, and then spin down until the next event. Using Netlify for your serverless functions creates a seamless workflow that allows you to write and test your functions locally with the Netlify CLI, build and deploy your applications, and avoid the setup, cost, and maintenance of a physical server.
On Netlify, there are several options when it comes to using serverless functions. This post is going to focus on traditional serverless functions, but you may also want to explore background functions or the new edge functions that can be distributed closer to your users.
Traditional Serverless Functions
What’s thought of as a traditional serverless function, is a short running synchronous function written in JavaScript, TypeScript, or Go that is hosted as an endpoint. It performs some server side code and then returns a response to the client immediately. These are AWS Lambda functions with a default region of us-east-1. They have a 10 second time limit and a memory limit of 1024 megabytes.
Everything that we do in technology has a tradeoff, there are pros and cons no matter what it is. Let’s look at both for serverless functions.
Pros
- lowers barrier to entry for devs
- inexpensive
- faster iteration
- quick deployments
- abstracts away the setup and maintenance of a physical server
Cons
- not built for long running processes (10 sec limit)
- stateless - does not maintain data
- cold starts - referring to the time it takes to start up when a function is invoked or ephemeral containers
Getting Started
Now we are going to walk through the steps to get a serverless function up and running on Netlify. To get started with this project, having some understanding of HTML, JavaScript, the command line, npm, and git will be helpful. Also, if you don’t already have a Netlify account, you can sign up for free here.
Project Setup
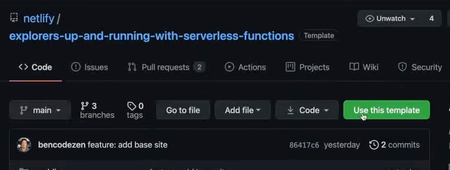
- Open the explorers up and running with serverless functions repository on Netlify’s GitHub.
- Click the Use this template button in order to create this repo inside of your own account.
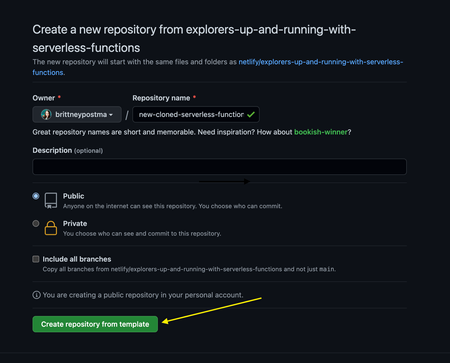
- Give your cloned repo a name and click the Create repository from template button.
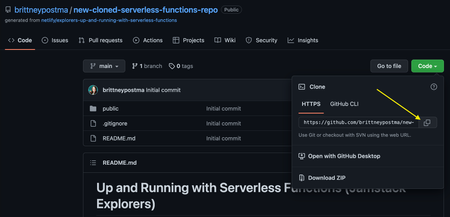
- Once you have created the new repository, click the Code button and copy the link to clone the repository.
Setting up the Project Locally
-
Open up a terminal to the location you want the project to be placed at, then run the
git clonecommand and paste your link that you copied in the last step.git clone https://github.com/brittneypostma/new-cloned-serverless-functions-repo -
You can change directory with
cdinto your new project folder directly from the terminal or open your folder in your favorite code editor.cd new-cloned-serverless-functions-repo -
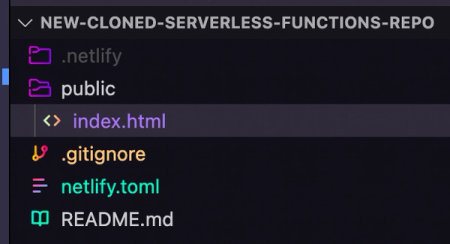
Currently there is only a
[README.md](http://README.md)and.gitignorefile and apublicfolder inside.
Netlify CLI
Now that you have the project cloned and up setup locally, we need to install the packages needed to run the serverless functions locally. First, make sure you have Node.js installed on your machine. You can check if you have it and what version by running npm --version. Now, we need to install the Netlify Command Line Interface, or CLI. Run the following command in the terminal to install it globally on your machine.
npm install netlify-cli --globalYou can either use the netlify or the shorthand ntl to run cli commands. I’ll be using the shorthand versions for the remainder of the tutorial. Check the version you are running of the cli with ntl --version.
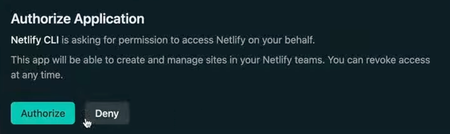
If you don’t already have a Netlify account, you can sign up for free here. Then you can login with the CLI by running ntl login and authorize the application.
 Now we need to initialize the application by running
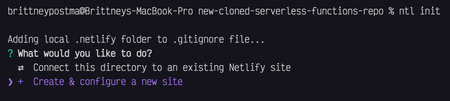
 ntl init and go through the steps to create a new site on Netlify.
- Run
ntl initand selectCreate & configure a new site.
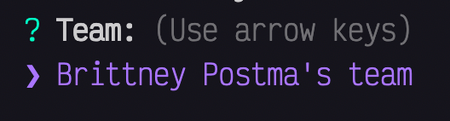
- Select the team you want to use.
- Name your site or leave it blank for a random name.

- The site is now created. You should see your admin URL, the main URL, and the site id listed in the terminal.

- The CLI will prompt us for the build command, leave this blank and the CLI will fill in
# no build command.

- Fill in the directory to deploy as the
publicfolder.

- In this step, leave the default
netlify/functionsfolder.

- And since we haven’t created a
netlify.tomlfile yet, in this step, enterYto generate one with the settings you specified.

- Once you see the Success! message, your site is ready to deploy. There are some next steps listed,
git pushto trigger a deploy or runntl opento open your new site’s dashboard.

Anatomy of a Serverless Function
The basic anatomy of any serverless function has three basic parts. It must export a handler asynchronous function and then return an object with a statusCode and body property, which typically has a JSON object that needs to be converted to a string using the JSON.stringify() method for the message to be read.
export const handler = async () => { return { statusCode: 200, body: JSON.stringify({ message: 'This is what will be returned!' }) }}Project Overview
Now that the project is set up locally and linked to a Netlify url, we can start looking through the project.
index.html
Open up the directory you created in your favorite code editor and navigate inside the public directory to the index.html file and open it up.
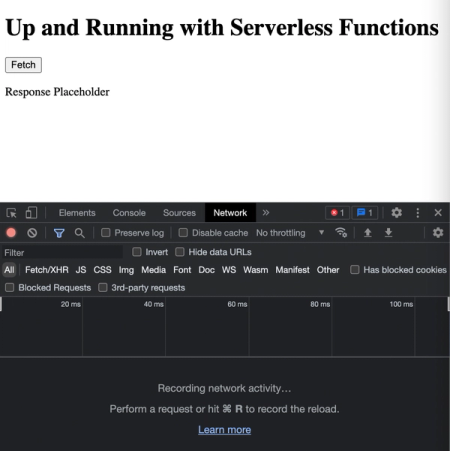
If you look inside the <body> tag, you should see an <h1> tag, a <button> with an id="fetch-btn", and a <p> placeholder for the response. In the <script> tag below, there is an event listener that listens for a click on the button and inserts the response into the placeholder area.
netlify.toml
The next file to look at is the netlify.toml file that we setup with the Netlify CLI. The build settings should be set up as follows.
[build] command = "# no build command" functions = "netlify/functions" publish = "public"
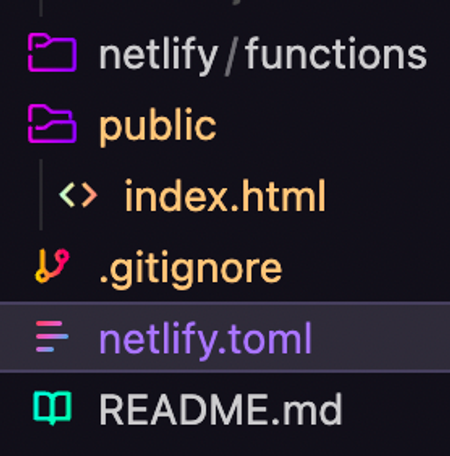
[functions] node_bundler = "esbuild"The directory for the functions defined in the toml file hasn’t been created yet. At the root of your project, create a new folder named netlify and another folder inside it named functions. The new project structure should look like this.
Creating Your First Serverless Function
Inside of the new netlify/functions directory, create a new file hello-world.js. Use the export syntax and create an async function called handler, that returns a statusCode of 200 and a body with the message that is stringified with the JSON.stringify method.
export const handler = async () => { return { statusCode: 200, body: JSON.stringify({ message: 'Hello World!', }), }}Fetching the Response
Now, let’s configure the client side JavaScript we will use to fetch the response over in the index.html file. In the script tag below the markup, there is a fetchBtn event listener set up to listen for a click on the button in the markup. Here we need to make the function async, create a variable to fetch the serverless function endpoint, and return the response. One interesting thing to point out, is when we fetch the serverless function, we need to call it at the directory .netlify, with a dot in front of it. This is to avoid name collisions with other APIs.
fetchBtn.addEventListener('click', async () => {  const response = await fetch('/.netlify/functions/hello-world')    .then(response => response.json()  )
  responseText.innerText = response})
Once the function is setup, we can run ntl dev in the console to run the development server and test the function. Open up [localhost:8888](http://localhost:8888) in the browser, open the developer console, and navigate to the network panel.
When you click on the fetch button, you will see the hello-world call come into the network panel.
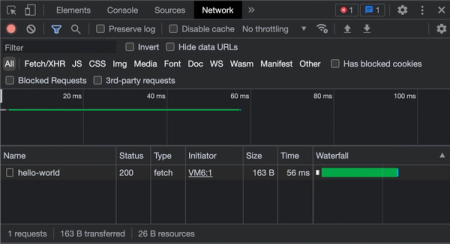
You can see the 200 status and if you click on the function and navigate to the Preview tab, you can see the object message of “Hello World!”.

You may notice the text is printing [object Object], this is because we need to stringify the response in the fetchBtn event listener function. Add the JSON.stringify(response) method and save the file.
fetchBtn.addEventListener('click', async () => { const response = await fetch('/.netlify/functions/hello-world') .then(response => response.json() )
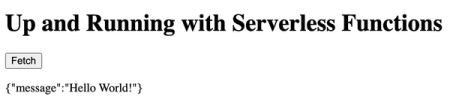
responseText.innerText = JSON.stringify(response)})If you reload the site and click the Fetch button again, now the message will display correctly.
Calling an API from a Serverless Function
External APIs can be integrated with a serverless function to grab data, that can then be used in the response. We are going to work with the Poke API, which allows you to get all kinds of information about the Pokémon world.
Creating a New Endpoint
Back in the code editor, we need to create a new file in our netlify/functions directory named pokedex.js that will house our new endpoint. This time, create a constant for the POKE_API url https://pokeapi.co/api/v2/pokedex/kanto, await the fetch call to the url, and create a new constant, data, and await the response.json(). Next, we’ll return the statusCode: 200, and stringify the data response in the body.
export const handler = async () => {  const POKE_API = 'https://pokeapi.co/api/v2/pokedex/kanto'
  const response = await fetch(POKE_API)  const data = await response.json()
  return {    statusCode: 200,    body: JSON.stringify({      data    })  }}
Fetch the Pokédex Endpoint
Back in the index.html file, first we will need to add a new button to fetch the pokedex.js endpoint we just created. Add a new button to the markup, with the id fetch-pokedex-btn and the text Fetch Pokedex.
<button id="fetch-pokedex-btn">Fetch Pokedex</button>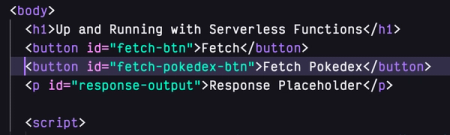
Next in the script tag, create a constant and add the element selector.
const fetchPokedexBtn = document.getElementById('fetch-pokedex-btn')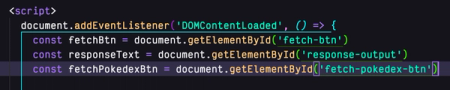
And finally, create a new event listener function for a click on the fetch-pokedex-btn to add the stringified data to the innerText of the variable set to the p tag.
fetchPokedexBtn.addEventListener('click', async () => {  const response = await fetch('/.netlify/functions/pokedex')    .then(response => response.json())
  responseText.innerText = JSON.stringify(response)})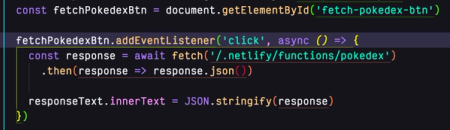
At this point, if you run the server with ntl dev, you will see both of the buttons we created, but the Fetch Pokedex button will return an error. Checking the network panel and the terminal for the issue, we’ll see a 500 error and an errorMessage: "fetch is not defined".
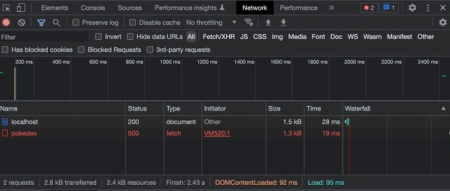

This happens because the serverless function running at the pokedex.js endpoint is on a Node.JS server. Node does not have access to the native fetch API provided inside the browser. As a result, we need to install a dependency that will allow us to run fetch on a Node server. Shut down the server with ctrl+C and follow the next steps to set up server-side fetch.
Initializing NPM
To install packages inside of our application, we need to create initialize this as a npm project. To do that, run npm init in the root directory of your project. This will walk through steps to create a package.json file. You can leave everything as default by hitting Enter through each step or change anything by typing it in and then hitting Enter. Once complete, it will ask you “Is this OK?” and you hit Enter for yes or type no if you wish to start over.
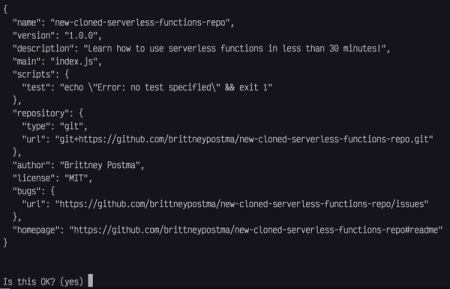
Once you say yes and hit Enter, a new package.json file will be created at the root of your project with the above information.

This file is responsible for keeping track of any dependencies and some basic details of the project.
ESM Support in Node
As of Node.js version 17.0.0, ESM, or ECMAScript modules, support became available in any Node.js application. Some libraries, like the one we will be installing next, have made the ESM migration. While you can use libraries with or without ESM, you can’t pick and choose the syntax you use. You must completely convert your application to ESM or stick with the old syntax. The original videos this tutorial is based on used the older syntax for the serverless functions. We have since updated the repo and this guide is using the newer ESM supported syntax. To convert over to ESM, add a "type": "module" to the package.json file and switch the exports.handler = async function () to const handler = async () =>. If you have any imports using the require() syntax, they will also need to be converted to import name from 'package' syntax.
Replace the CommonJS syntax:
const fetch = require('node-fetch')
exports.handler = async function () {
with the ESM syntax:
import fetch from 'node-fetch'
export const handler = async () => {
We also need to update the netlify.toml file to tell Netlify to use esbuild for the serverless functions when they are deployed. Add the setting node_bundler = "esbuild" under [functions]
[functions] node_bundler = "esbuild"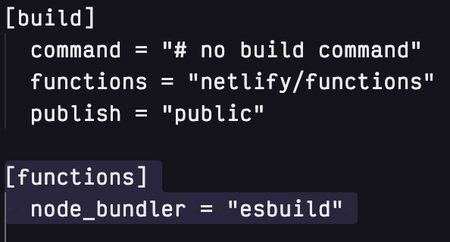
Installing Packages
Now that we have the package.json file created, we can install a Node fetch library. In the terminal, run the command npm install --save-dev node-fetch. Once it is completed, you will see a new devDependencies property with the node-fetch library in the package.json file and a new package-lock.json file created automatically.

Your version will probably look different than mine. If you run into any issues, try removing node-fetch with the npm rm node-fetch command and then install npm install --save-dev node-fetch@3.2.8 to install the save version.
Import Packages
Head back to the netlify/functions/pokedex.js file where we need to import and use the node-fetch library we just installed. We’ll need to use the import syntax, since version 3 and greater of the node-fetch library uses ESM syntax. Add this line to the beginning of the file.
import fetch from 'node-fetch'Don’t forget, you also have to update the package.json file with a "type": "module" property if you didn’t already to tell it to use ESM as well.
Now if you start the server again with ntl dev and navigate to [localhost:8888](http://localhost:8888) in the browser, you can see the function run successfully.
Deploying Serverless Functions
Earlier we setup and linked a site to Netlify with the Netlify CLI. Any time we make a push to the git repository that is linked to the Netlify site, a deploy will automatically trigger. Let’s go ahead and run the commands to push our code and trigger a deploy.
- Shut down your server, if it isn’t already, with
Ctrl+C. - Add all of the files with the
git add .command, I have 7 changes to commit.
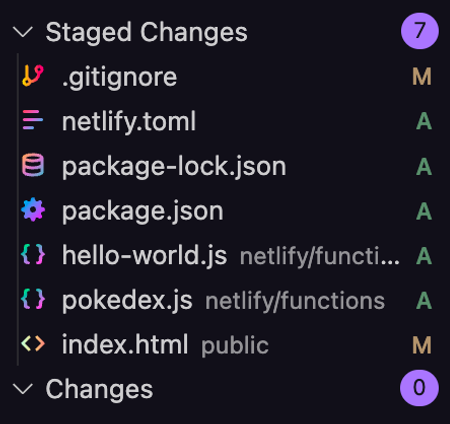
-
Commit the files with a message about what was changed.
git commit -m 'Set up a Netlify site with 2 serverless functions.' -
Push the changes up to your git provider with
git pushorgit push origin main.
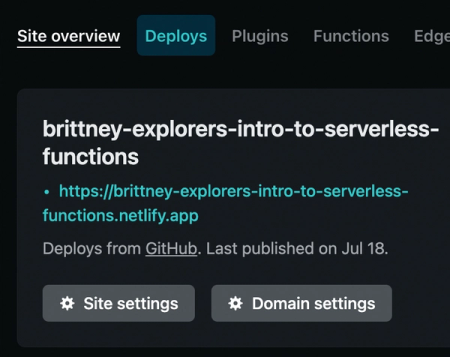
That push will have set off a deployment on Netlify. You can run ntl open to open the Netlify dashboard linked to your site. Once there, you can click directly on the url to open the site or click on the Deploys tab to see the last deployment log.
To see the serverless functions we created, click on the Functions tab.
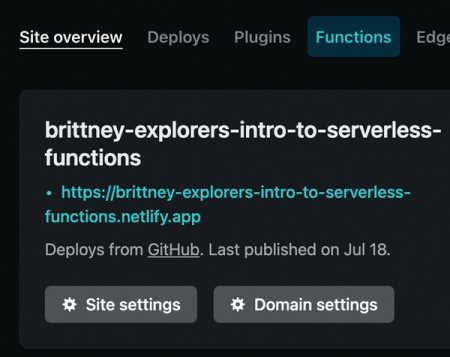
You should then see the 2 functions listed by the name of the files.
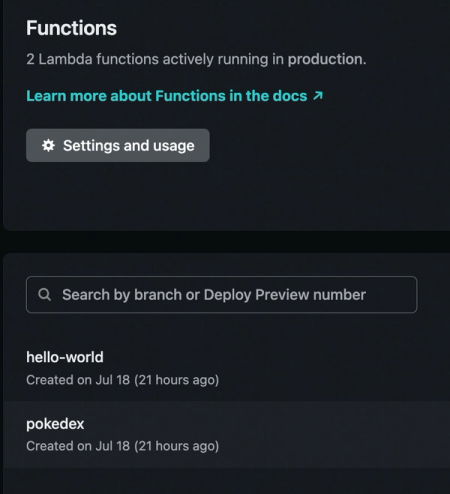
You can further click into each function to see the times and logs from when they were ran.
Customizing the Serverless Functions Request
Any serverless function can do stuff to the data before it returns to the frontend. It can be customized in whatever way you need it and only return the things you want to use. In our example the pokedex.js is returning all of the data about every Pokémon and wasting space on information we probably don’t need. Back in the pokedex.js file in your code editor, customize the data object being returned in the body to limit it to only the pokemon_entries.
import fetch from 'node-fetch'
export const handler = async () => {  const POKE_API = 'https://pokeapi.co/api/v2/pokedex/kanto'
  const response = await fetch(POKE_API)  const data = await response.json()
  return {    statusCode: 200,    body: JSON.stringify({      pokemon: data.pokemon_entries    })  }}
This will limit what is returned to just a list of the Pokémon without some of the extra data.
Fetching Different Data
Back in the index.html file, we’ll add another button and update our current one to grab 2 different types of data. Update the button with the id fetch-pokedex-btn to the id fetch-kanto-btn. Then add a new button with an id of fetch-hoenn-btn.
<button id="fetch-kanto-btn">Fetch Kanto Pokedex</button><button id="fetch-hoenn-btn">Fetch Hoenn Pokedex</button>We’ll also need to update the variables and functions in the script tag. Replace the fetchPokedexBtn line with the new variables that grab the new ids.
const fetchKantoBtn = document.getElementById('fetch-kanto-btn')const fetchHoennBtn = document.getElementById('fetch-hoenn-btn')Next, we have to update the event listener functions to grab the different data types. First, update the name on the current fetchPokedexBtn event listener to be fetchKantoBtn. Now we can edit the data coming back by using the native fetch API, which takes an options object as a second parameter, to pass a POST method and send the custom data back to the serverless function. Here we want to specify the kanto region for the Pokémon API.
fetchKantoBtn.addEventListener('click', async () => {  const response = await fetch('/.netlify/functions/pokedex', {    method: 'POST',    body: JSON.stringify({      region: 'kanto'    })  })    .then(response => response.json())
  responseText.innerText = JSON.stringify(response)})
We also need an event listener function for the “Fetch Hoenn Pokedex” button. We’ll do the same thing, but switch out the kanto region for hoenn.
fetchHoennBtn.addEventListener('click', async () => {  const response = await fetch('/.netlify/functions/pokedex', {    method: 'POST',    body: JSON.stringify({      region: 'hoenn'    })  })    .then(response => response.json())
  responseText.innerText = JSON.stringify(response)})
Event and Context Parameters
All serverless functions accept two parameters, event and context. The event object includes information about the request and the context parameter includes information about the context that the function was called in. We can use the event object to grab the custom headers we are sending along with the requests we added to our index.html code. In the pokedex.js file, add the two parameters to the handler function and log the event and context with console.log(event, context) I like to wrap the variables I am logging in an object, {}, to see the name when it comes through.
import fetch from 'node-fetch'
export const handler = async (event, context) => {  console.log({event}, {context})  const POKE_API = 'https://pokeapi.co/api/v2/pokedex/kanto'
  const response = await fetch(POKE_API)  const data = await response.json()
  return {    statusCode: 200,    body: JSON.stringify({      pokemon: data.pokemon_entries    })  }}
Save the file and run ntl dev, click on one of the Fetch Kanto Pokedex button and in the terminal you will see a lot of data coming back. The important part here is the event.body, which you will see is the region of the Pokémon that we sent through the POST method.

We are going to use this information by creating a variable to hold the parsed event.body and then update the url that is fetched to dynamically update depending on the region sent.
import fetch from 'node-fetch'
export const handler = async (event, context) => {  const eventBody = JSON.parse(event.body)  const POKE_API = 'https://pokeapi.co/api/v2/pokedex/' + eventBody.region
  const response = await fetch(POKE_API)  const data = await response.json()
  return {    statusCode: 200,    body: JSON.stringify({      pokemon: data.pokemon_entries    })  }}
Now if you refresh the page and click the two Pokedex buttons, you will see two separate sets of data based on the region specified. You can add, commit, and push your code to git to kick off a new deploy of the site.
Next Steps with Serverless Functions
Great job! You have experienced how serverless functions can give developers superpowers to build and customize functionality in their applications. This allows you to solve business needs with a wider range of tools and techniques without needing to manage any infrastructure. Now there’s a whole realm of possibilities for you to explore with serverless functions. To learn more about how you can get the most out of serverless functions with Netlify be sure to check out the official docs where you can learn more about other solutions, such as background functions, which allow you to execute longer running scripts, using serverless techniques. I can’t wait to see what you build with Netlify functions. Remember, if your experience is different from anything written here or something didn’t work as expected, please let us know about it here and we will help you or answer any questions you have.