Static sites powered by data from a CMS are fantastic. Manage your content in a tidy UI. Publish your content. Kick off a new build with a build hook, and bam! Your new blog post is live in a matter of minutes, served as a static asset from a CDN. But what if you’d like to preview your new blog post without pushing the publish button — on a shareable URL, as a static asset, served from a CDN? Because we all make typos once in a while, right?
The good news is this is entirely possible on Netlify using a combination of build hooks, branch deploys, and a bit of custom code. In theory, this approach could work for any static site, hosted on any platform, powered by any CMS! And in this article we’re going to learn how to preview your draft content stored in Contentful by building a custom Contentful app, which builds a preview branch of your static site.
To make our system for content previews possible, we’ll do five things. We will:
- Create a new branch deploy in Netlify that we’ll use to preview draft content
- Create a build hook URL to deploy the preview branch to a live URL
- Create a new custom Contentful app to trigger the build hook
- Deploy your new Contentful app to Netlify
- Automatically keep your preview branch up to date with changes in production with a bonus GitHub Action
Ready to dig in? Great, let’s get into the details. But before we get started, this article assumes you are familiar with building a static site with data fetched from a CMS at build-time, and:
- You fetch data from Contentful and build the content to a static site,
- You host your static site on Netlify,
- You want to preview draft content in Contentful without deploying to production,
- And you are familiar with the concept of a Contentful app.
Let’s get to it.
Configure the preview branch
We’re going to create a new branch from our production branch that will fetch our draft content and be deployed separately to Netlify as a branch deploy. Think of this as a separate environment to production. You might be familiar with the concept of a staging environment, for example, that development teams used to test changes on a live URL.
The first step is to configure a preview branch that will fetch draft content from Contentful. Using Git, checkout a new branch from main (I called mine preview) and let’s modify the code that fetches data from Contentful to use the preview API. This will be unique to your situation depending on whether you’re using the GraphQL API, or a client library that uses the REST API.
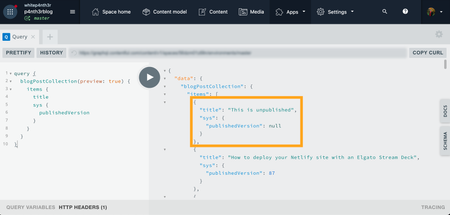
If you’re using the GraphQL API, pass in preview: true to the Contentful query.
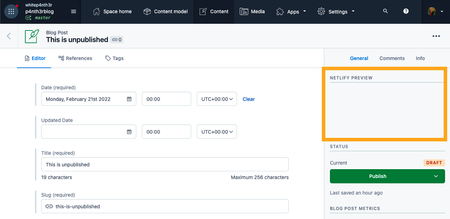
query { blogPostCollection(preview: true) { items { title sys { publishedVersion } } }}To confirm that the code is returning draft content, you can inspect sys.publishedVersion on each item, which will return null for unpublished content. Here’s a screenshot from the Contentful GraphQL Playground App to demonstrate.
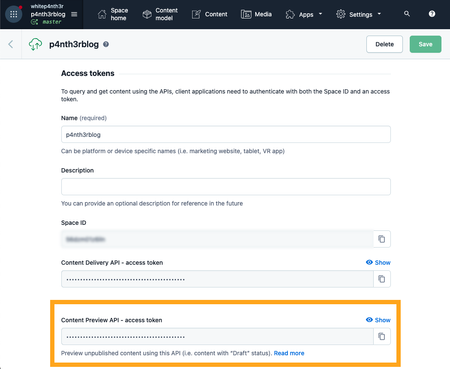
Fetch the data from the Contentful GraphQL API in your code using a Content Preview Access Token, which you can find in Settings > API Keys.
Make sure to add the access token as an environment variable to Netlify, so you’re not storing a secret in the code. If you’re using the Netlify CLI, you can add new environment variables from the command line — no .env file required! Running the app locally with netlify dev will inject environment variables stored against your Netlify site.
netlify env:set CONTENTFUL_PREVIEW_ACCESS_TOKEN your_access_token_valueHere’s a short snippet showing how to call the Contentful GraphQL API for your preview content using JavaScript fetch. This is just an example, and the final implementation will be unique to you.
async function getPreviewContent() {  const query = `query {    blogPostCollection(preview: true) {      items {        title      }    }  }`;
  const data = await fetch(`https://graphql.contentful.com/content/v1/spaces/${CONTENTFUL_SPACE_ID}`, {    method: "POST",    headers: {      Authorization: `Bearer ${CONTENTFUL_PREVIEW_ACCESS_TOKEN}`,      "Content-Type": "application/json",    },    body: JSON.stringify({ query }),  }).then((response) => response.json());
  return data;}
If you’re using the Contentful REST API via the JavaScript client library, modify your call to contentful.createClient to use the preview accessToken and preview host to fetch draft content.
const contentful = require('contentful')
const client = contentful.createClient({  space: '<space_id>',  accessToken: '<content_preview_api_key>',  host: 'preview.contentful.com'})
For more guidance on how to fetch draft content from Contentful using your particular client library or language, visit the official documentation. Once you’ve configured your new preview branch, commit your code and push up that branch.
Set up a new branch deploy in Netlify
By default, Netlify deploys your site’s production branch after every change. A branch deploy allows you to deploy additional branches as you push changes, as well!
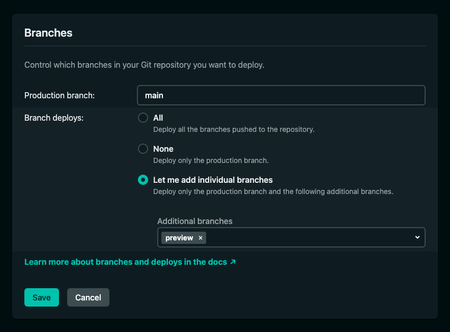
In the Netlify UI, select your site on the Sites page. Then go to Site settings > Build & deploy > Continuous Deployment > Branches, and select Edit settings. Select Let me add individual branches, and below Additional branches, add the name of your preview branch.
Create a build hook for your preview branch
Build hooks are URLs you can use to trigger new builds and deploys. If you’re already deploying your static on Netlify site each time you publish to Contentful, you’ve probably already set up a deploy hook for your production branch.
Navigate to Site settings > Build & deploy > Continuous deployment > Build hooks, and click on Add build hook. Give your new build hook a name (I chose Contentful preview), choose your preview branch from the dropdown, and click Save.
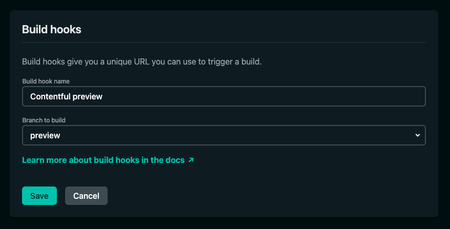
Your new build hook for your preview branch is now configured, and we’ll come back to grab this value later.

Now we’ve created a preview branch to fetch draft content, set up a branch deploy, and configured a new build hook, the next step is to create a custom Contentful app that will deploy the preview branch at the click of a button.
Create a new Contentful app
Contentful apps are React apps that you can use to add custom functionality to your Contentful space. The Contentful App Framework also comes with its own design system and components — Forma 36 — that you can use to speed up development, and ensure the app’s look and feel fits with the style of the Contentful UI.
We’re going to create a new Contentful app that will trigger the preview branch build hook at the click of a button — and we’re also going to host this on Netlify! If you’re not already familiar with Contentful apps and you’d like some guidance on getting started, check out this tutorial from Contentful that takes you through building your first app from scratch.
To create a new Contentful app, open up your terminal and use the following command. This will bootstrap a new Contentful app and install all dependencies for you. You can choose any name you like for your new app, I chose netlify-preview-contentful-app.
npx create-contentful-app init netlify-preview-contentful-appAdd your Contentful app to Netlify
Before we write any custom code, let’s set up the infrastructure. First, push your bootstrapped Contentful app to GitHub/GitLab/BitBucket, and let’s add the app to Netlify using the Netlify CLI.
Run the following command to install the Netlify CLI.
npm install netlify-cli -gUsing your terminal, run:
netlify initSelect the team for your app, and give it a name. There’s no need to deploy just yet!
Add two environment variables
We’re going to add two environment variables to our Contentful app on Netlify. Given that this is a React app, all environment variables need to be prefixed with REACT_APP_ .
First, add the REACT_APP_NETLIFY_BUILD_HOOK environment variable. The value of this variable is the Contentful preview build hook you created earlier.
netlify env:set REACT_APP_NETLIFY_BUILD_HOOK https://api.netlify.com/build_hooks/678910Next, if you’d like to create a button to open your Netlify dashboard after you’ve created a preview deploy, add the REACT_APP_NETLIFY_URL environment variable, switching out the value for whichever URL you like.
netlify env:set REACT_APP_NETLIFY_URL https://app.netlify.com/teams/myteam/overviewNow it’s time to install this app to your Contentful space.
Install your app to Contentful
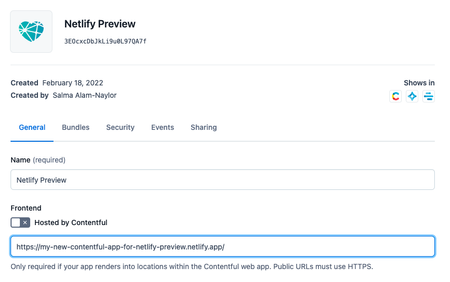
Follow the instructions on this tutorial from Contentful under “Embed your app in the Contentful web app” to install your local app to your Contentful space. The magic of the Contentful App Framework is that you can install locally running apps to your Contentful space whilst you’re developing. Install your app using the URL http://localhost:3000, and we’ll switch that out for the live Netlify URL later.
When creating your AppDefinition, name your app “Netlify preview” or similar, make sure to select the Entry Sidebar location, and click Create at the top right of the screen. Install your app, and make sure to assign your app to a content type (such as blogPost), and configure it to show in the entry editor sidebar. (All instructions for this are in the linked Contentful tutorial!)
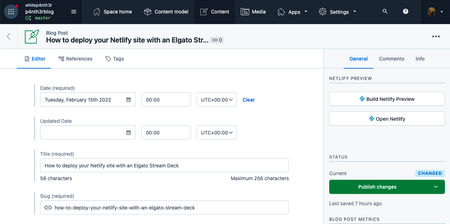
When you see an empty “Netlify Preview” app in the sidebar of your entry editor — it’s time to write some code!
Build the Netlify buttons
In your new Contentful app code, open up the Sidebar.tsx file found in src/components/. We’re going to use two components from Forma 36 to build our app. Add the following to the top of the Sidebar.tsx.
import { Button } from "@contentful/f36-button";import { Stack } from "@contentful/f36-core";Next, let’s set up the function that will trigger the build hook. Anywhere in the file, add the following async function code. When run, this function will send a post request to the build hook you set up for the preview branch — and kick off a deploy!
async function triggerBuildHook() { try { await fetch(`${process.env.REACT_APP_NETLIFY_BUILD_HOOK}`, { method: "POST", }); } catch (e) { console.log(e); }}Next, add two Button components inside a Stack component in the return of the Sidebar function. The first button will run our triggerBuildHook function, and the second (optional) button will open up our Netlify dashboard.
const Sidebar = (props: SidebarProps) => { return ( <Stack flexDirection="column" spacing="spacingM"> <Button size="medium" isFullWidth onClick={triggerBuildHook}> Build Netlify Preview </Button> <Button size="medium" isFullWidth as="a" href={process.env.REACT_APP_NETLIFY_URL} target="_blank"> Open Netlify </Button> </Stack> );};Run your app locally with netlify dev to make sure the app picks up the environment variables you set earlier. Now, given that Contentful has access to your app running locally on https://localhost:3000, when you click the “Build Netlify Preview” button, a new Netlify deploy of your preview branch will be triggered! It’s like magic!
Commit and push your Contentful app code, and let’s deploy!
Deploy your Contentful app to Netlify
Head on over to your terminal. In the root of your Contentful app project, use the following command to deploy the app to Netlify. Your environment variables are all set up, so you’re good to go.
netlify deploy --prodPoint your Contentful app to the live URL on Netlify
In the Contentful UI, navigate to Apps > Manage Apps and scroll down to find your Netlify Preview app. Click on the three dots to the right and select Edit app definition.

Switch out http://localhost:3000 for the live URL of your app on Netlify.
And you’re done! You have successfully deployed a custom Contentful app that publishes draft content to your preview branch on your static site. Great work!
But we’re not done yet. Here’s some bonus content for you to finish up.
Bonus content: create a GitHub action to keep your preview branch up to date
The preview branch we created will exist forever — or as long as you want to keep deploying content previews(!) — and won’t be merged into the production branch. However, your production branch code is likely to change, in which case you’ll want to make sure your preview branch stays up to date with production as the code evolves. If this sounds too much like manual hard work, don’t despair! We can automate this!
If your project code is hosted on GitHub, we can write a GitHub Action to automatically merge a production branch back into the preview branch — every time a PR is merged. Huge thanks to Alexander Karlstad for this blog post that provided the boilerplate for this handy addition to the workflow!
At the root of your static site project, create a .github directory, and inside that, create a workflows directory. (Skip this step if you already use GitHub Actions in your project.)
Inside the workflows directory, create a new file. Name it auto-merge.yml and add the following code:
name: Merge main to previewon: pull_request: branches: [main] types: [closed]jobs: merge-main-to-preview: if: github.event.pull_request.merged == true timeout-minutes: 2 runs-on: ubuntu-latest steps: - uses: actions/checkout@v2 - name: Set Git config run: | git config --local user.email "actions@github.com" git config --local user.name "Github Actions" - name: Merge main to preview run: | git fetch --unshallow git checkout preview git pull git merge --no-ff main -m "Auto-merge main to preview" git pushCommit and push the new GitHub Action to GitHub. This will trigger when a pull request to the production branch (main) is closed and merged, and merges the production branch (main) into the preview branch (preview). Switch out main and preview if your branches are named differently. And just like that, your preview branch is kept up to date!
View the source code
If you’d like to take a look at the source code for my Contentful app that deploys a preview branch with my draft content, head on over to the repo on GitHub.
And that’s a wrap!
Previewing draft content on your static site gives you peace of mind and the confidence to hit that publish button. Happy previewing! And if you’ve got any questions — find me on Twitter!


