With the release of Netlify Edge Functions, the Netlify team has been focused on helping surface the constantly growing list of ways to utilize The Edge. Edge Functions allow you to serve content from the CDN server closest to the user. With just a bit of JavaScript or TypeScript, developers can use edge functions to modify network requests at the edge so it’s closer to your site visitors around the globe. I had personally heard a lot of really solid use-cases around localization and internationalization, but was curious what the story around data delivery was.
Our friends at PolyScale were able to shed some light on the growing need to make sure that not only are your web pages being served closer to your users, but your database interactions as well. Polyscale is a Global Database Cache as a Service. Scale low latency database reads globally, without deploying servers or writing code. They also allow you to bring your own database, which in this tutorial will be a Postgres DB through Supabase.
Our goal today will be to query some “product” data from Supabase, but with PolyScale cache as the first touch point inside of an edge function. At the end you will be able to bring edge functions using PolyScale to any project and make your interactions with your database… blazingly fast 😏.
Prerequisites
Before getting started you’ll need accounts with:
We’re going to be using VSCode, so it will be helpful to have the following extensions installed:
We’ll also be taking advantage of a few CLI’s throughout the tutorial:
Scaffold the base project
To build this project, we’re going to use Astro as our framework. Thankfully the Astro team has built a really great CLI experience to make sure we have all the things we need to get up and running swiftly. Let’s get our project started using the Astro CLI.
yarn create astro..or using npx
npx create-astro@latestThis will launch you into their CLI wizard, where you can decide the needs for your project scaffold and get going. For the purpose of this tutorial, choose the base Typescript configuration and recommended settings.
Pushing to Github and deploying on Netlify
Let’s initialize a repo so we can track our changes and deploy live to the web as we go.
Start off with a quick command to initialize the repository.
git initThen let’s get all of our current changes added and pushed to the main branch, so we can create a repo.
git add .git commit -m "Initial commit"Now, using the Github CLI we can create our repo and push our code to it.
gh repo create {your-project-name} -s=. -r=upstream --public --pushThis command will:
- create your repo
- name it (make sure to replace {your-project-name} with the value you want)
- set the remote of our repo to upstream
- designate the repo as public
- push up our commits
…all in one command!
We can see that everything is successful by running
gh repo view -wWe’re going to create a new project on Netlify, with our new repo as the base by connecting the new git repository we just created to your Netlify account. Thankfully Netlify makes this quick and neat. Run this next command at the root of your project directory.
netlify init.. and fill in the prompts as they come:
- What would you like to do?
Create & configure a new site - Team:
YOUR_TEAM - Site name (optional):
CHOOSE_UNIQUE_SITE_NAME
The Netlify CLI will auto-detect that you’re using Astro, so the following prompts will be pre-filled. Hit enter to use the defaults.
- Your build command (hugo build/yarn run build/etc):
(astro build) - Directory to deploy (blank for current dir):
(dist) - Netlify functions folder:
(netlify/functions)
This will return an Admin URL and base URL link in the console and move on to a few more prompts:
- Authenticate Github through Netlify
- leave build command blank (default)
- leave netlify functions folder blank (default)
Once all that is done, run a command to view our site in the Netlify UI.
netlify openIn less than 10 commands, we’ve pushed to Github with a full CI/CD pipeline for Netlify deploys. Sweet 😏!
Create the Supabase database
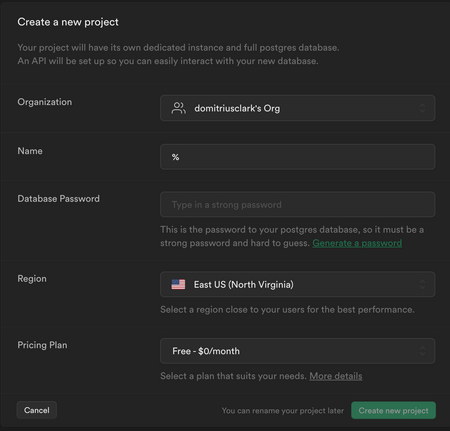
With our project code ready, we can move on to setting up the services we’ll be using. Before moving on create a Supabase account. Once you’re logged in you will land on the Dashboard. Select Create a new project. Fill in the fields shown below and click Create a new project. The Create a new Project page will have some fields we’ll need to fill in before selecting to create the project.
After a few minutes, your database should be provisioned and ready to start creating tables and entries inside of it. Let’s go ahead and click the Table Editor button and create our schema.
Create a new table, named products. Keeping everything else as is, we’ll set up our columns for a product:
Next, set the name and price columns to non-nullable values to make sure we’ve always got at least that data available to us when we query. Now all that’s left is to grab a few values we’ll need to configure PolyScale and we’re done with Supabase for now!
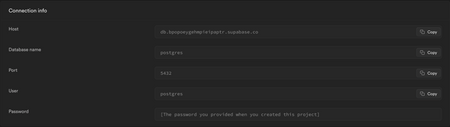
Navigate to project settings → Database then copy from the Connection info section at the top.:
- Host
- Database name
- Port
- user (or username as PolyScale will call it)
- password (the one we created earlier for the database)
Set up the PolyScale Cache
Next up on our list to create our PolyScale cache. PolyScale caches database data locally to users reducing latency, accelerating read performance, and scaling throughput.
Navigate to PolyScale’s website and create your account. Once you’re logged in and on the Dashboard, select the New Cache button.
Once your cache is created, click Connect to navigate to the page containing our connection details.

Copy your connection URI into your editor of choice, where you can replace Username, Password, and Database using the Supabase values we copied previously.
- user (or username as you’re seeing PolyScale name it)
- password (same one from earlier)
- database → postgres
We’ll need these to create the connection URI for the PolyScale cache. It will look like →
postgres://postgres:testingpolyscale@psedge.global:5432/postgres?application_name=b17486c3-0f61-4358-8f0b-ea78ed6f6a1d
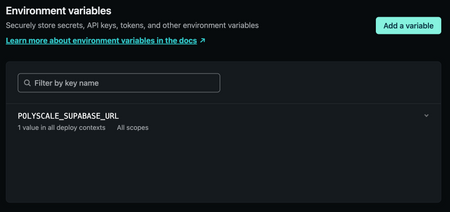
To finish things out let’s hop over the Netlify UI and save our environment variables so our edge function has access to them and we’re not storing sensitive data in the code.
Create an Edge function to query the DB
If you’ve never interacted with Netlify Edge Functions before, you should take some time to check out Deno. Deno is a JavaScript and Typescript runtime with secure defaults and a great developer experience. Deno is the runtime Netlify uses for edge functions, unlike Netlify’s serverless functions that use Node.
We’re ready to create our edge function and start querying our data! Create a new netlify folder at the base of the project. Afterwards, create the edge-functions folder inside of your new netlify folder! Now, Inside your edge-functions folder, create a file named getProducts.ts. Your file structure should now resemble the image below:
We can delete the HTML that lives in /src/pages/index.astro and replace it with this code:
---import Layout from "../layouts/Layout.astro";---
<Layout title="Welcome to Astro.">  <main>    <h1>Serving products from the Edge</h1>      <div class="products">  <span id="products"></span>      </div>  </main></Layout>
Inside of our new getProducts file, copy and paste the following code:
// Below this fold are our URL imports. You can read more about that here https://deno.land/manual@v1.0.0/linking_to_external_codeimport { Client } from "https://deno.land/x/postgres@v0.17.0/mod.ts";import { HTMLRewriter } from "https://raw.githubusercontent.com/worker-tools/html-rewriter/master/index.ts";
import type { Context } from "https://edge.netlify.com/";
type Product = {  id: number;  created_at: string;  name: string;  description: string;  price: number;  done: boolean;};
export default async (_request: Request, context: Context) => {  try {     /*  1.  Here we create and connect to our Supabase DB through        PolyScale's URI from our env variables     */
    const config = Deno.env.get("POLYSCALE_SUPABASE_URL");    const client = new Client(config);    await client.connect();
     /*  2.  context.next() grabs the next HTTP response in the chain so        we can intercept and modify it. Learn more about modifying        responses at https://docs.netlify.com/edge-        functions/api/#modify-a-response     */
     const response = await context.next();     const products = await client.queryObject("SELECT * FROM products");

     /*         3.         First we help narrow the products type, so Typescript can know         the shape of a Product. Then we create some html based on the         products coming from the DB so we can drop it into our rewrite         function below     */     const products: Product[] = result.rows as Product[];     const productsHTML = products.map((product) => {       return `<p>${product.name}</p>`;     });
      /*         4.         Now we're going to find and replace an element using         HTMLRewriter with the HTML we created above.      */
      return new HTMLRewriter()        .on("span#products", {           element(element) {             element.replace(productsHTML.join(""), {              html: true,           });        },      }).transform(response);  } catch (error) {    console.log(error);    return;  }};
The final step of our edge function creation is to create a netlify.toml in our base directory.
Once that’s created fill in the code below.
[[edge_functions]] function = "getProducts" path = "/"Time to test this out and run our application using Netlify:
netlify devRight away you should see the products coming in from the Database. Since we are using the Netlify CLI, we have access to our environment variables without having to worry about setting them up in a local .env file!
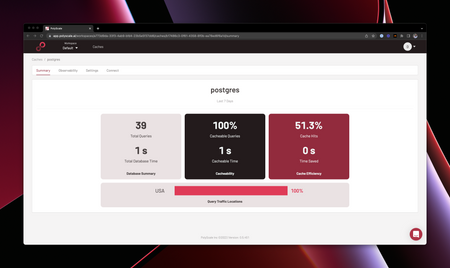
Let’s go back to the PolyScale summary page. We can see that PolyScale is successfully tracking our queries!
We’ve proven our code works. Commit and push our code to trigger our redeploy on Netlify.
It’s working! Now what?
After successfully setting up PolyScale, I’m sure you’re left thinking: “Okay, but how does this apply out in the real world?” In our case, we’re not handling large queries, nor serving users in the locations where you’d find this the most impactful. With the knowledge you’ve gained, you’re now able to bring this into applications where you’ve already got a database setup, and pull in the edge function you’ve learned about today right into the action.
If you’re curious about performance differences of a database using and not using PolyScale, there’s an amazing resource from the PolyScale folks that will do just that!


