Changelog
-
A denial-of-service (DoS) vulnerability (CVE-2026-23869, CVSS 7.5) has been disclosed affecting React Server Components (RSCs), a feature used by Next.js and other React metaframeworks. A malicious payload can cause excessive CPU consumption. Here’s what Netlify customers need to know.
Impact on Netlify
Nominally, this is a server-side DoS vulnerability. However, on Netlify this has minimal impact: our autoscaling serverless architecture means that a malicious request resulting in a crashed or hung function does not affect other requests. However, active exploitation could increase your function costs.
Affected frameworks
All RSC frameworks are affected:
- Next.js (see version table below)
- React Router 7 (if using RSC preview)
- Waku
@parcel/rsc@vitejs/plugin-rsc
Astro, Gatsby, and Remix are not affected.
React affected versions
See the React advisory for full details.
Affected versions Fixed in 19.0.0–19.0.4 19.0.5 19.1.0–19.1.5 19.1.6 19.2.0–19.2.4 19.2.5 Next.js affected versions
See the Next.js advisory for full details.
Affected versions Fixed in 13.3.0+ EOL - no fix 14.x EOL - no fix 15.0.0–15.5.14 15.5.15 16.0.0–16.2.2 16.2.3 What should I do?
If any of your projects are using an affected version, we recommend upgrading as soon as possible to a patched release.
For Next.js 13.x and 14.x users: patches are not planned for these versions. Consider upgrading to Next.js 15.x or 16.x.
Note that any publicly available deploy previews and branch deploys may remain vulnerable until they are automatically deleted. Consider deleting these deploys manually.
Resources
-
Watching a deploy? You’ll notice logs now appear faster and more smoothly in the Netlify UI. We’ve reduced log delivery latency and decreased the size of the batches sent to the browser, so output streams in closer to real time.
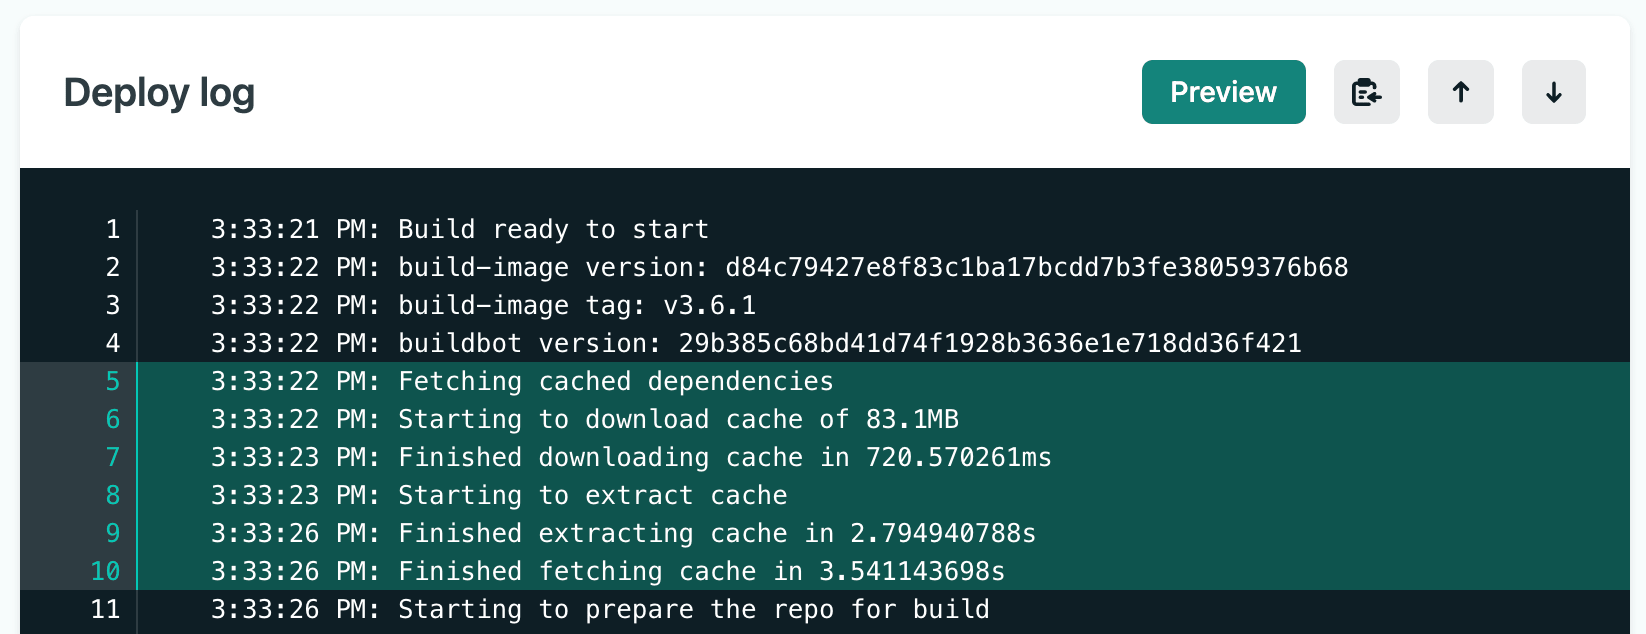
This means less waiting and fewer large chunks of text appearing all at once. Instead, logs flow steadily as your build progresses — making it easier to follow what’s happening and catch issues early.
Deploy logs are available on the detail page of every deploy and show build image details, dependency caching, all standard output from your build, Build Plugin execution, and the final deploy status. For successful deploys, highlights are automatically included in the deploy summary.
You can also share specific log lines with your team — select a line number to highlight it, or shift+click a range to generate a shareable URL. Select the clipboard icon to copy the entire log.
For more details, check out the deploy log documentation.
No changes are required on your end. The improvement applies automatically to all deploy logs viewed on app.netlify.com.
-
You can now deploy sites to Netlify directly from OpenAI Codex using the Netlify plugin in the Codex plugin directory.
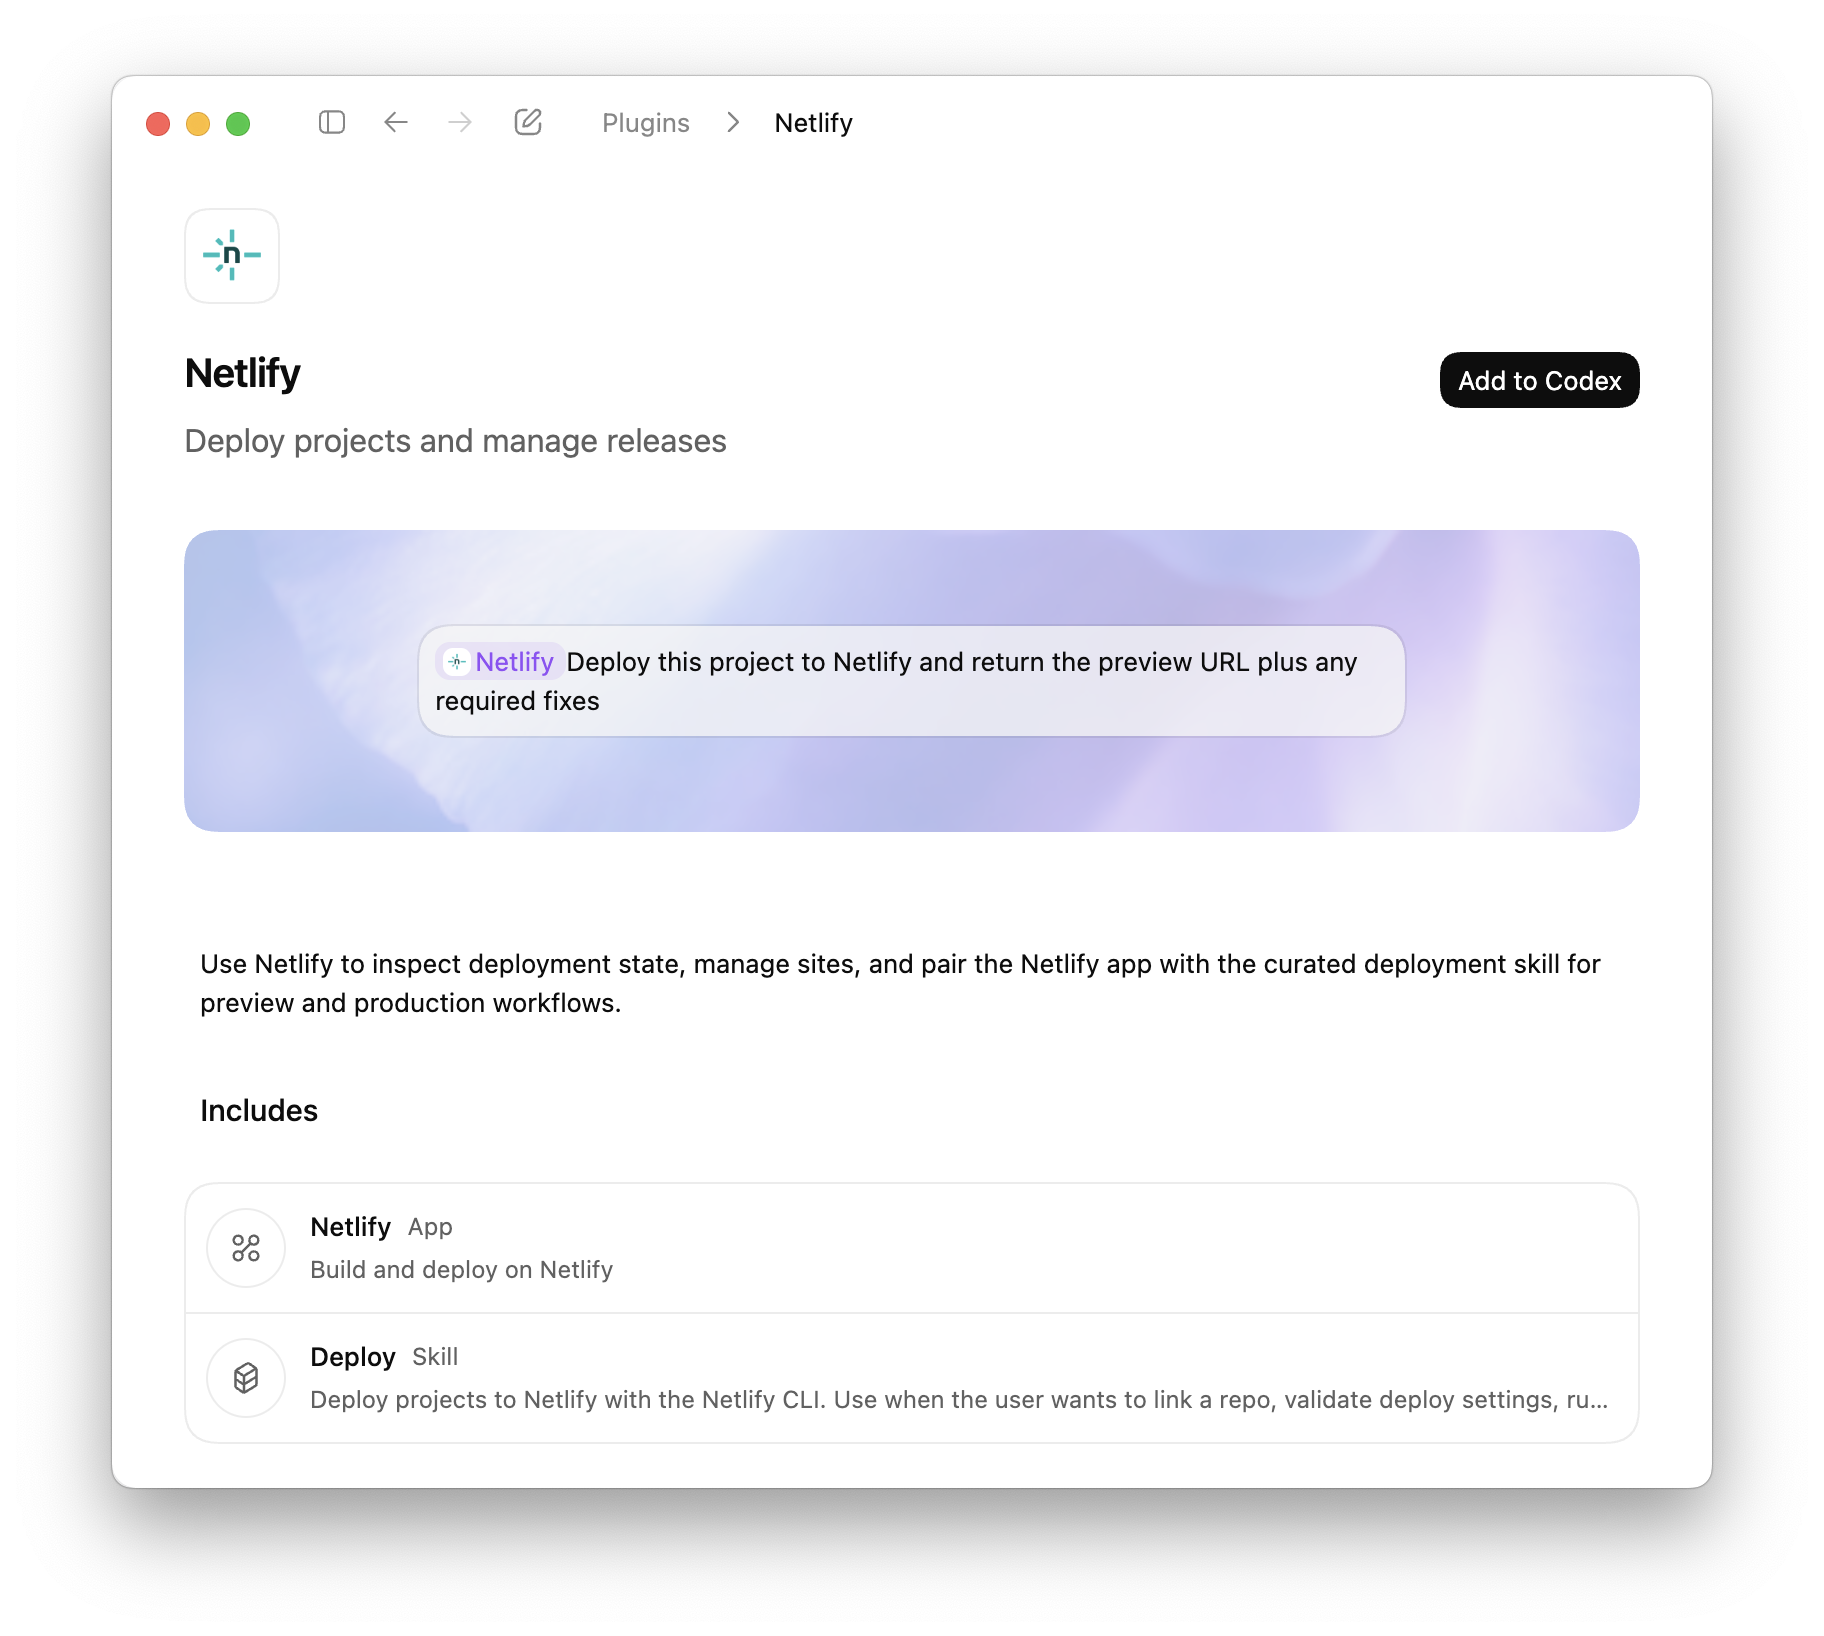
Codex plugins extend Codex with apps, skills, and MCP servers, to access external tools, data, and workflows directly from your coding environment. With the Netlify plugin, Codex can create projects, configure settings, and deploy without leaving the coding workflow.
What you can do
Deploy directly from Codex
- Deploy projects using the Netlify CLI workflow
- Generate preview URLs automatically
- Deploy to production when ready
- Validate build configuration before deployment
Manage your projects
- Create new projects
- Install extensions
- Manage environment variables
- Configure visitor access controls
- Manage forms
- Update project settings
Review and fix deployments
- Inspect deploy status
- Retrieve build logs
- Identify configuration issues
- Iterate on fixes within Codex
Codex is also available through Agent Runners, where you can prompt AI agents against your live project and deploy changes directly from the Netlify Dashboard.
The Netlify plugin for Codex is available now in the Codex plugin directory.
-
Shopify’s Hydrogen framework now works on Netlify with React Router 7 and Hydrogen 2026.1.0. The Netlify Hydrogen template has been fully rebuilt, and
@netlify/vite-plugin-react-routernow supports Hydrogen sites out of the box.The updated template also comes with two meaningful improvements:
- Netlify Cache API integration — Data fetching is cached using the Netlify Cache API, giving you low-latency responses without extra configuration.
- Full local platform emulation — The Netlify Vite Plugin provides zero-config local emulation of Blobs, Functions, Edge Functions, and AI Gateway during development, so what you test locally matches what runs in production.
To get started with a new Hydrogen site on Netlify, deploy the updated template:

To move an existing Hydrogen site over to Netlify, follow the How to deploy a Shopify Hydrogen storefront to Netlify guide.
Learn more:
-
Users on credit-based plans can now see a day-by-day breakdown of their credit consumption. Head to Usage & Billing > Account usage insights > Credits to view exactly how your credits are being used each day.
Track credit usage across the following meters:
- AI Inference
- Bandwidth
- Compute
- Production deploys
- Web Requests
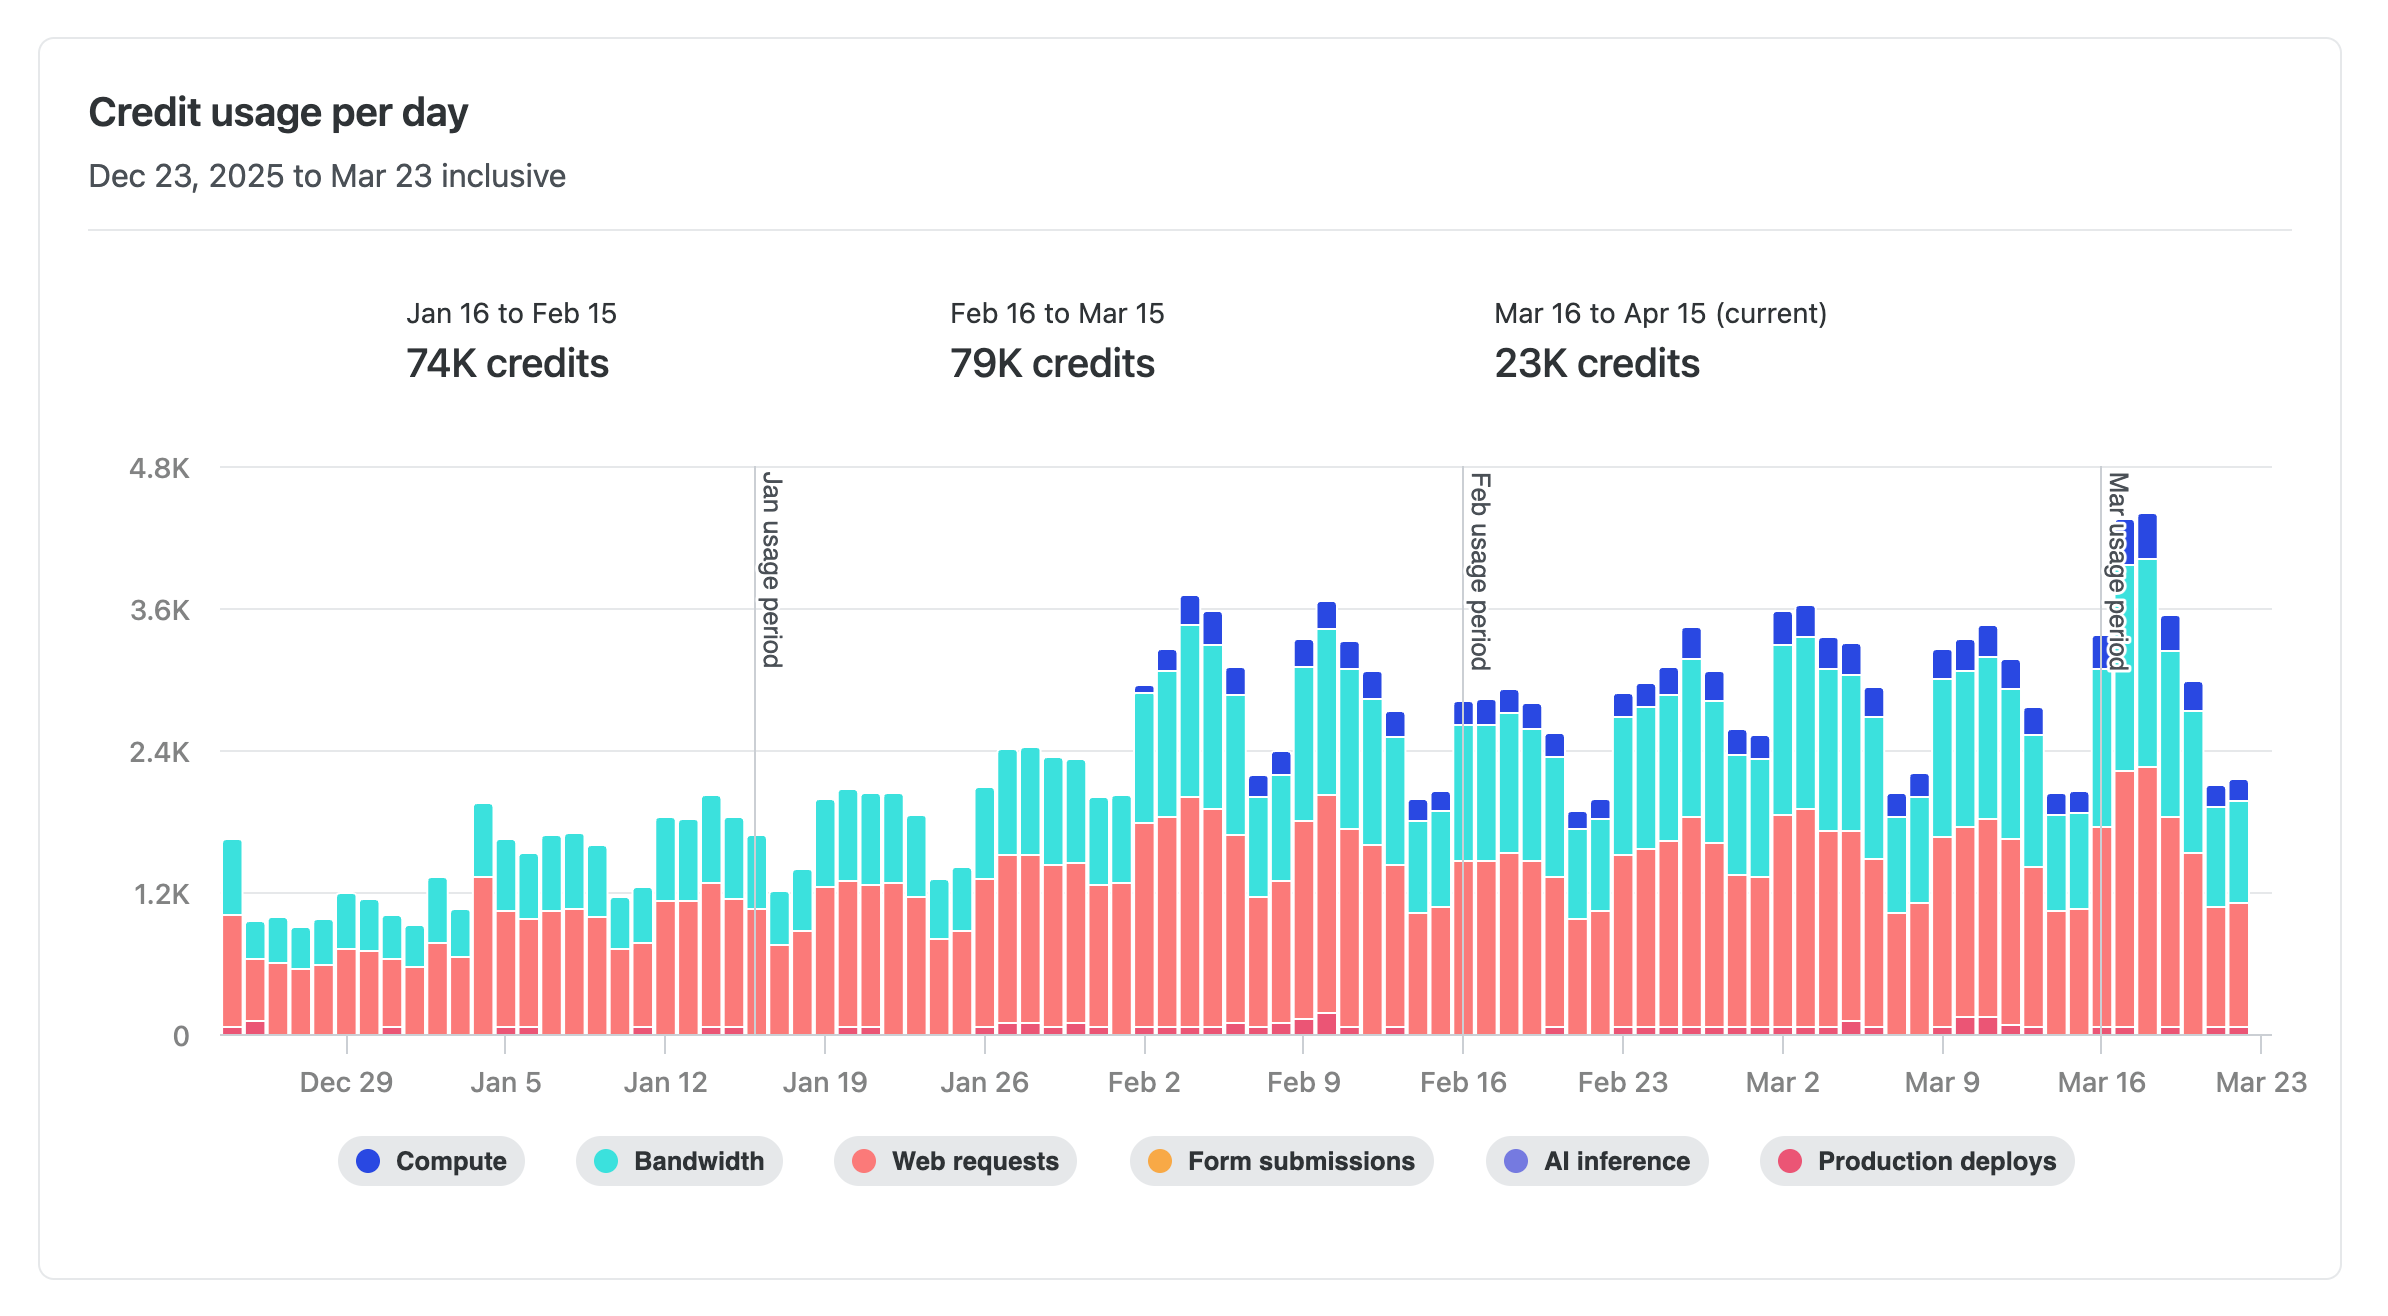
This makes it easier to spot usage trends, identify spikes, and plan ahead — so you can stay on top of your credit consumption without any guesswork.
Learn more about how credits work.
-
Enterprise and Grid customers can now find issued invoices directly on their billing pages in Netlify. You can review what each invoice includes and open it right away to pay or download.
On the team Usage & billing page for Enterprise and the Organization billing page for Grid, invoices are now listed where billing work already happens. This makes it faster to confirm charges, get details, and handle payment or download in fewer steps.
Enterprise teams without an organization grid plan: Find your invoices in your team’s Usage & billing dashboard.
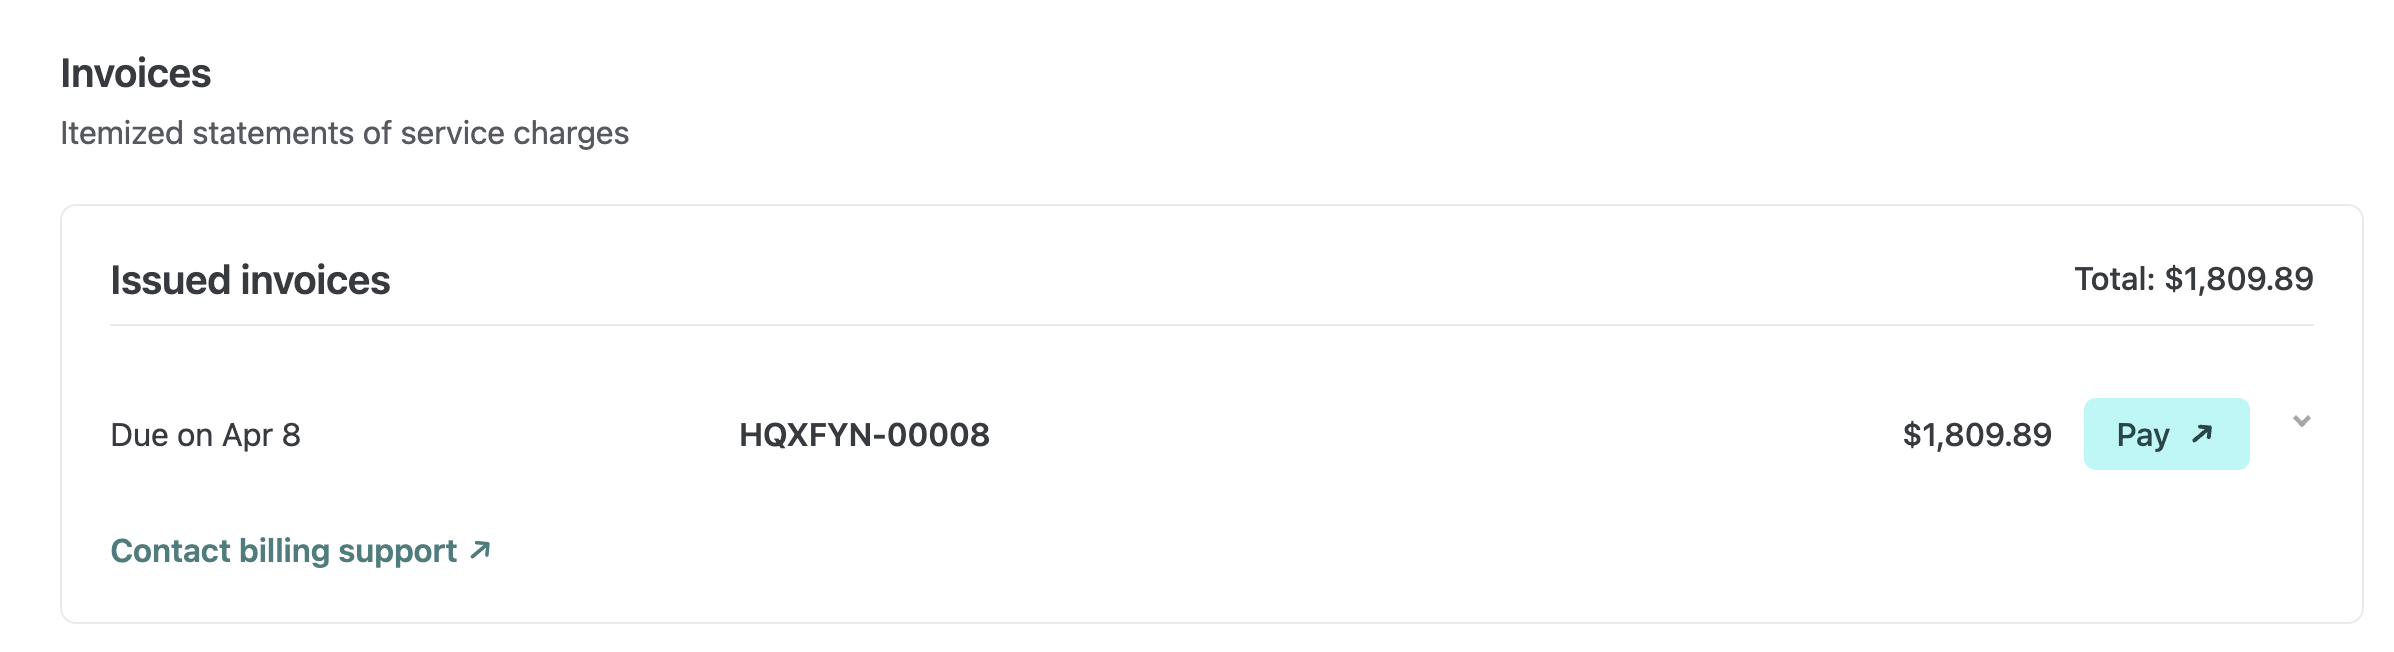
Enterprise plans with an organization grid plan: Find invoices on your Organization’s billing dashboard.
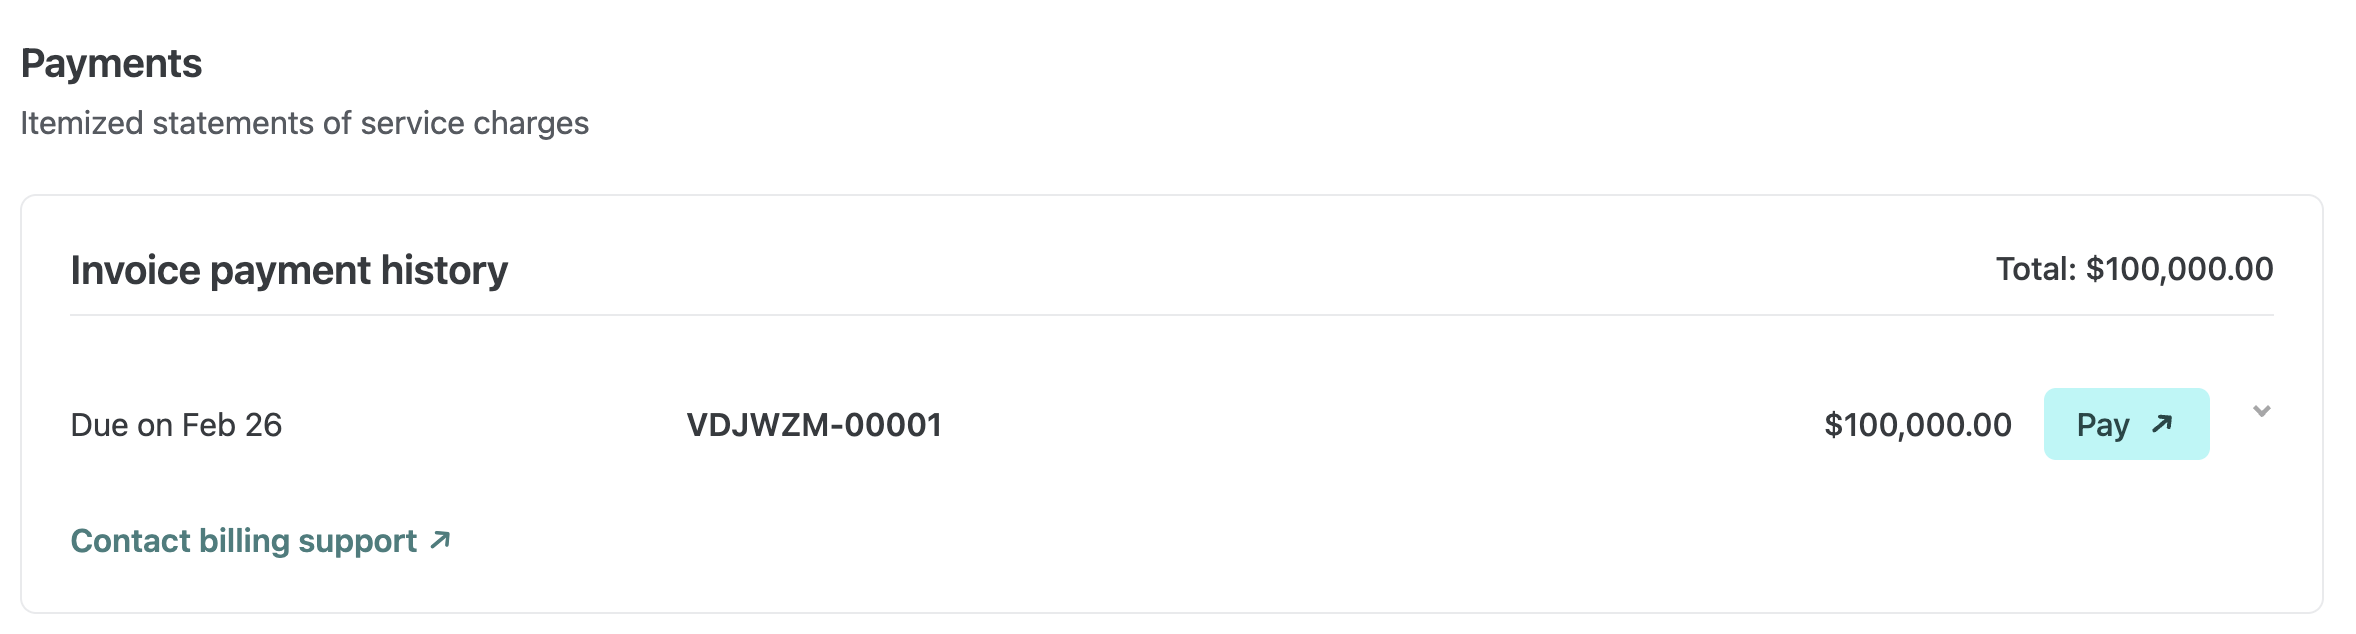
You can quickly see a breakdown for each invoice and use the Pay button to open the invoice portal when you’re ready to take action.
This update affects Enterprise teams and Grid organizations. No setup is required.
Learn more about Netlify billing.
-
Build and ship web apps faster with AI and Netlify. Start with a prompt, use production infrastructure, and grow without rebuilding.
-
To help you and your agents build more effectively, we’re introducing reusable Prompt Templates available directly from within Netlify.
Browse a curated collection of reusable prompts for common Netlify workflows: accessibility audits, A/B testing with Edge Functions, and more. Each template uses variable placeholders so you can adapt it to your project without starting from scratch.
Prompt Templates live directly in your project’s agent runs dashboard. From there you can:
- Browse public prompt templates
- Customize and save your own versions of any template for your team
- Submit templates back to the community to share what is working for you
Learn more about managing Prompt Templates for your team.
-
OpenAI’s GPT-5.4 Nano and GPT-5.4 Mini models are now available through Netlify’s AI Gateway with zero configuration required.
Use the OpenAI SDK directly in your Netlify Functions without managing API keys or authentication. The AI Gateway handles everything automatically. Here’s an example using the GPT-5.4 Nano model:
import OpenAI from 'openai';export default async () => {const openai = new OpenAI();const response = await openai.responses.create({model: 'gpt-5.4-nano',input: 'Give a concise explanation of how AI works.',});return Response.json(response);};GPT-5.4 Nano and GPT-5.4 Mini are available for all Function types. You get automatic access to Netlify’s caching, rate limiting, and authentication infrastructure.
Learn more in the AI Gateway documentation