Guides & Tutorials
Creating Netlify's Schematics for Angular
We want to make your development process as seamless and easy as possible. My goal is to hone in on working with Angular and Netlify. One way I realized we could do this was to take advantage of Angular Schematics and Angular's ng add functionality. Let me break down what these two sets of words mean.
-
Schematics: Schematics allow you to programmatically add to and edit a project to incorporate tooling and/or features. This can cut out a lot of steps in project setup and help customize projects to automate common practices. It does this by creating a virtual file system, or tree, checking to make sure your changes don't break the project, then applying the changes.
-
ng add: This CLI command incorporates a library into your project by installing it, and running its schematics (if they exist).
In making this v1 of the Netlify schematics I had to search for a lot of reference pieces and glue them together. I also had some great help from Mike Brocchi and Justin Schwartzenberger on ngBS. Not everyone can be fortunate enough to have direct help from someone who helped write the CLI. So, I wanted to create a resource that went straight into the process, helped you create a quick schematics project, and give you my collected knowledge as succinctly as possible.
In this first post we'll look at the current Netlify schematics and how to add them to your project. Then you can follow along in a couple other posts to learn the process and make your own schematics. Here's what is covered in the other posts in this series:
Part 2: Creating and Editing Files
- generate a blank schematic with the cli tool
- make an
ng addschematic that will:- create files using user input (via
x-prompt) - edit or create the project's
.gitignorefile
- create files using user input (via
Part 3: Testing and Publishing Schematics
- create tests for each outcome
- run and publish our schematic
Let's take a look at the finished product we have so far!
What The Netlify Schematics Do
In order to break the ice with the schematics, I decided to have them add a few pieces of handy data. So, this version of the schematics creates two files.
-
netlify.toml: this is a Netlify configuration file that holds the build command for the project and the path to where the built project lives. You can add a lot more to this file (here's info on that) but for now this will give Netlify the information it needs to do a simple deploy. -
netlifyConfig.json: there are a few pieces of information that will help you communicate with the Netlify API (API ID, Personal Access Token, and project name), this file will store them.
Finally, I wanted to make sure the sensitive information stayed local and wouldn't be pushed up to any public repos. To do this the schematics will check if the project has a .gitignore file. If so, it adds the netlifyConfig file to the list of items to ignore. If there is no .gitignore it adds one with the config file listed.
This is currently what the schematics do. I'm super open to suggestions or requests and know that this project will evolve. Let's check out what we get to play with now!
Using the Netlify schematics
You can find the current version of our Netlify schematics in this repo. To run these schematics in your Angular project you simply write this command from your projects directory.
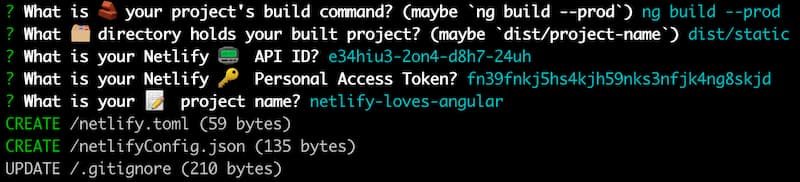
ng add netlify-schematicsIt will prompt you to enter a few bits of information:
-
project's build command: for Angular projects this is usually
ng buildor for production builds,ng build --prod. -
directory of your build project: when you run your build command where does the built project live (for Angular it's
/dist/<project name>for Angular + Scully prerender it'sdist/static) -
Netlify API ID: this is found in your Netlify Site information page in the path
/sites/sitename/settings/general#siteinformation.
-
Personal Access Token: this is a very sensitive piece of data (why we add this file to the .gitignore file) that can be generated by going to your User Settings/Application/Personal access tokens.

-
project name: the name of your project, ummm, yes, a little self-explanatory there 😄.
Here's what that output will display:
The end...or is it?
This is v1 of our schematics for Netlify. There are a few more things I want to do and this project will evolve and change in time. I will definitely keep you updated, because 1. I care about you and 2. it's my job. So stay tuned, and always feel free to ping us in the Netlify Community if you have any requests or questions. Happy coding 👩🏻💻!