Guides & Tutorials
Testing and Publishing Schematics
Welcome to the third part of our series about the Netlify schematics we created for your Angular projects. I wanted to walk you through the creation process in hopes of helping you fulfill any schematics dreams you may have :). If this is the first post you're seeing you may want to check out the other two:
-
Part 1 – Creating Netlify Schematics: Where we go over what the Netlify schematics are and how to add them to your Angular project.
-
Part 2 – Creating and Editing Files: Which walks through, generating a blank schematic with the CLI tool and making an
ng addschematic that will create files using user input (viax-prompt) and edit or create the project's.gitignorefile.
Here and now we'll be looking into testing and publishing the schematics that we build out in Part 2. Specifically, here is our game plan:
- Review the initial, generated test file.
- Add testing for file creation.
- Add testing for the file editing.
- Build and run the schematics.
- Publish the schematics to npm to share it with the 🌏 world!
Away we go!
Adding Tests
Obviously we need testing. I mean who would ever not test things? Testing is the best! Amirite? In src/netlify-schematics-index_spec.ts we will go through the ng-add functionalities we added in the previous post in the series and make sure the files are created or amended with the correct information.
The Starter
The initial test file from the schematics CLI-generated blank schematic has all the setup you need. It imports the Tree, the schematics testing library, SchematicTestRunner, and path. It uses path to access the collection.json file and names it collectionPath. Then it starts a describe function to start tests.
Initially it's testing works using runner which is new instance of the SchematicTestRunner & our collections.json. It also creates tree which uses the runner to invoke runSchematic passing in the schematic name, an empty options object, and the source Tree.
import { Tree } from "@angular-devkit/schematics";
import { SchematicTestRunner } from "@angular-devkit/schematics/testing";
import * as path from "path";

const collectionPath = path.join(__dirname, "../collection.json");

describe("netlify-schematics", () => {
  it("works", () => {
    const runner = new SchematicTestRunner("schematics", collectionPath);
    const tree = runner.runSchematic("netlify-schematics", {}, Tree.empty());

    expect(tree.files).toEqual([]);
  });
});
Testing the File Creation
In the first schematic post we added some files. Let's make sure that actually happened. To do that we can keep the runner the same at the top of the describe block. Then we'll make an it block for "creates a netlify config file". Three variables will be used in this one:
options– which holdspublishandcommandtree– here we just change the default to the schematic name "ng-add" and the empty object tooptionsnetlifyConfig– this is where we'll pass the file we want to test usingtree.readContent()
...
describe("ng-add", () => {
  const runner = new SchematicTestRunner("schematics", collectionPath);

  it("creates netlify config file", () => {
    const options = {
      publish: "publish",
      command: "command"
    };
    const tree = runner.runSchematic("ng-add", options, Tree.empty());
    const netlifyConfig = tree.readContent("/netlify.toml");
...
Now, with that all in place we can use expect() to make sure the file contains the publish and command information.
expect(netlifyConfig).toContain('publish = "publish"');
expect(netlifyConfig).toContain('command = "command"');
The second file can be checked the same way. All we need to do is change up the options, the file we're reading, and the options we expect the file to contain.
🐙 Check out the file here to see the tests for the private config file.
Testing the File Additions
Currently, all we have left to test is the .gitignore file that we added the private config file to. Since we're only testing to see if the file name was added to the .gitignore file we don't need to pass any options. Here's what we have:
it("adds private config to gitignore", () => {
  const tree = runner.runSchematic("ng-add", {}, Tree.empty());
  const gitignore = tree.readContent("/.gitignore");

  expect(gitignore).toContain("netlifyConfig.json");
});
To run these tests we need to use the npm test script.
npm run testPop that in the command line and what do we get? Basically, well, no failures. If only it were that easy to have no failures in life.

Success! I'm very proud of us, we now have tested schematics.
🐙 Here is the link to the complete test file.
Running & Publishing Your Schematic
We have the functionality, we have the testing, so it should work, right? Let's hope so. To find out we'll first need to build out our schematic project using the npm build script.
npm run buildUsing the Schematics CLI to Run ng-add
Once the schematics are built we can try running them. There are a few ways to run your schematic, the default is to run in dry mode. The dry mode runs through all the schematic actions, like prompting the user and creating files, but only does this on the virtual tree, not changing your actual project. This way is great for seeing that the prompts are correct and what playing through the developer experience but we want to see what the files look like. So, for this run we'll turn the dry run option off.
schematics .:ng-add --dry-run=falseWe could have also used
--debug=falseinstead of the dry run flag. Some people like more because it saves them keystrokes ⌨️👍.
In this command we have called on the schematics CLI and passed in a reference to the schematic ng-add in the current directly by using .:. Then we set the dry-run flag to false.
Here is the output for the Netlify schematics:
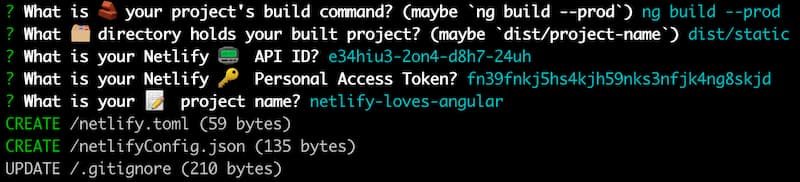
If we take a look at our directory we can see that our new files are listed in our project's root directory and the netlifyConfig.json filename has been added to our .gitignore file.

Publish Our Schematic
It works the way we expected! Let's virtually shout it from the rooftops aka publish it on npm. This way we can all use your amazing schematics for our projects!
You will need an npm account to do this, you can set it up on their site. When your account is set up you can just login and publish from your schematics directory with two commands:
npm login
npm publish
Now whenever you have an update, you can figure out the correct semver version and just run npm version [major, minor, patch]. That's it! The world can now benefit from your hard work. Thank you!
Our Journey's End
I'm so glad you came along to create some schematics with me. Don't you feel just a little closer, you know, in the grand schema of things? 😋 I hope this has helped you on your schematics path. If you have any questions or are interested in what's happening next with the Netlify schematics make sure to join is in the Netlify Community or stay tuned to our blog. I can't wait to see what you create! Happy coding! 👩🏻💻


