WordPress is the most popular content management system on the planet, powering about a third of the websites online today.
If you’re working on one of the roughly 1 in 3 websites powered by WordPress and wish you could migrate your development workflow to the Jamstack, I have good news! It’s possible to move your WordPress websites to the Jamstack today.
And what’s even more exciting is that your content creators don’t need to change their current workflow! They can continue to use the WordPress admin dashboard to manage content and their changes will trigger a rebuild of your new, blazing fast Jamstack site.
In this post, we’ll walk through migrating a WordPress site to Gatsby, a popular Jamstack framework powered by React and GraphQL.
If you prefer video, we’ve got you covered!
This post is an expanded version of a project I built with Zac Gordon on Learn With Jason. In about 90 minutes, Zac and I migrated a WordPress site to Gatsby. Watch Zac Gordon teach us how to migrate WordPress sites to the Jamstack on Learn With Jason.
If you prefer short videos that only focus on code and don’t waste any time, I also created a 30-minute video tutorial that covers all the steps in this project. You can learn how to move your WordPress site to Gatsby on egghead.
NOTE: The lessons from the egghead course are also embedded in this tutorial so it’s easy to watch and reference the code.
Set up WordPress
The first things we need to migrate a WordPress site to the Jamstack is a WordPress site. In this tutorial, we’re going to use https://wordpressjamstack.lwj.dev/, but you can follow along using your own site if you prefer.
Install WPGraphQL and WPGraphiQL
{% renderFile ”./src/_includes/pages/blog/egghead-embed.vue”, { eggheadVideoTitle: “Install WPGraphQL and WPGraphiQL plugins in WordPress using the command line”, eggheadVideoUrl: “https://egghead.io/lessons/gatsby-install-wpgraphql-and-wpgraphiql-plugins-in-wordpress-using-the-command-line” } %}
The heart of a Jamstack-friendly WordPress site is pulling WordPress data from an API instead of using the built-in template system. One of the most approachable options for accessing WordPress data via API is WPGraphQL.
Because these plugins are developer-focused, they’re not available through the standard WordPress plugins search. Instead, we need to install them from GitHub.
We need two plugins:
- WP GraphQL — this enables a GraphQL API that allows access to all public WordPress data through an unauthenticated GraphQL API. (There’s also an authenticated API for privileged access, but we won’t go into details on that in this post.)
- WP GraphiQL — this is technically optional, but it adds a new tab inside the WordPress admin that allows us to quickly try out GraphQL queries and see data coming back.
To install the plugins, log into the server where your site is hosted and clone the plugins into the wp-content/plugins directory:
ssh <user>@<domain>
cd /path/to/your/wp-content/plugins/
git clone  --depth=1 --single-branch https://github.com/wp-graphql/wp-graphql.git
git clone  --depth=1 --single-branch https://github.com/wp-graphql/wp-graphiql.git
This will add the latest files to your site’s plugins directory without including unnecessary Git metadata.
Activate the GraphQL plugins
Once the plugins are installed, we need to activate them. Head to your WordPress admin dashboard, then click the “Plugins” option from the left-hand menu.
We should see both WP GraphQL and WP GraphiQL as installed, but not activated.
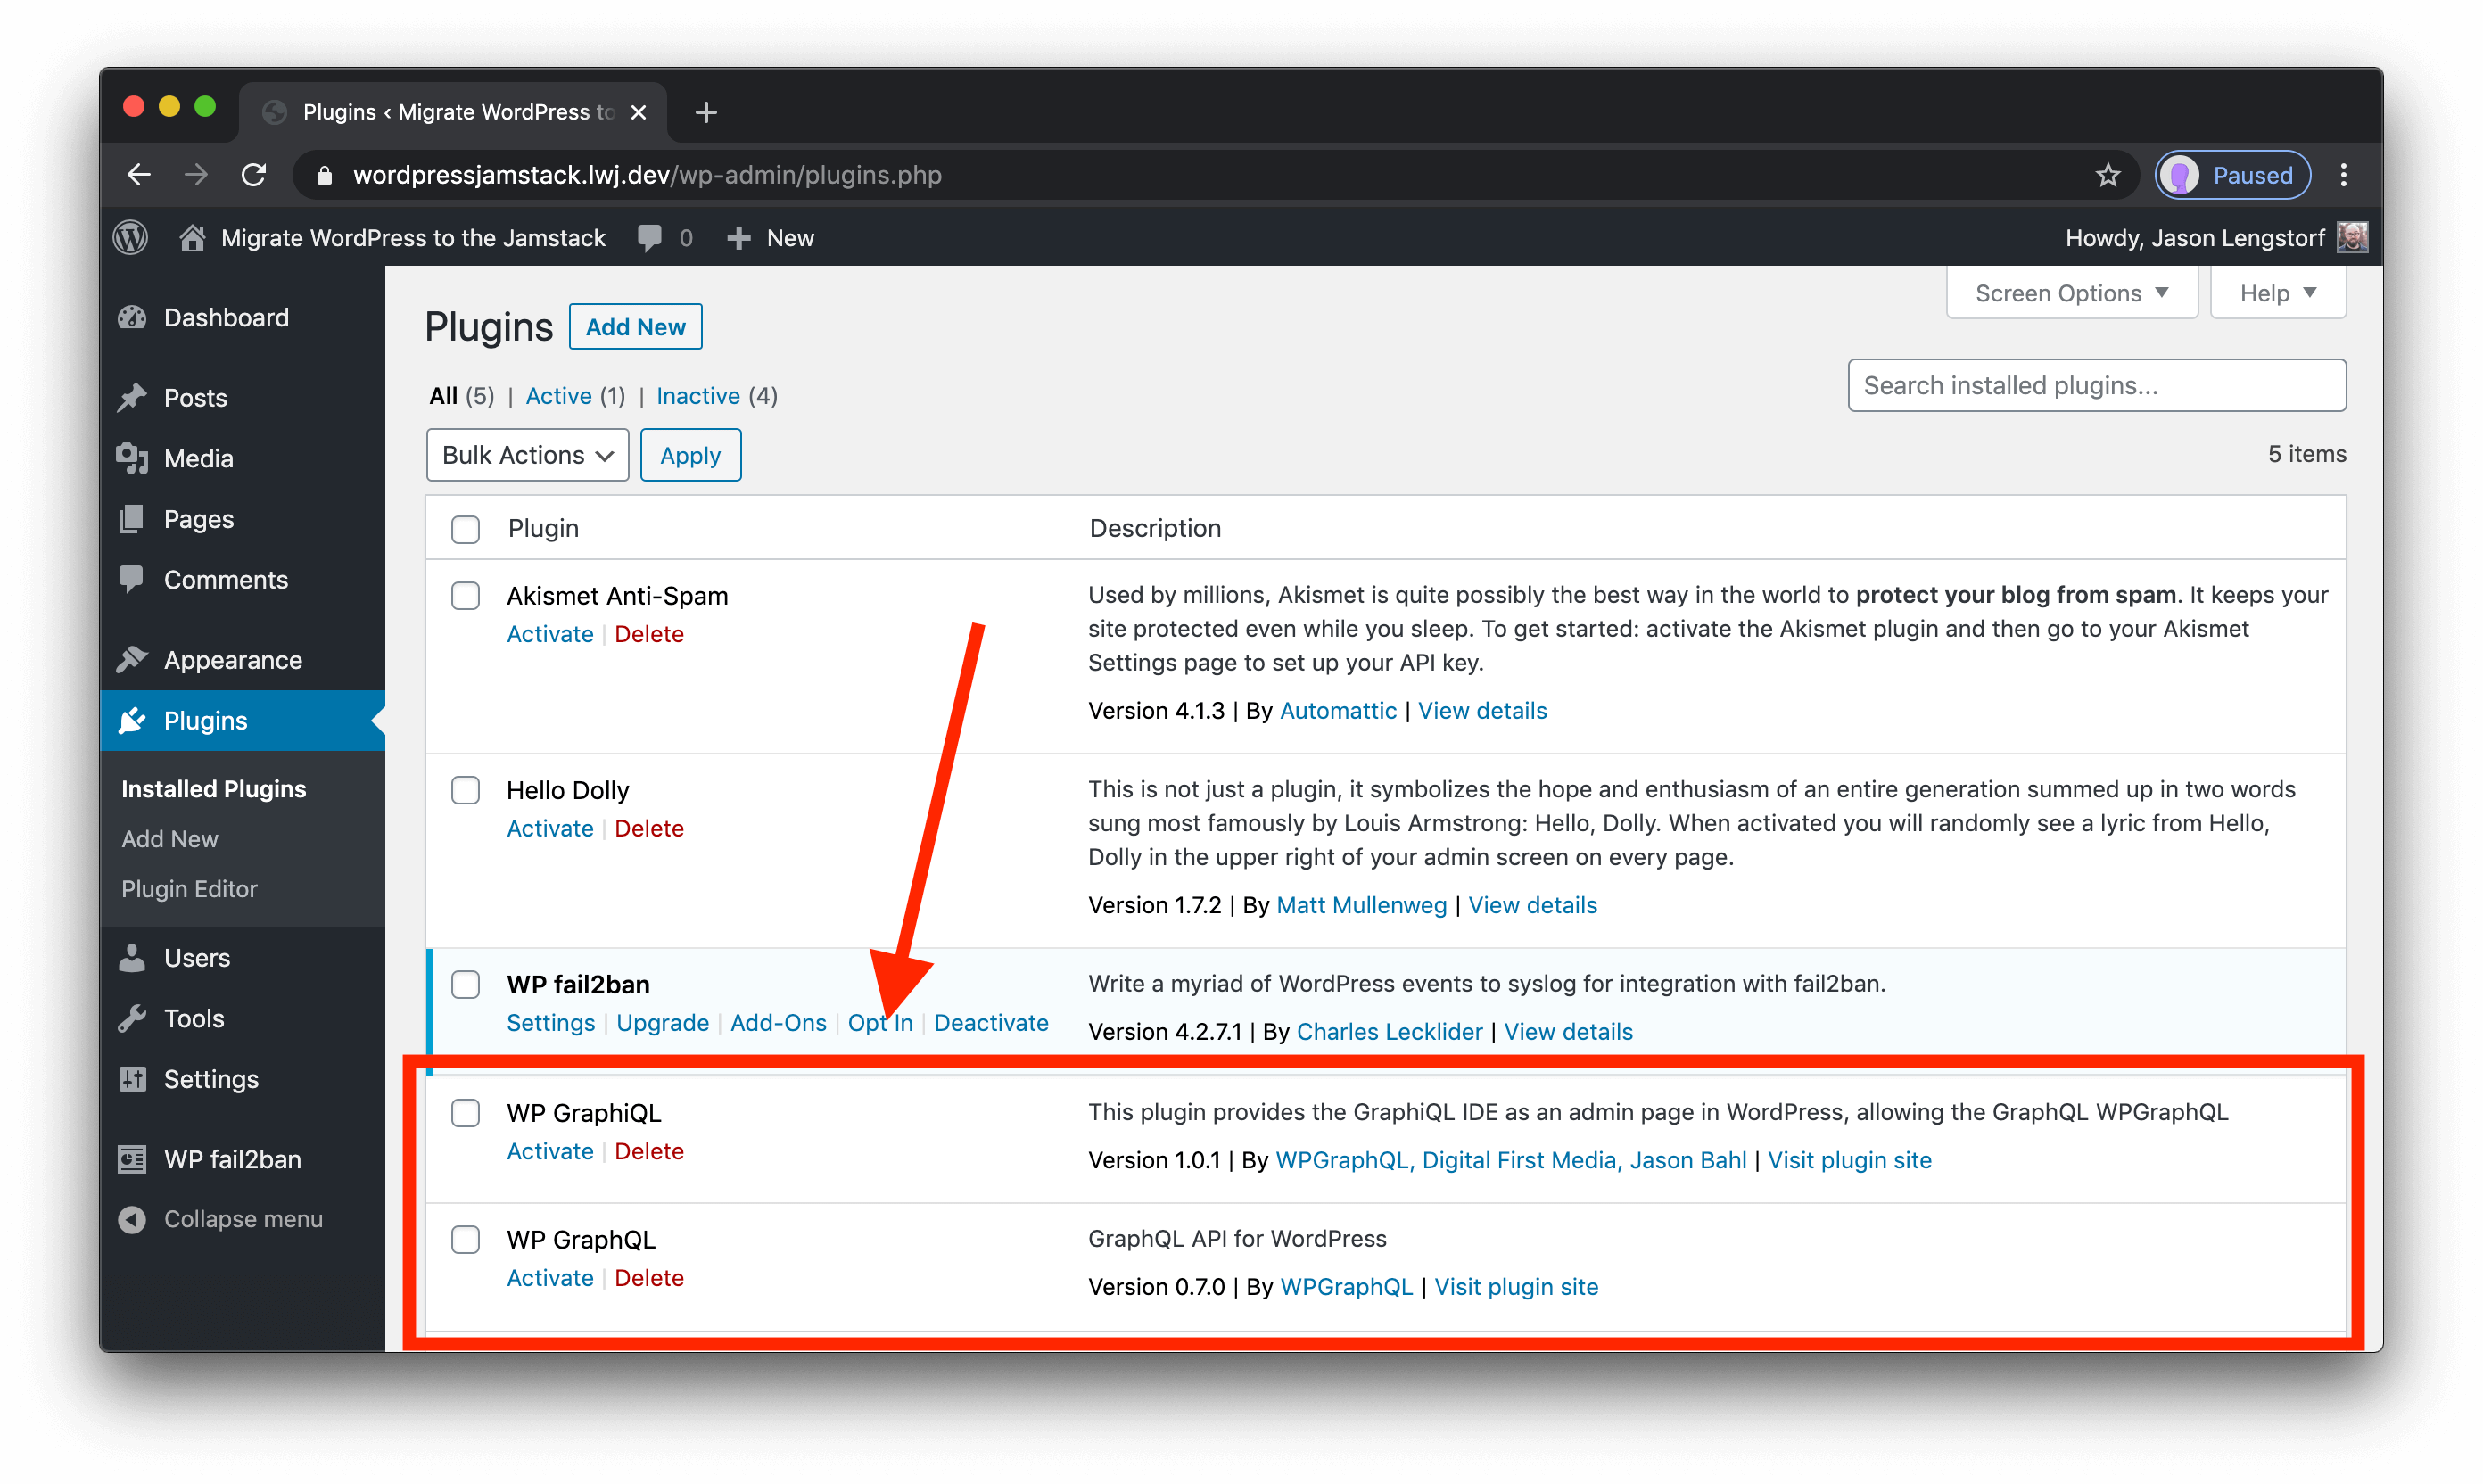
Click the “Activate” link for both WP GraphQL and WP GraphiQL.
Write our first GraphQL query in WP GraphiQL
Click the new “GraphiQL” menu option at the left-hand side. This brings up the GraphiQL interface inside our WordPress dashboard.
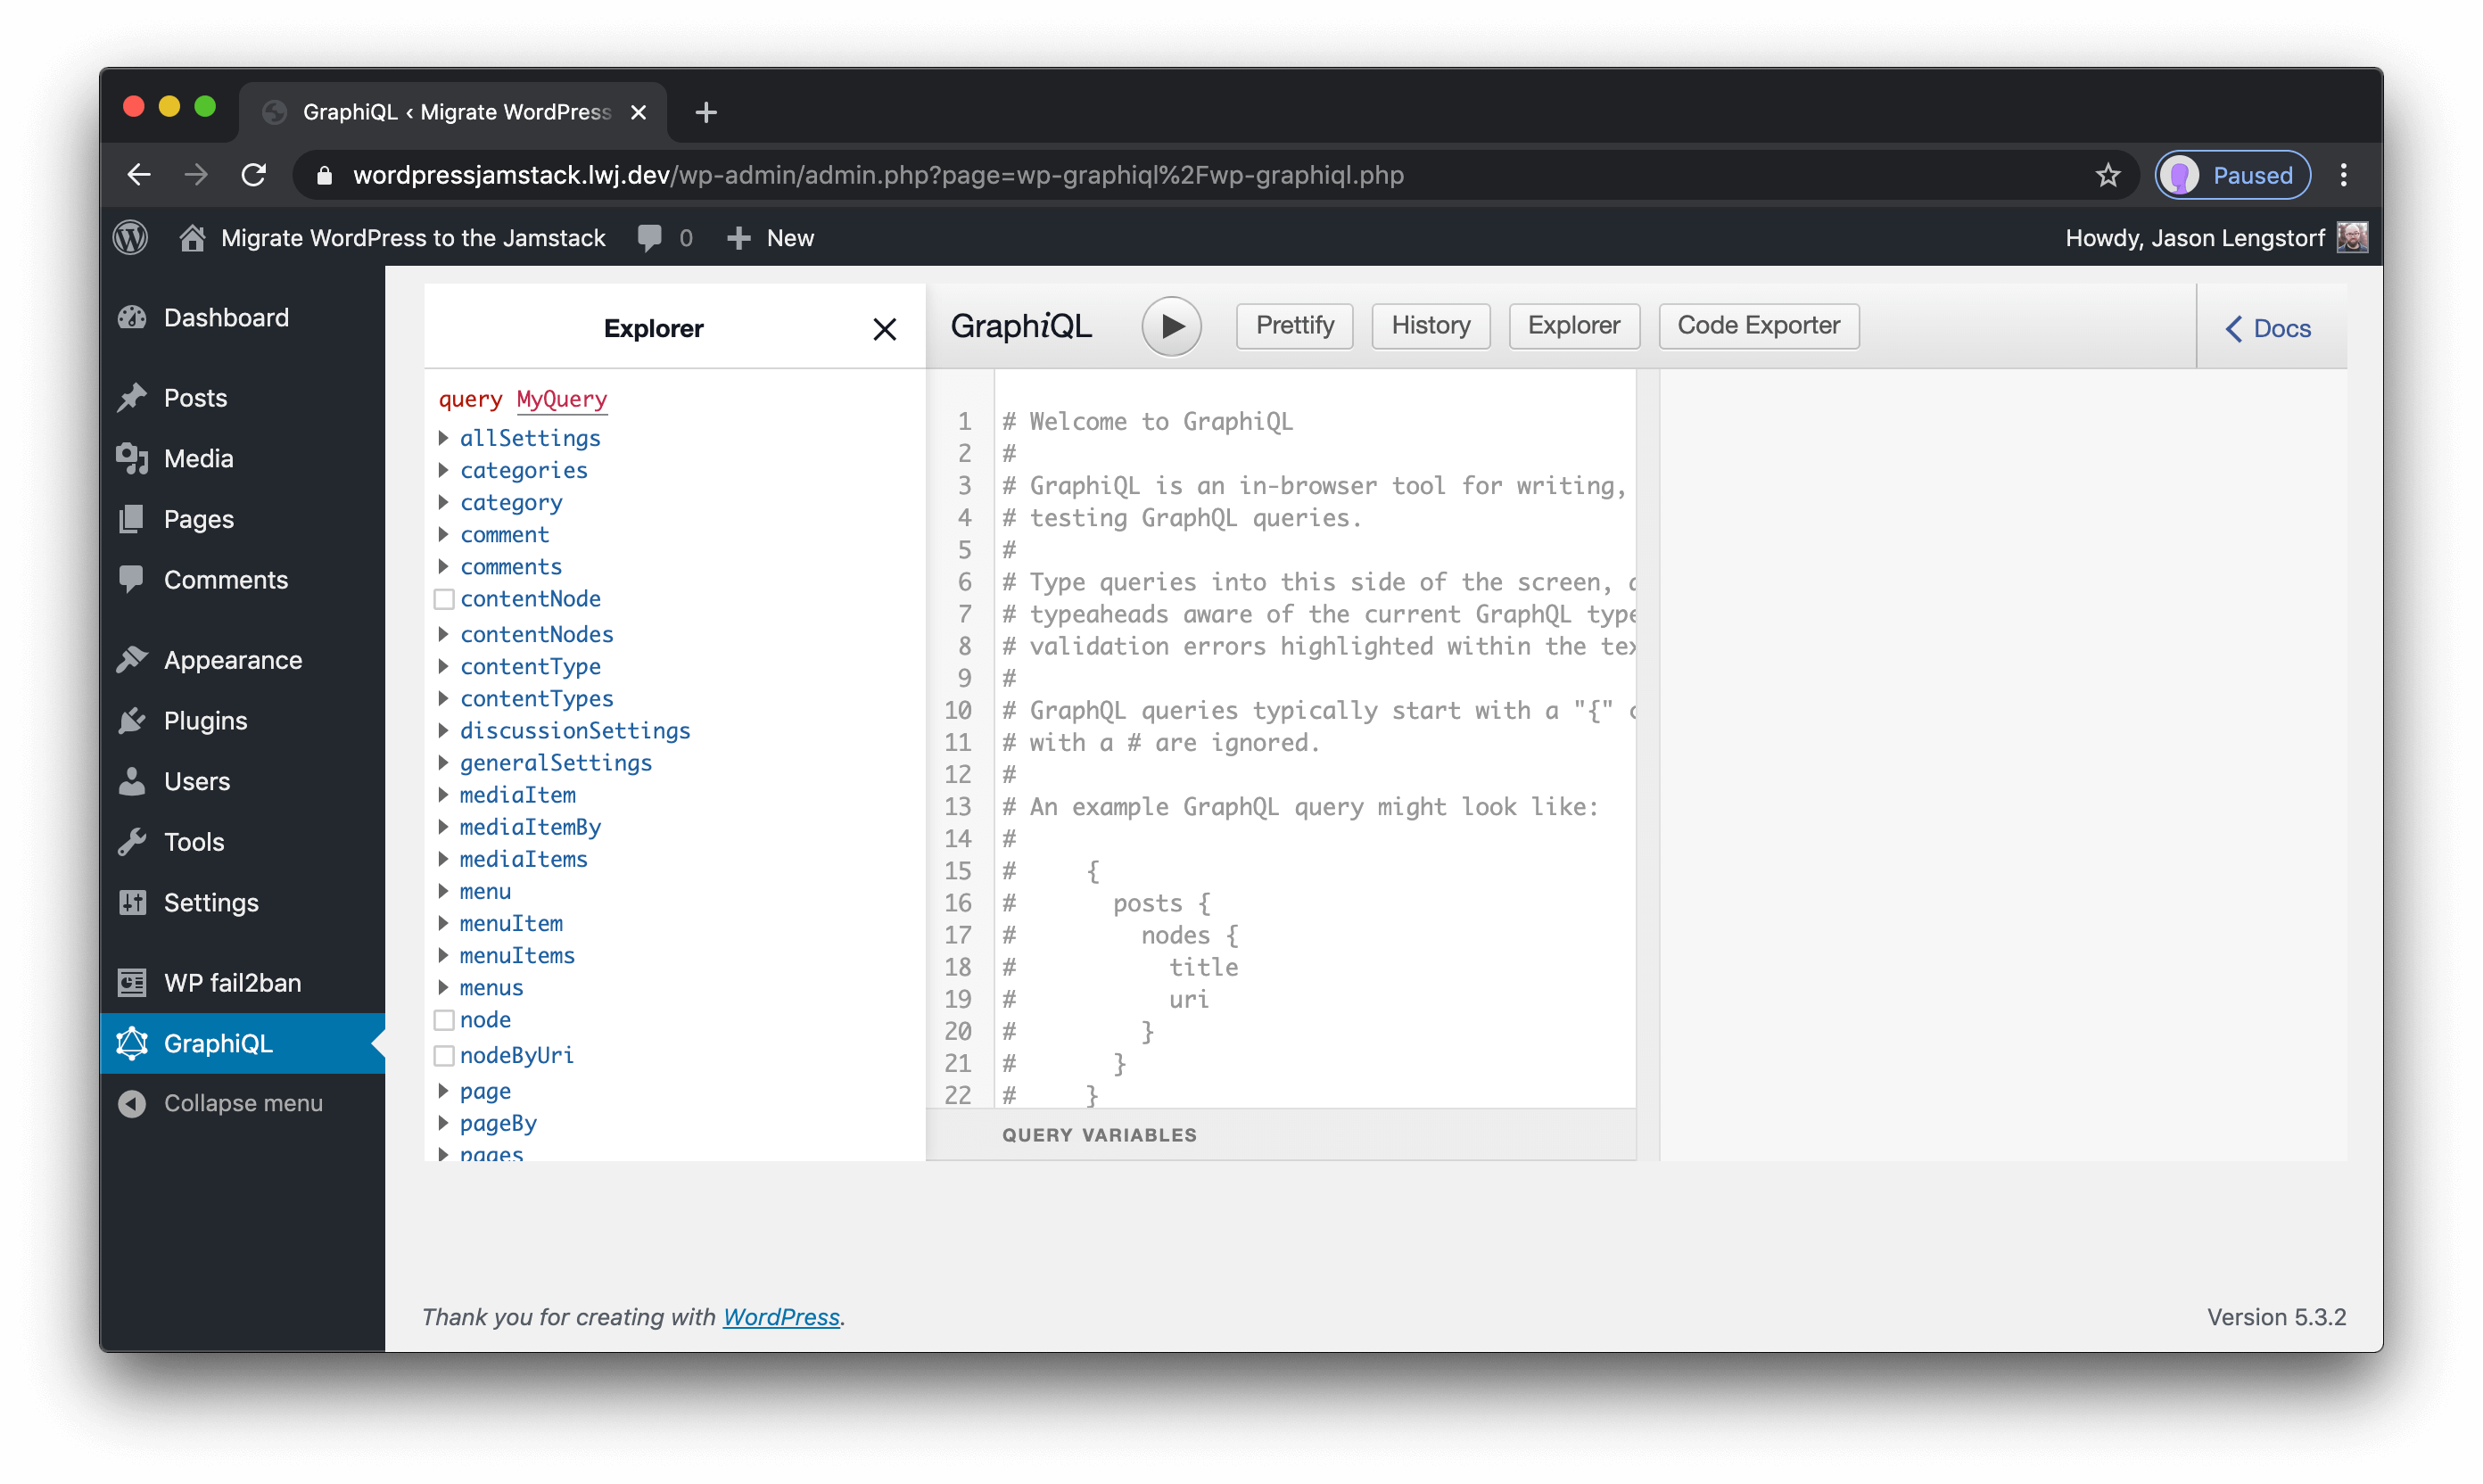
Choose fields in the explorer at the left-hand side to build out a query. For example, if we want to load our site’s pages, we can run this query:
query MyQuery {
  pages {
    nodes {
      title
      uri
      content
      isFrontPage
    }
  }
}
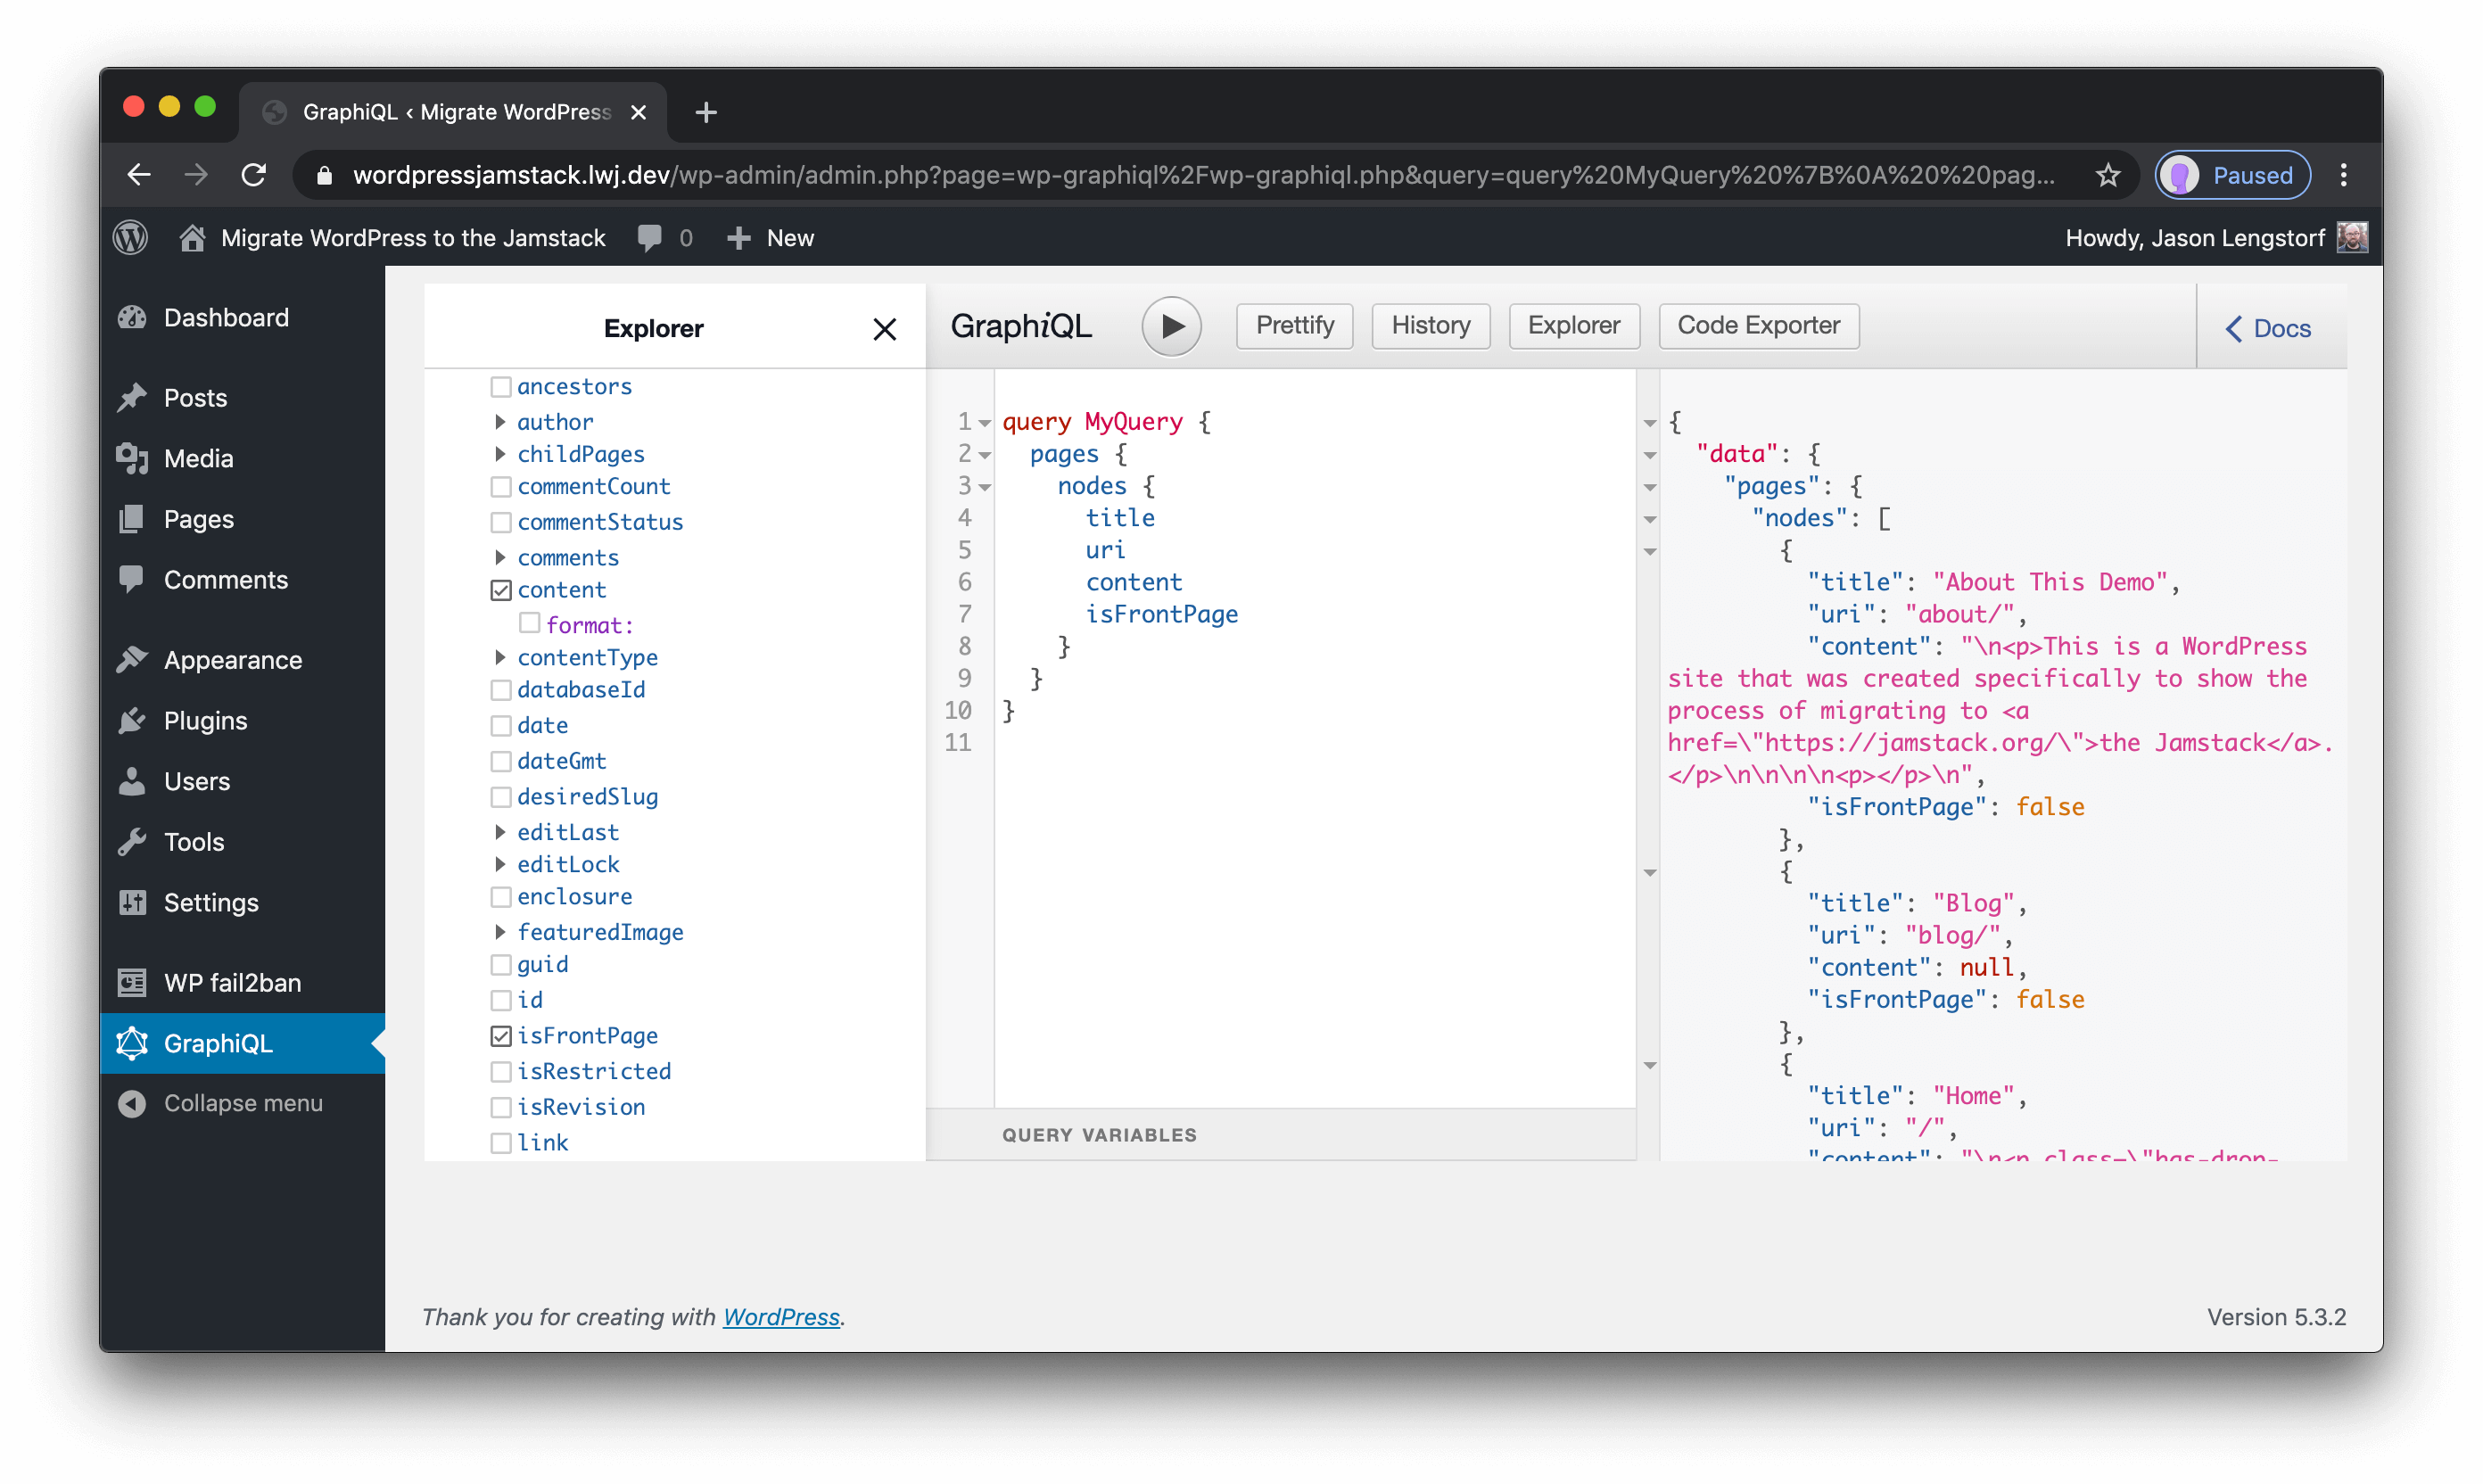
Great! We’ve now got a functioning GraphQL API for WordPress that we can use to power our Jamstack frontend!
Create a new Gatsby site
{% renderFile ”./src/_includes/pages/blog/egghead-embed.vue”, { eggheadVideoTitle: “Create a new Gatsby site using npx and the hello world starter”, eggheadVideoUrl: “https://egghead.io/lessons/gatsby-create-a-new-gatsby-site-using-npx-and-the-hello-world-starter” } %}
Before we can use our WordPress data, we need to create a new Jamstack site that will display it.
In this example we’ll use Gatsby, an open source, React-based framework that specializes in pulling data from third-party sources.
To create a new site, run the following commands:
# create a new Gatsby site in a directory called `wordpress-jamstack`
# using the Hello World Gatsby starter
npx gatsby new wordpress-jamstack gatsbyjs/gatsby-starter-hello-world

# move into the folder
cd wordpress-jamstack/
This generates a new site in a directory called wordpress-jamstack with a bare-bones Gatsby site.
NOTE: There are lots of additional options for starting a new Gatsby site with WordPress that come with batteries included. One great example is Alexandra Spalato’s
gatsby-theme-wordpress-blog. We’re intentionally building this site from scratch to make sure we understand how Gatsby and WordPress work together under the hood.
Install and configure gatsby-source-graphql
{% renderFile ”./src/_includes/pages/blog/egghead-embed.vue”, {
eggheadVideoTitle: “Install and configure gatsby-source-graphql to read WordPress data from WPGraphQL”,
eggheadVideoUrl: “https://egghead.io/lessons/gatsby-install-and-configure-gatsby-source-graphql-to-read-wordpress-data-from-wpgraphql”
} %}
Gatsby uses source plugins to load data. One of the most powerful source plugins is gatsby-source-graphql, which allows us to use any GraphQL API as a data source in Gatsby.
Since we just created a GraphQL API for our WordPress site, this is a perfect option for loading our WordPress data in Gatsby!
Install the plugin with the following command:
npm install gatsby-source-graphql
After installing the plugin, we need to load it by modifying gatsby-config.js:
/**
   * Configure your Gatsby site with this file.
   *
   * See: https://www.gatsbyjs.org/docs/gatsby-config/
   */

  module.exports = {
-   /* Your site config here */
+   plugins: [
+     {
+       resolve: 'gatsby-source-graphql',
+       options: {
+         typeName: 'WPGraphQL',
+         fieldName: 'wpgraphql',
+         url: 'https://wordpress-jamstack.lwj.dev/graphql',
+       }
+     }
+   ]
  }
Save this, then start the Gatsby development server by running:
npm run develop
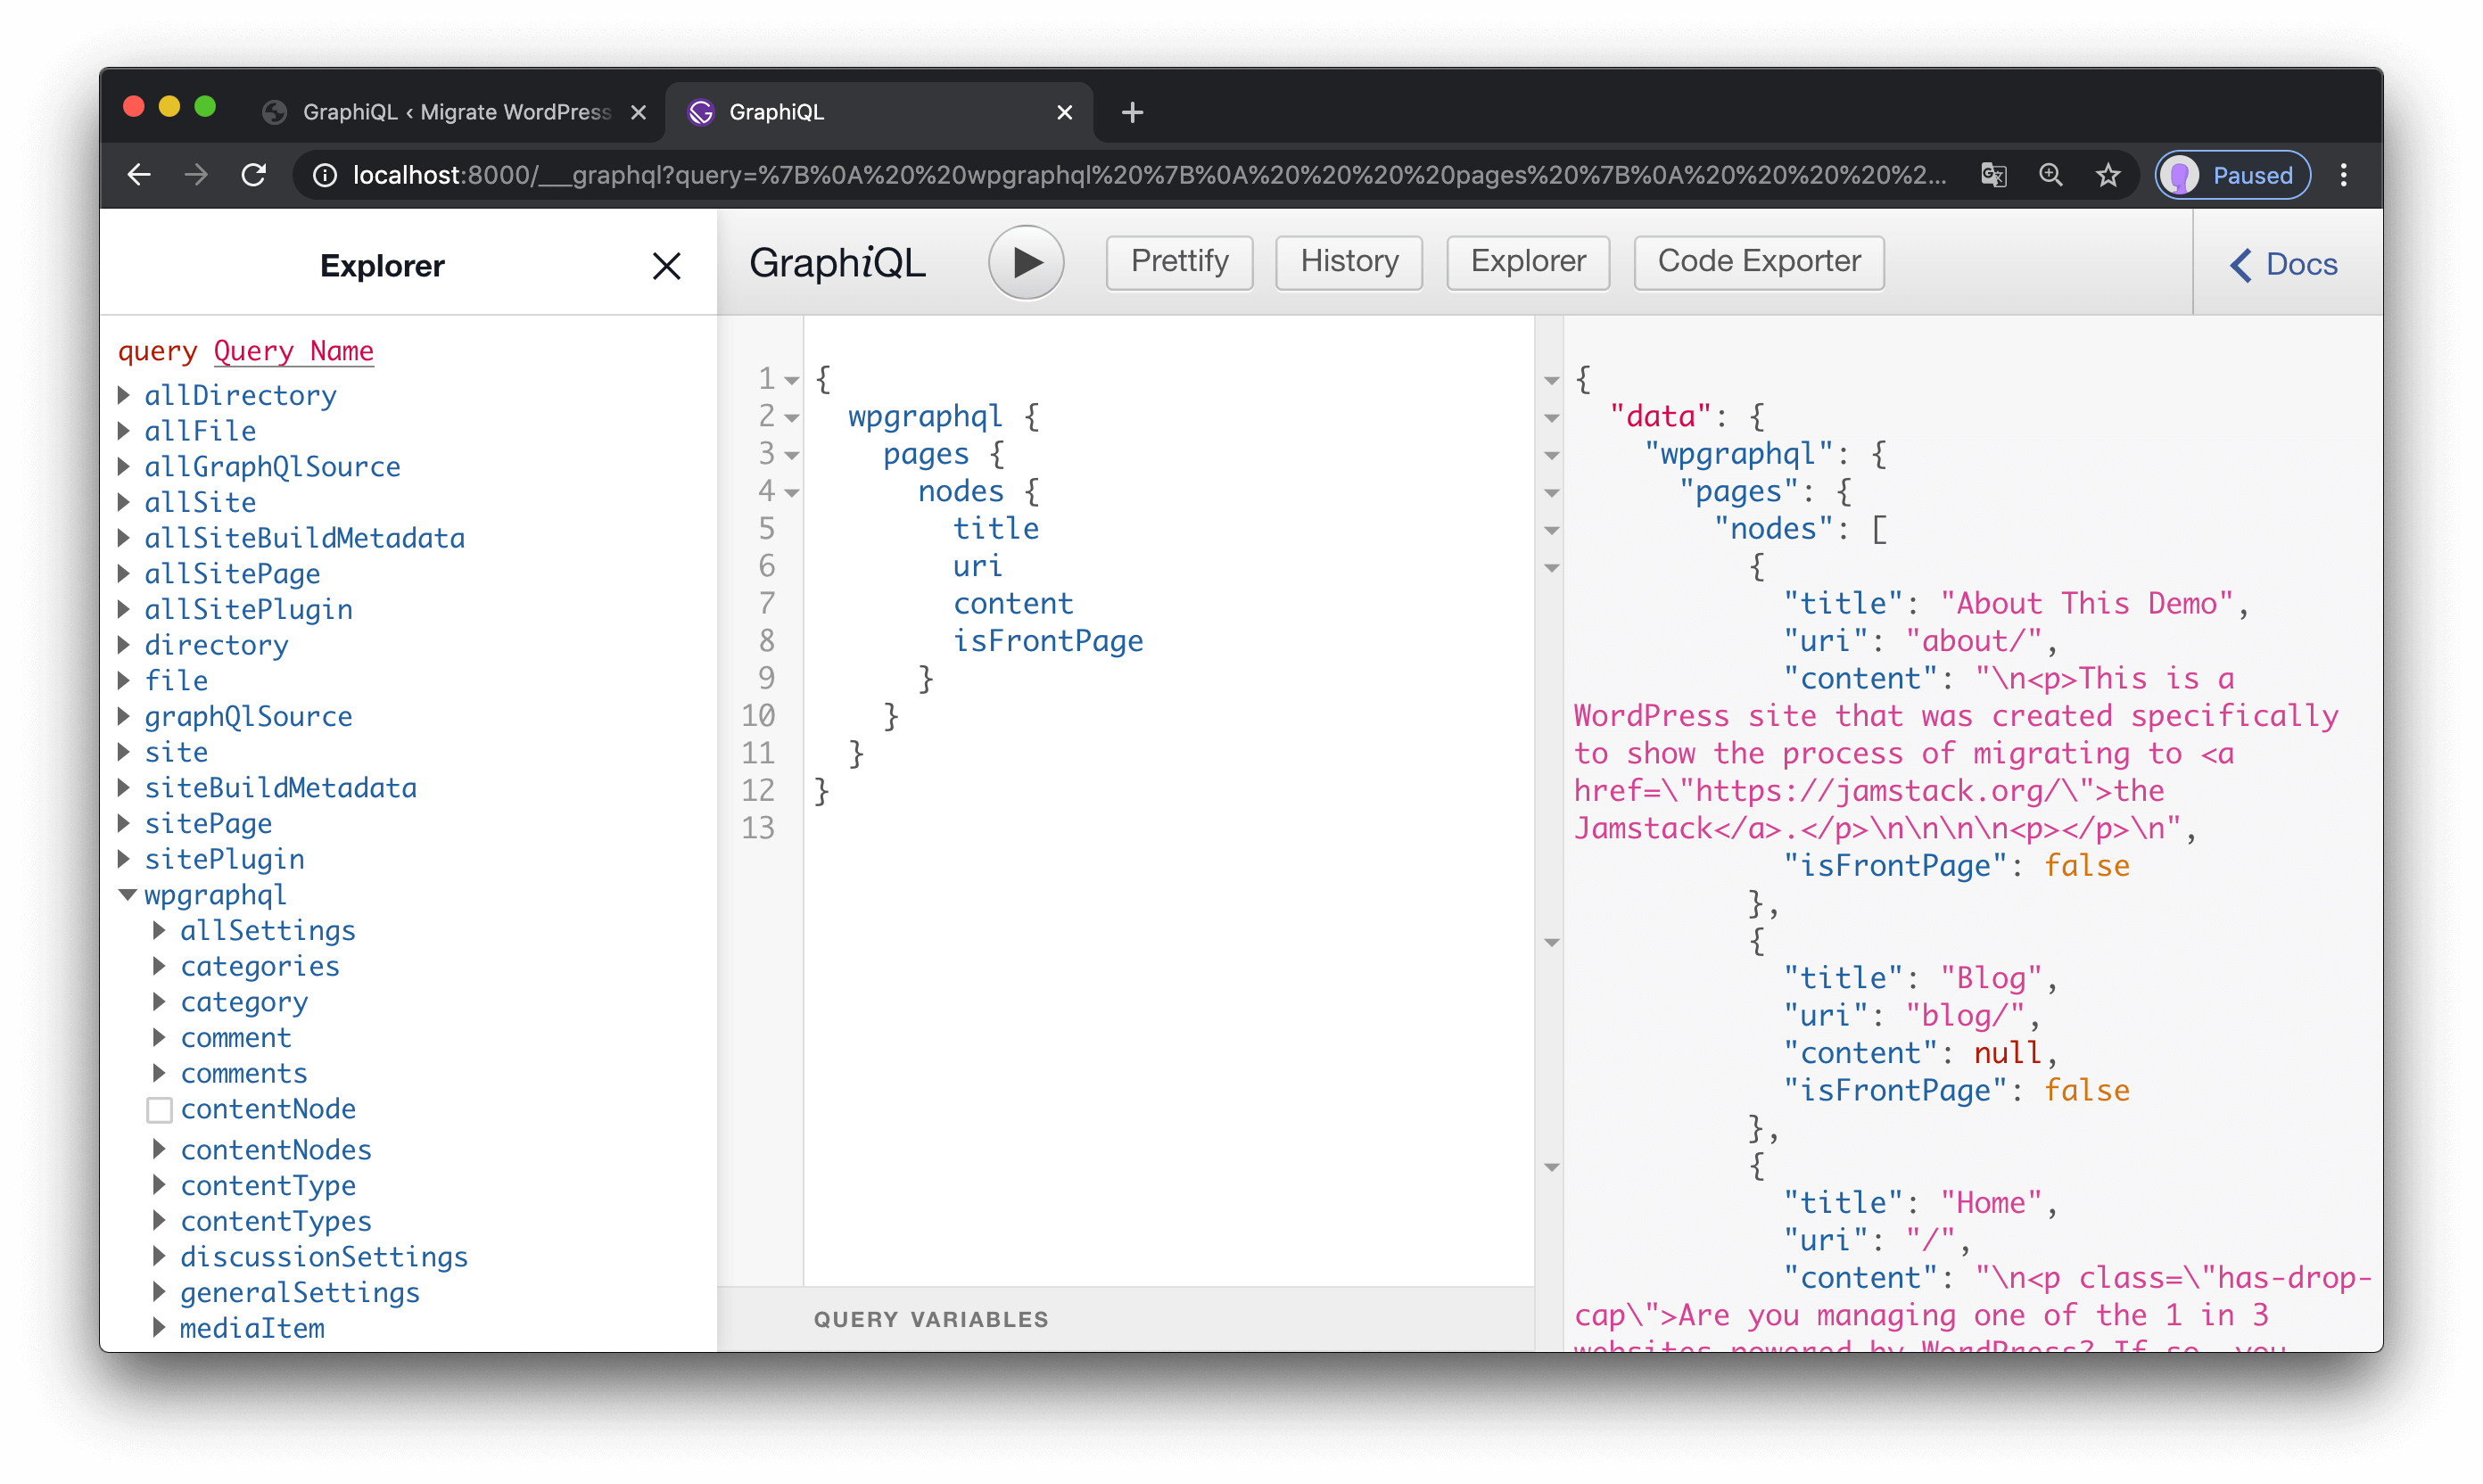
Once the site finishes starting up, open http://localhost:8000/___graphql in your browser to see Gatsby’s version of GraphiQL.
In Gatsby, writing a query to load WordPress data is almost exactly the same as the one we used in WP GraphiQL, except Gatsby wraps all WordPress queries in wpgraphql — the fieldName we set in our config — to avoid naming collisions with other data sources.
Add the following query in GraphiQL:
{
  wpgraphql {
    pages {
      nodes {
        title
        uri
        content
        isFrontPage
      }
    }
  }
}
After executing the query by pressing the play button, we’ll see our WordPress data loaded in Gatsby!
Create pages from WordPress content
{% renderFile ”./src/_includes/pages/blog/egghead-embed.vue”, { eggheadVideoTitle: “Create pages in Gatsby from WordPress pages”, eggheadVideoUrl: “https://egghead.io/lessons/gatsby-create-pages-in-gatsby-from-wordpress-pages” } %}
Now that we have a Gatsby site that has access to our WordPress data, we can start creating pages.
To create pages in Gatsby, we need three things:
- Data to display on the page
- A template component to define the page layout
- A call to the
createPagesAPI exported fromgatsby-node.jsto combine the data and template together into pages
We have the data from WordPress now, so we can create our template component, then create pages.
Create a template component for pages
A template component in Gatsby is a standard React component. Gatsby passes in several props to the component when it creates pages, so it’s probably a good idea to take a look at what those are.
Create a new files called src/templates/page-template.js and put this inside:
import React from "react"

const PageTemplate = props => {
  return <pre>{JSON.stringify(props, null, 2)}</pre>
}

export default PageTemplate
Once we’ve saved this file, we’re ready to actually create pages.
Create pages in gatsby-node.js
To create pages, create a new file in the root directory (next to gatsby-config.js) called gatsby-node.js. Inside, let’s add a createPages API call:
exports.createPages = async ({ actions, graphql }) => {
  // query for WordPress page data
  const result = await graphql(`
    {
      wpgraphql {
        pages {
          nodes {
            id
            uri
          }
        }
      }
    }
  `)

  // pull the page data out of the query response
  const pages = result.data.wpgraphql.pages.nodes

  // loop through WordPress pages and create a Gatsby page for each one
  pages.forEach(page => {
    actions.createPage({
      path: page.uri,
      component: require.resolve("./src/templates/page-template.js"),
      context: {
        id: page.id,
      },
    })
  })
}
After saving this file, we can stop the server (press control + C), then run npm run develop again.
Once the site has started, visit http://localhost:8000. We can see everything that Gatsby passes to page components, including the id value we passed in context:
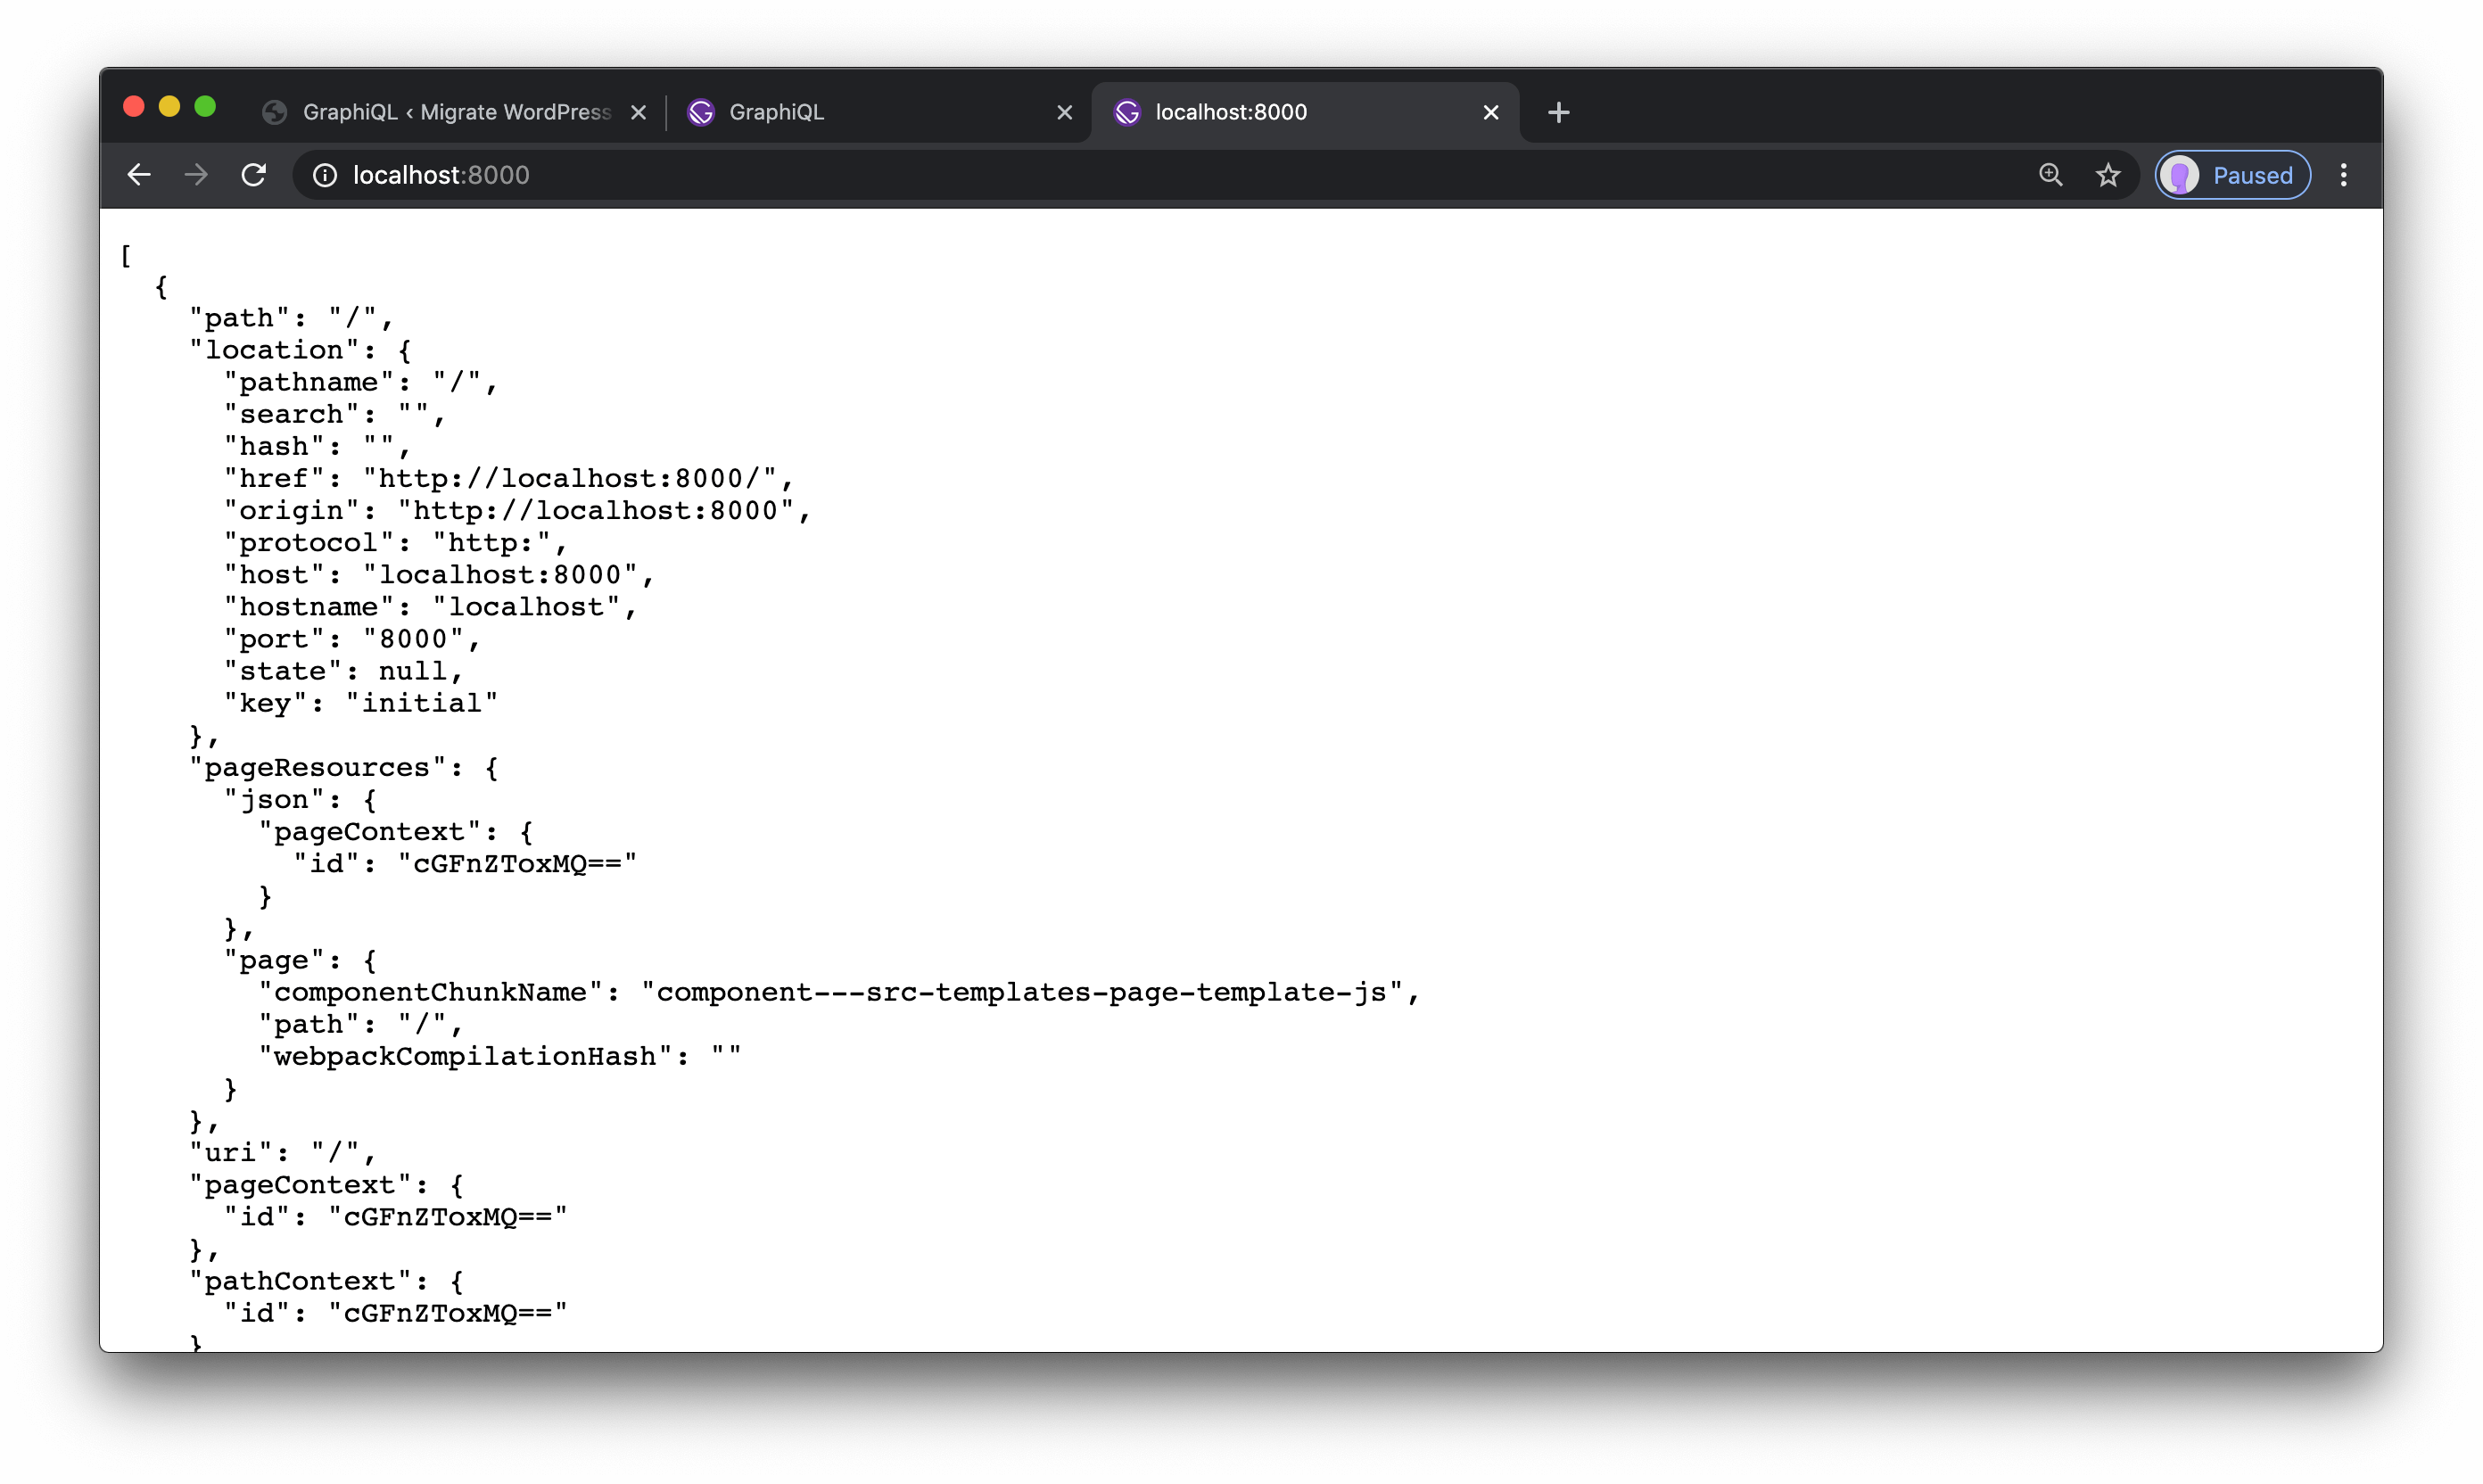
This doesn’t look like much right now, but it gives us the page ID, which will let us load page-specific data in our template component.
Write a GraphQL query to load page content from WordPress
{% renderFile ”./src/_includes/pages/blog/egghead-embed.vue”, { eggheadVideoTitle: “Display WordPress page content in Gatsby page template components”, eggheadVideoUrl: “https://egghead.io/lessons/gatsby-display-wordpress-page-content-in-gatsby-page-template-components” } %}
Collocating GraphQL queries with the components that use them is a great way to keep your codebase understandable. Because of this, we’re going to query for individual page data using the page ID in the template component itself.
Anything passed in the context object is also available as a GraphQL variable, so we can use the id to load content for each page by adding the following query:
  import React from "react"
+ import { graphql } from "gatsby"
+
+ export const query = graphql`
+   query($id: ID!) {
+     wpgraphql {
+       page(id: $id) {
+         title
+         content
+       }
+     }
+   }
+ `

  const PageTemplate = props => {
    return <pre>{JSON.stringify(props, null, 2)}</pre>
  }

  export default PageTemplate
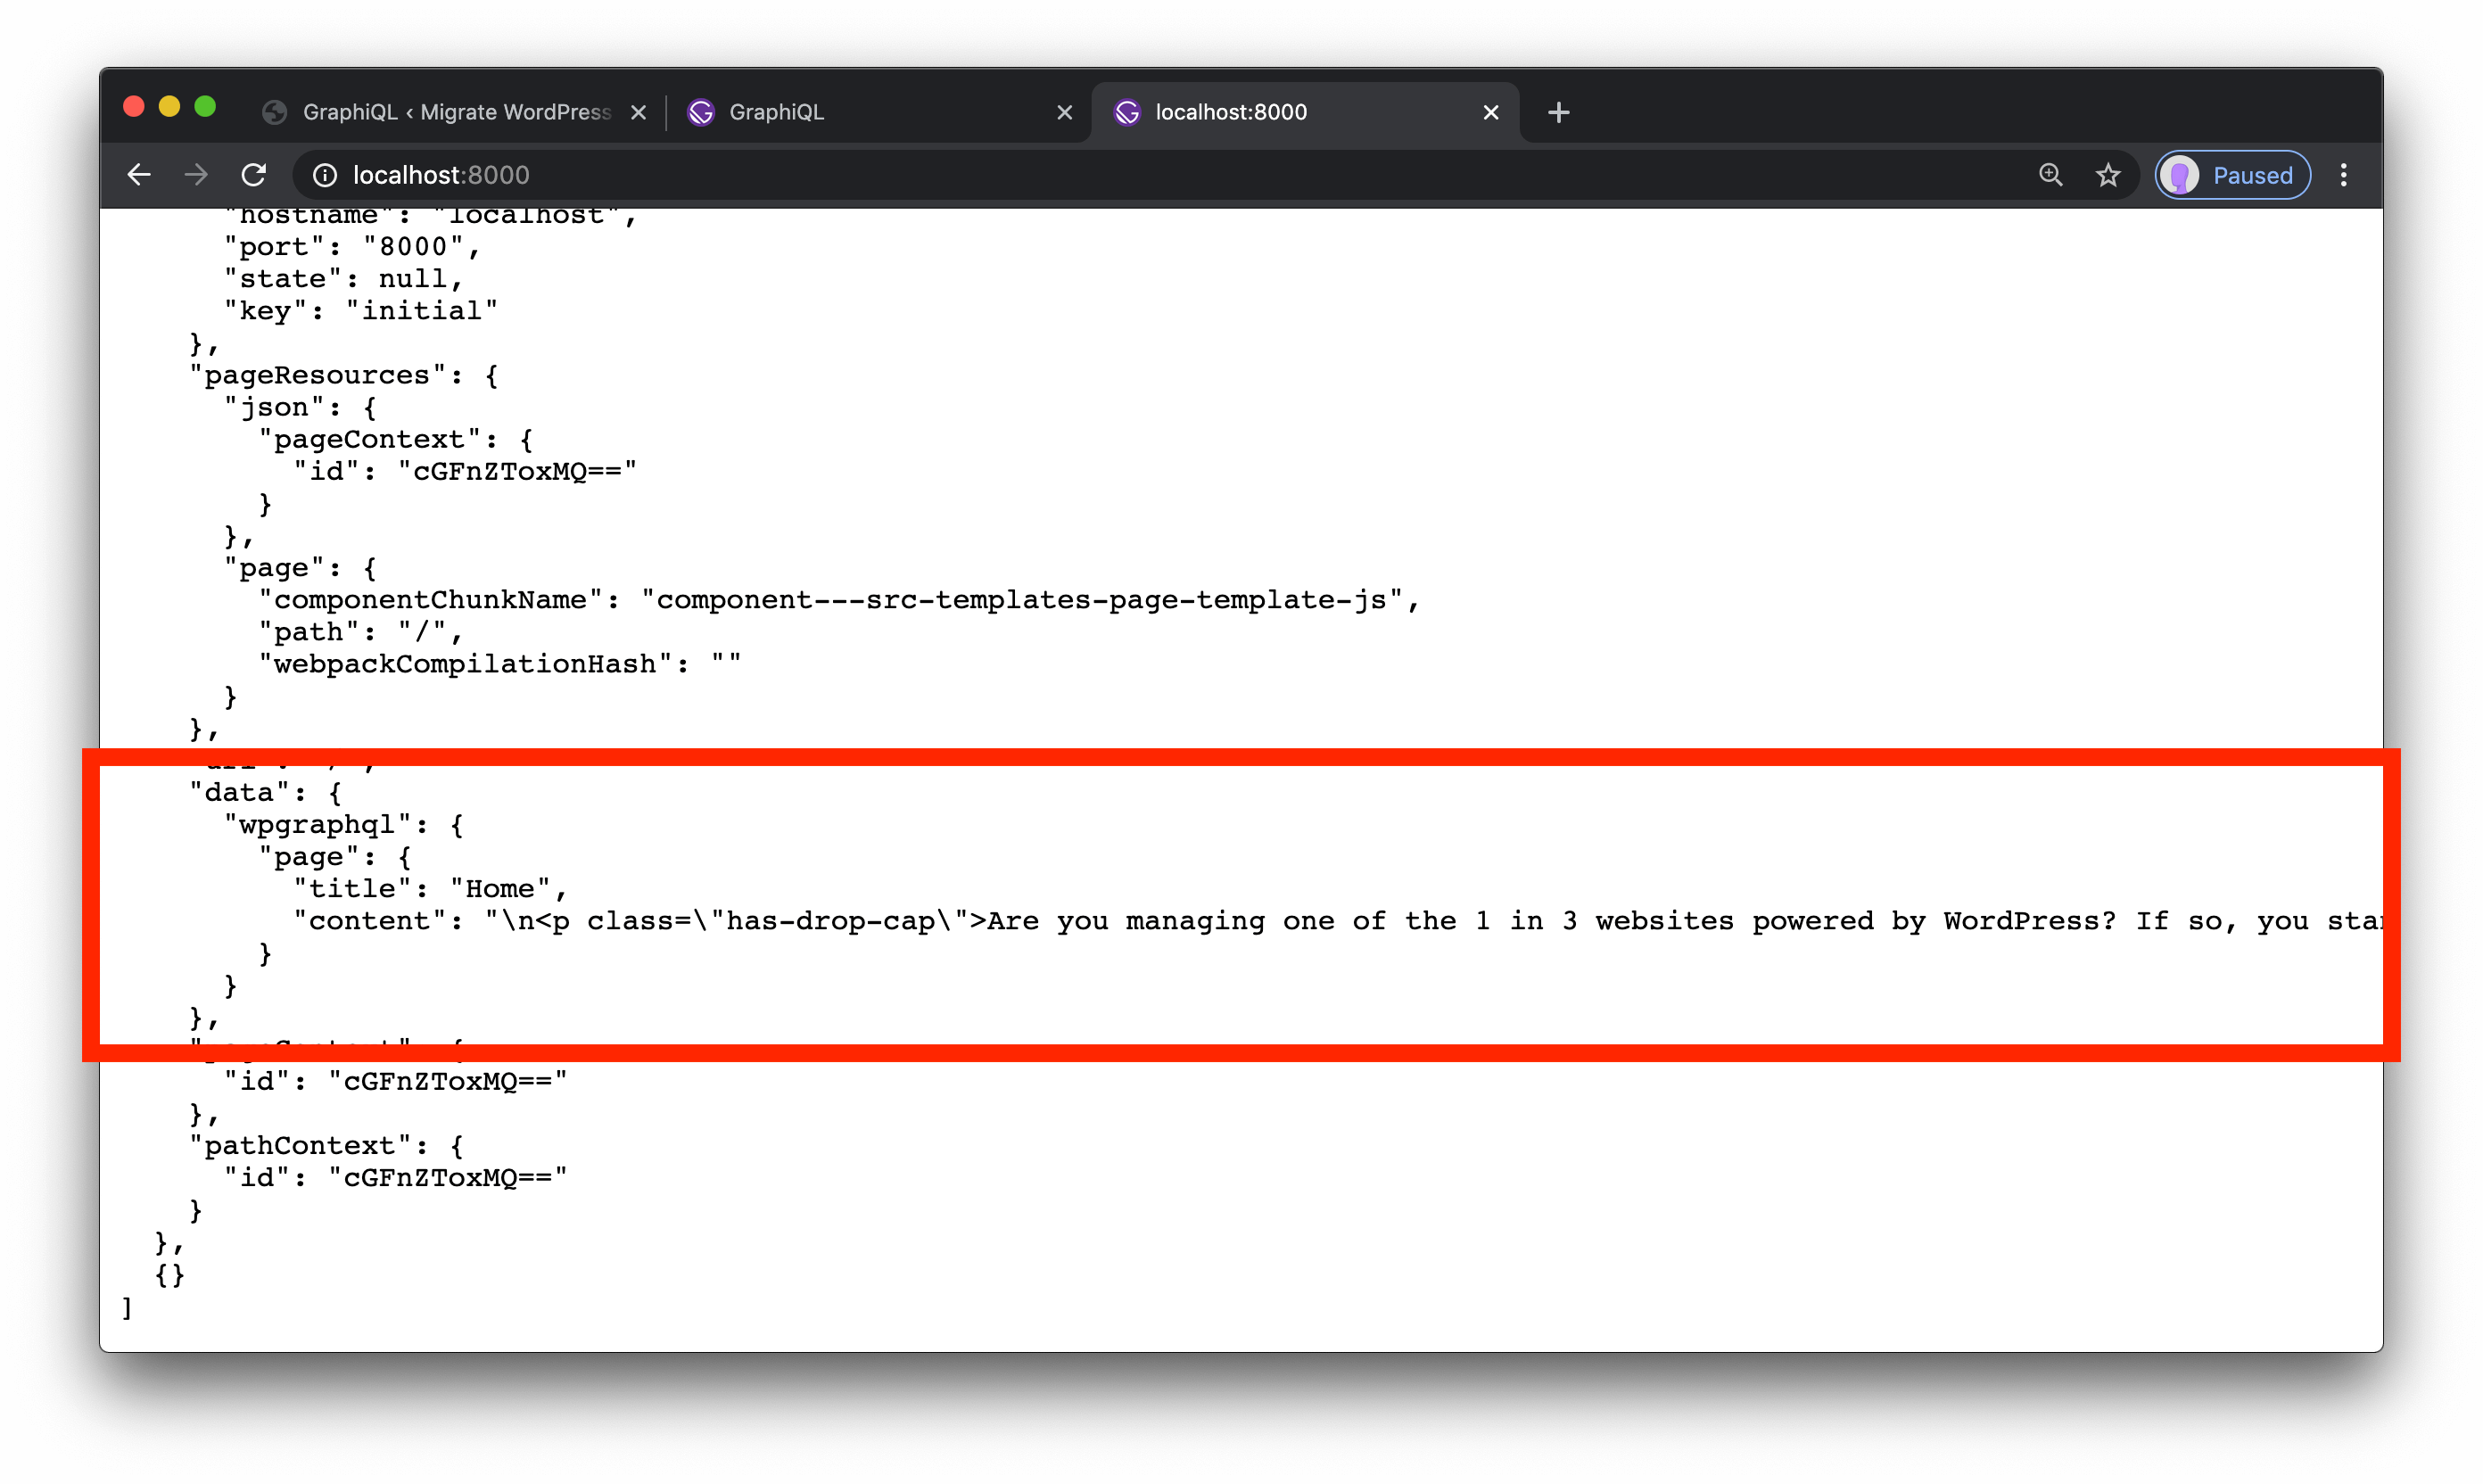
Once we save this, the page at http://localhost:8000 will update to include a new data prop that contains the result of this query.
Alright! Now that we have content, we need to write some markup to actually display it in a reader-friendly way.
Display the content in the page template
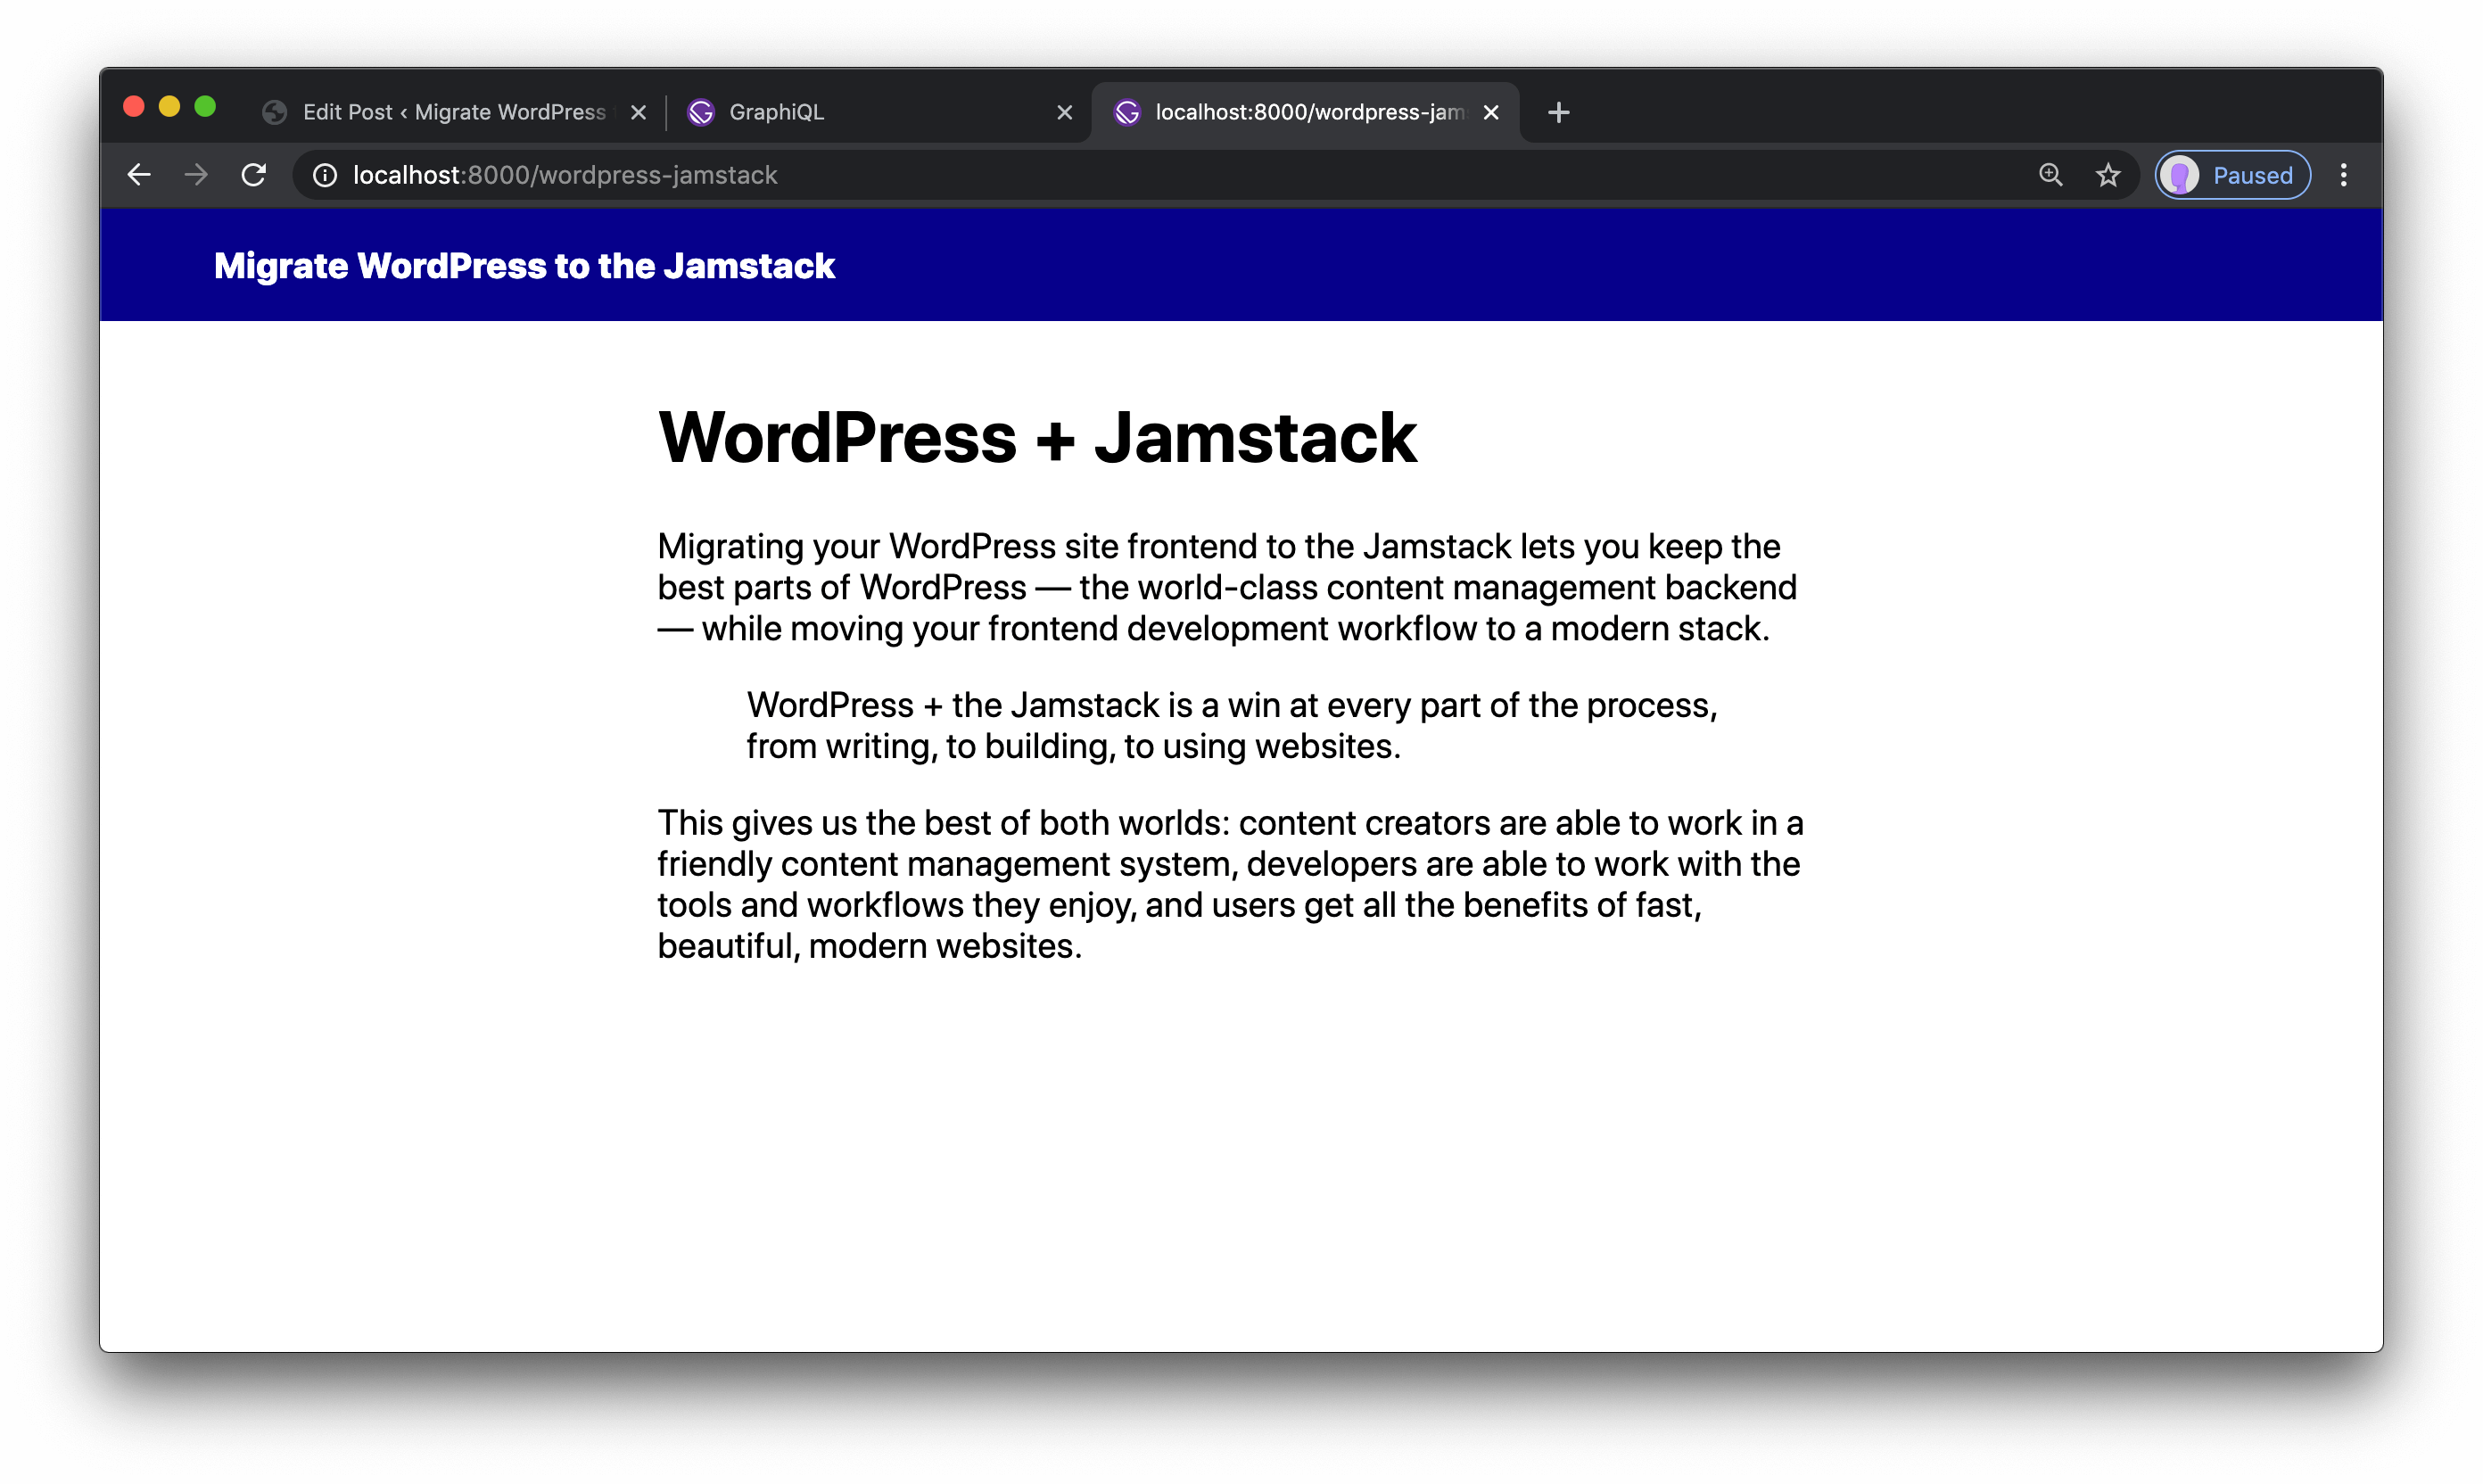
WordPress returns markup and HTML-encoded entities, so we need to use dangerouslySetInnerHTML to make sure our content displays properly.
To use our page data, we can grab just the data prop in our component, then drill down to the page content and display those values:
  {% raw %}
  import React from "react"
  import { graphql } from "gatsby"

  export const query = graphql`
    query($id: ID!) {
      wpgraphql {
        page(id: $id) {
          title
          content
        }
      }
    }
  `

- const PageTemplate = (...args) => {
-   return <pre>{JSON.stringify(args, null, 2)}</pre>
+ const PageTemplate = ({ data }) => {
+   const page = data.wpgraphql.page
+   return (
+     <>
+       <h1 dangerouslySetInnerHTML={{ __html: page.title }} />
+       <div dangerouslySetInnerHTML={{ __html: page.content }} />
+     </>
+   )
  }

  export default PageTemplate
  {% endraw %}
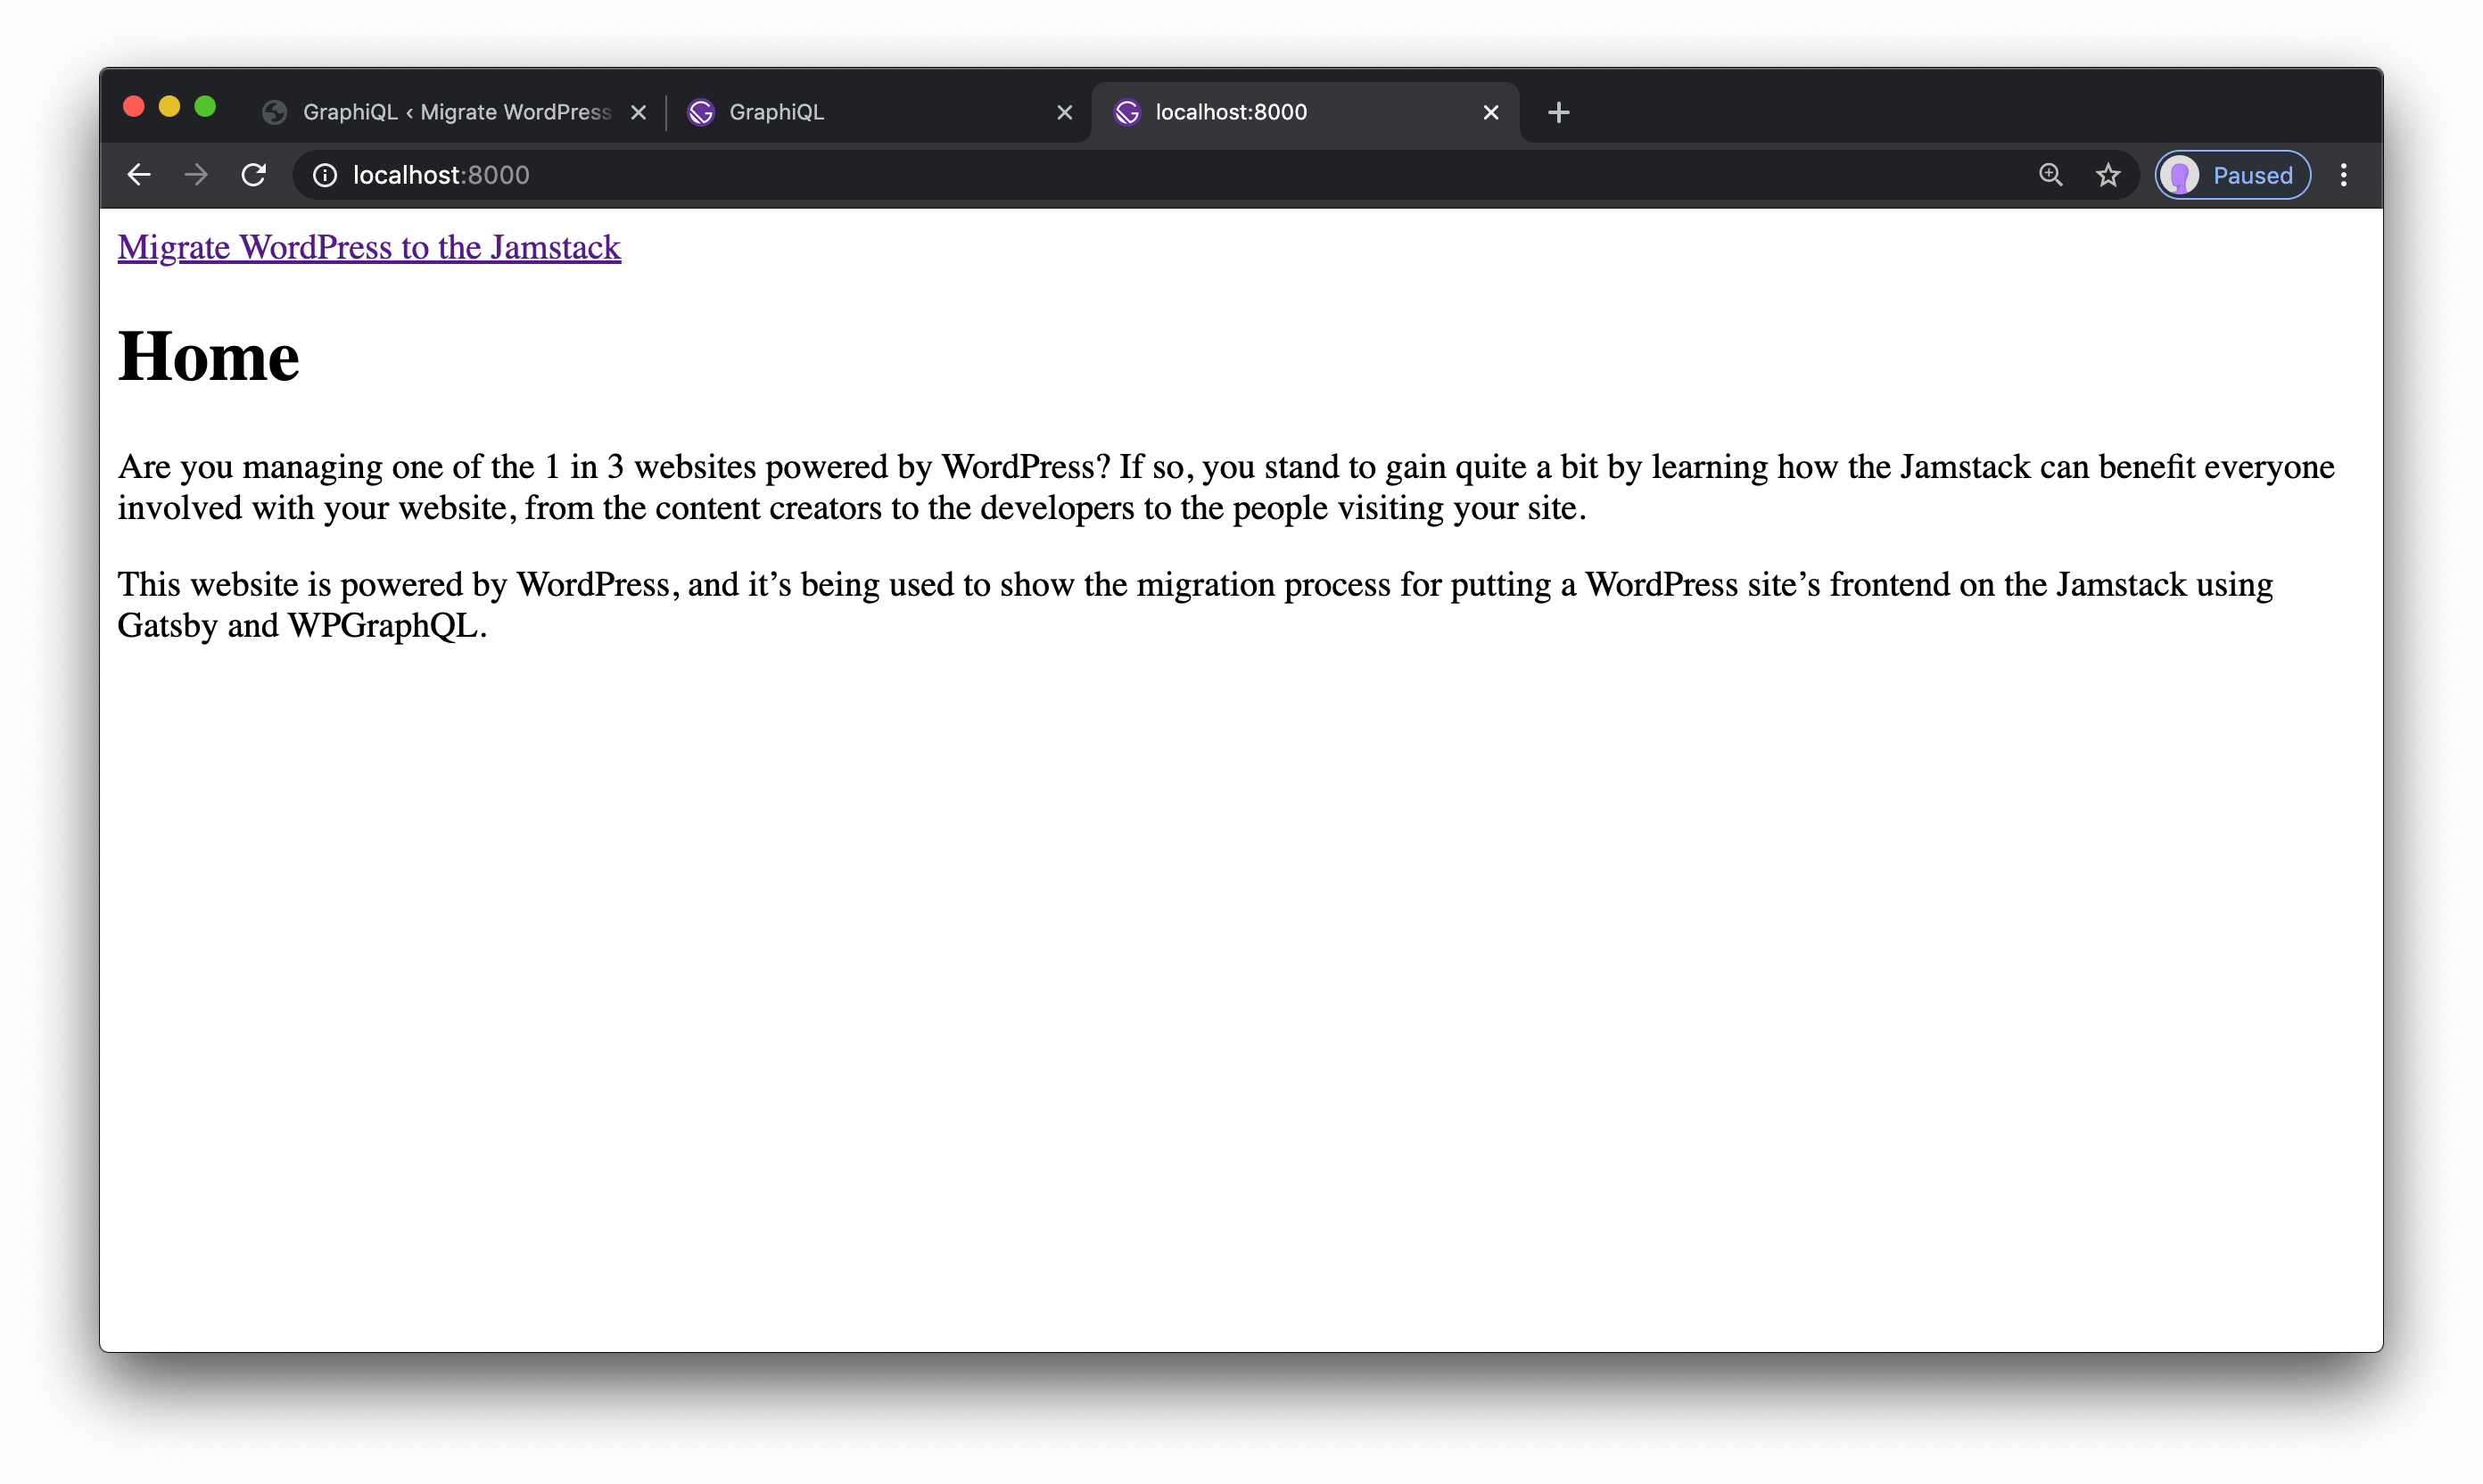
Save and check out http://localhost:8000 — it’s working!

Add a shared layout and styles
{% renderFile ”./src/_includes/pages/blog/egghead-embed.vue”, { eggheadVideoTitle: “Add a shared layout component and global styles to a Gatsby site”, eggheadVideoUrl: “https://egghead.io/lessons/gatsby-add-a-shared-layout-component-and-global-styles-to-a-gatsby-site” } %}
To make our Gatsby site look more like a real website, we need to add a layout — a shared header in this case — and styles.
Create a shared Layout component
Creating a Layout component requires a standard React component that wraps whatever content is passed to it (as the children prop) with markup to give the page semantic structure.
Create src/components/layout.js, then add the following code:
import React from "react"
import { Link } from "gatsby"

const Layout = ({ children }) => {
  return (
    <>
      <header>
        <Link to="/" className="home">
          Migrate WordPress to the Jamstack
        </Link>
      </header>
      <main>{children}</main>
    </>
  )
}

export default Layout
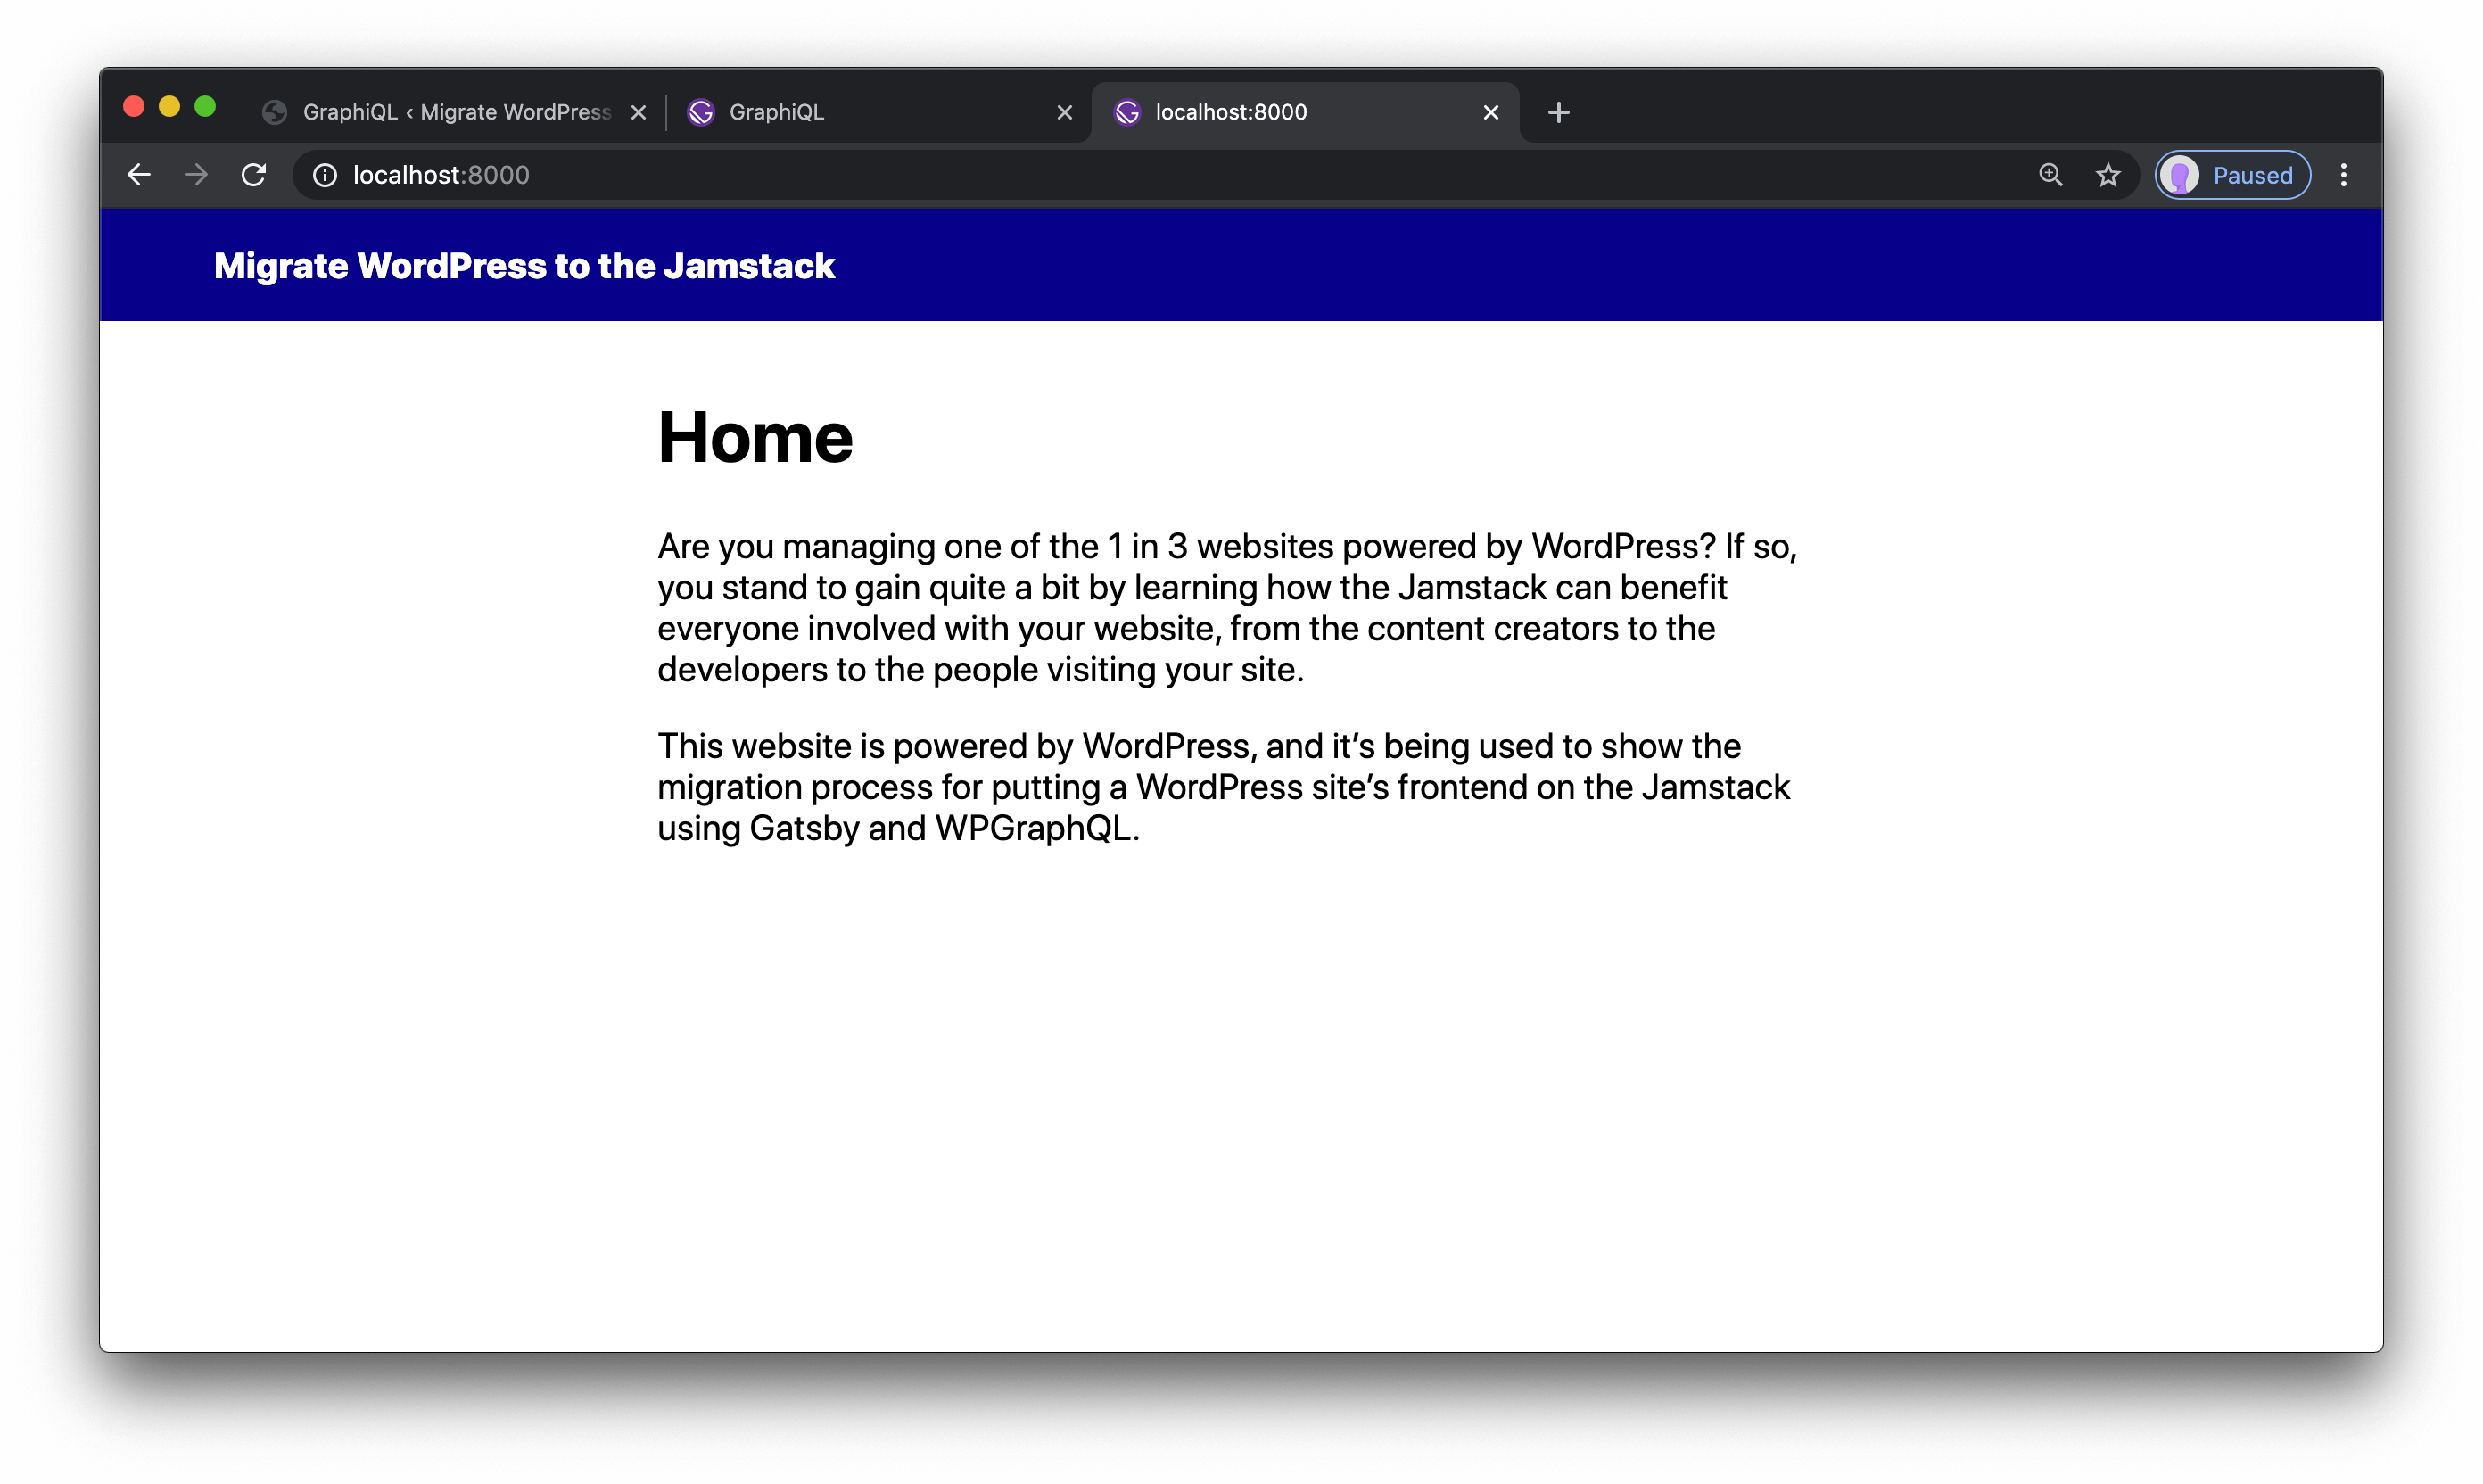
This sets up a header element with a link to go back to the home page and a main element that contains the page content.
Use the layout in pages
Once we have a layout component, we need to import it in our page template and wrap it around the output:
  {% raw %}
  import React from "react"
  import { graphql } from "gatsby"
+ import Layout from '../components/layout';

  export const query = graphql`
    query($id: ID!) {
      wpgraphql {
        page(id: $id) {
          title
          content
        }
      }
    }
  `

  const PageTemplate = ({ data }) => {
  const page = data.wpgraphql.page
  return (
-   <>
+   <Layout>
      <h1 dangerouslySetInnerHTML={{ __html: page.title }} />
      <div dangerouslySetInnerHTML={{ __html: page.content }} />
-   </>
+   </Layout>
    )
  }

  export default PageTemplate
  {% endraw %}
Once we’ve saved these changes, we can head to http://localhost:8000 to see the header at the top of the page.
Add basic styles
Adding styles helps our site look a bit more polished.
Create src/styles/layout.css, then add the following:
html,
body {
  margin: 0;
  font-family: -apple-system, BlinkMacSystemFont, "Segoe UI", Roboto, Helvetica,
    Arial, sans-serif, "Apple Color Emoji", "Segoe UI Emoji", "Segoe UI Symbol";
}

header {
  background: darkblue;
  padding: 1rem 5vw;
}

header a {
  color: white;
  display: inline-block;
  margin-left: 0.75rem;
}

header .home {
  font-weight: 800;
  margin-left: 0;
  text-decoration: none;
}

main {
  margin: 2rem auto;
  max-width: 54ch;
  width: 90vw;
}
This CSS makes the header blue with white text and adds some spacing around elements on the page.
To apply our styles, we need to import the stylesheet in our Layout component:
  import React from "react"
  import { Link } from "gatsby"

+ import "../styles/layout.css"

  const Layout = ({ children }) => {
    return (
      <>
        <header>
          <Link to="/" className="home">
            Migrate WordPress to the Jamstack
          </Link>
        </header>
        <main>{children}</main>
      </>
    )
  }

  export default Layout
After saving this change, our page at http://localhost:8000 will start looking a little more stylish.
NOTE: Gatsby has built-in support for multiple styling approaches. You can likely use whatever flavor of CSS you prefer.
Create pages from WordPress posts
{% renderFile ”./src/_includes/pages/blog/egghead-embed.vue”, { eggheadVideoTitle: “Load WordPress post data and create Gatsby pages”, eggheadVideoUrl: “https://egghead.io/lessons/gatsby-load-wordpress-post-data-and-create-gatsby-pages” } %}
In WordPress, content can be split up into multiple content types. By default, there are “pages”, which we’ve already handled, and “posts”, which are most commonly used to power blogs.
Our WordPress site is using both pages and posts, so we need to write additional code to create Gatsby pages for each WordPress post.
Create a page template component
Fortunately, the process for creating pages from WordPress posts is very similar to the process for creating WordPress pages.
To start, we can duplicate src/templates/page-template.js and name the new file src/templates/post-template.js. Inside, we need to make the following edits:
{% raw %}
  import React from "react"
  import { graphql } from "gatsby"
  import Layout from "../components/layout"

  export const query = graphql`
    query($id: ID!) {
      wpgraphql {
-       page(id: $id) {
+       post(id: $id) {
          title
          content
        }
      }
    }
  `

- const PageTemplate = ({ data }) => {
-   const page = data.wpgraphql.page
+ const PostTemplate = ({ data }) => {
+   const post = data.wpgraphql.post
    return (
      <Layout>
-       <h1 dangerouslySetInnerHTML={{ __html: page.title }} />
-       <div dangerouslySetInnerHTML={{ __html: page.content }} />
+       <h1 dangerouslySetInnerHTML={{ __html: post.title }} />
+       <div dangerouslySetInnerHTML={{ __html: post.content }} />
      </Layout>
    )
  }

- export default PageTemplate
+ export default PostTemplate
{% endraw %}
Now we’re ready to actually load post data and create Gatsby pages.
Create pages from WordPress post data in gatsby-node.js
Inside gatsby-node.js, we need to add to our GraphQL query, then add another block of code that pulls the posts out of the response and creates pages for each one.
To differentiate posts from pages, each post will have its URL prefixed with blog/.
Make the following changes to put this in place:
exports.createPages = async ({ actions, graphql }) => {
    const result = await graphql(`
      {
        wpgraphql {
          pages {
            nodes {
              id
              uri
            }
          }
+         posts {
+           nodes {
+             id
+             uri
+           }
+         }
        }
      }
    `)

    const pages = result.data.wpgraphql.pages.nodes

    pages.forEach(page => {
      actions.createPage({
        path: page.uri,
        component: require.resolve("./src/templates/page-template.js"),
        context: {
          id: page.id,
        },
      })
    })
+
+   const posts = result.data.wpgraphql.posts.nodes
+
+   posts.forEach(post => {
+     actions.createPage({
+       path: `blog/${post.uri}`,
+       component: require.resolve("./src/templates/post-template.js"),
+       context: {
+         id: post.id,
+       },
+     })
+   })
  }
Stop the server and restart it, then visit one of your post URLs, such as http://localhost:8000/blog/wordpress-jamstack.
Hey, that wasn’t so bad — we’re getting pretty close here!
Add support for WordPress block styles
{% renderFile ”./src/_includes/pages/blog/egghead-embed.vue”, { eggheadVideoTitle: “Add styles for WordPress content blocks in Gatsby pages”, eggheadVideoUrl: “https://egghead.io/lessons/gatsby-add-styles-for-wordpress-content-blocks-in-gatsby-pages” } %}
With the release of Gutenberg, WordPress introduced a block-based editor that allows a slick visual editing experience that supports some stylized blocks like pull quotes.
If we want to avoid rewriting all the CSS to support those stylized blocks, we need to import the block styles from the official WordPress package.
Install @wordpress/block-library
Our first step is to install the official WordPress block library:
npm install @wordpress/block-library
Import the stylesheet into the Layout component
Once we have the package installed, we can import only the stylesheet in our layout component:
  import React from "react"
  import { Link } from "gatsby"

+ import "@wordpress/block-library/build-style/style.css"
  import "../styles/layout.css"

  const Layout = ({ children }) => {
    return (
      <>
        <header>
          <Link to="/" className="home">
            Migrate WordPress to the Jamstack
          </Link>
        </header>
        <main>{children}</main>
      </>
    )
  }

  export default Layout
After saving this, start up the server and head to a page with a styled block on it (such as http://localhost:8000/blog/wordpress-jamstack) to see the WordPress block styles applied.
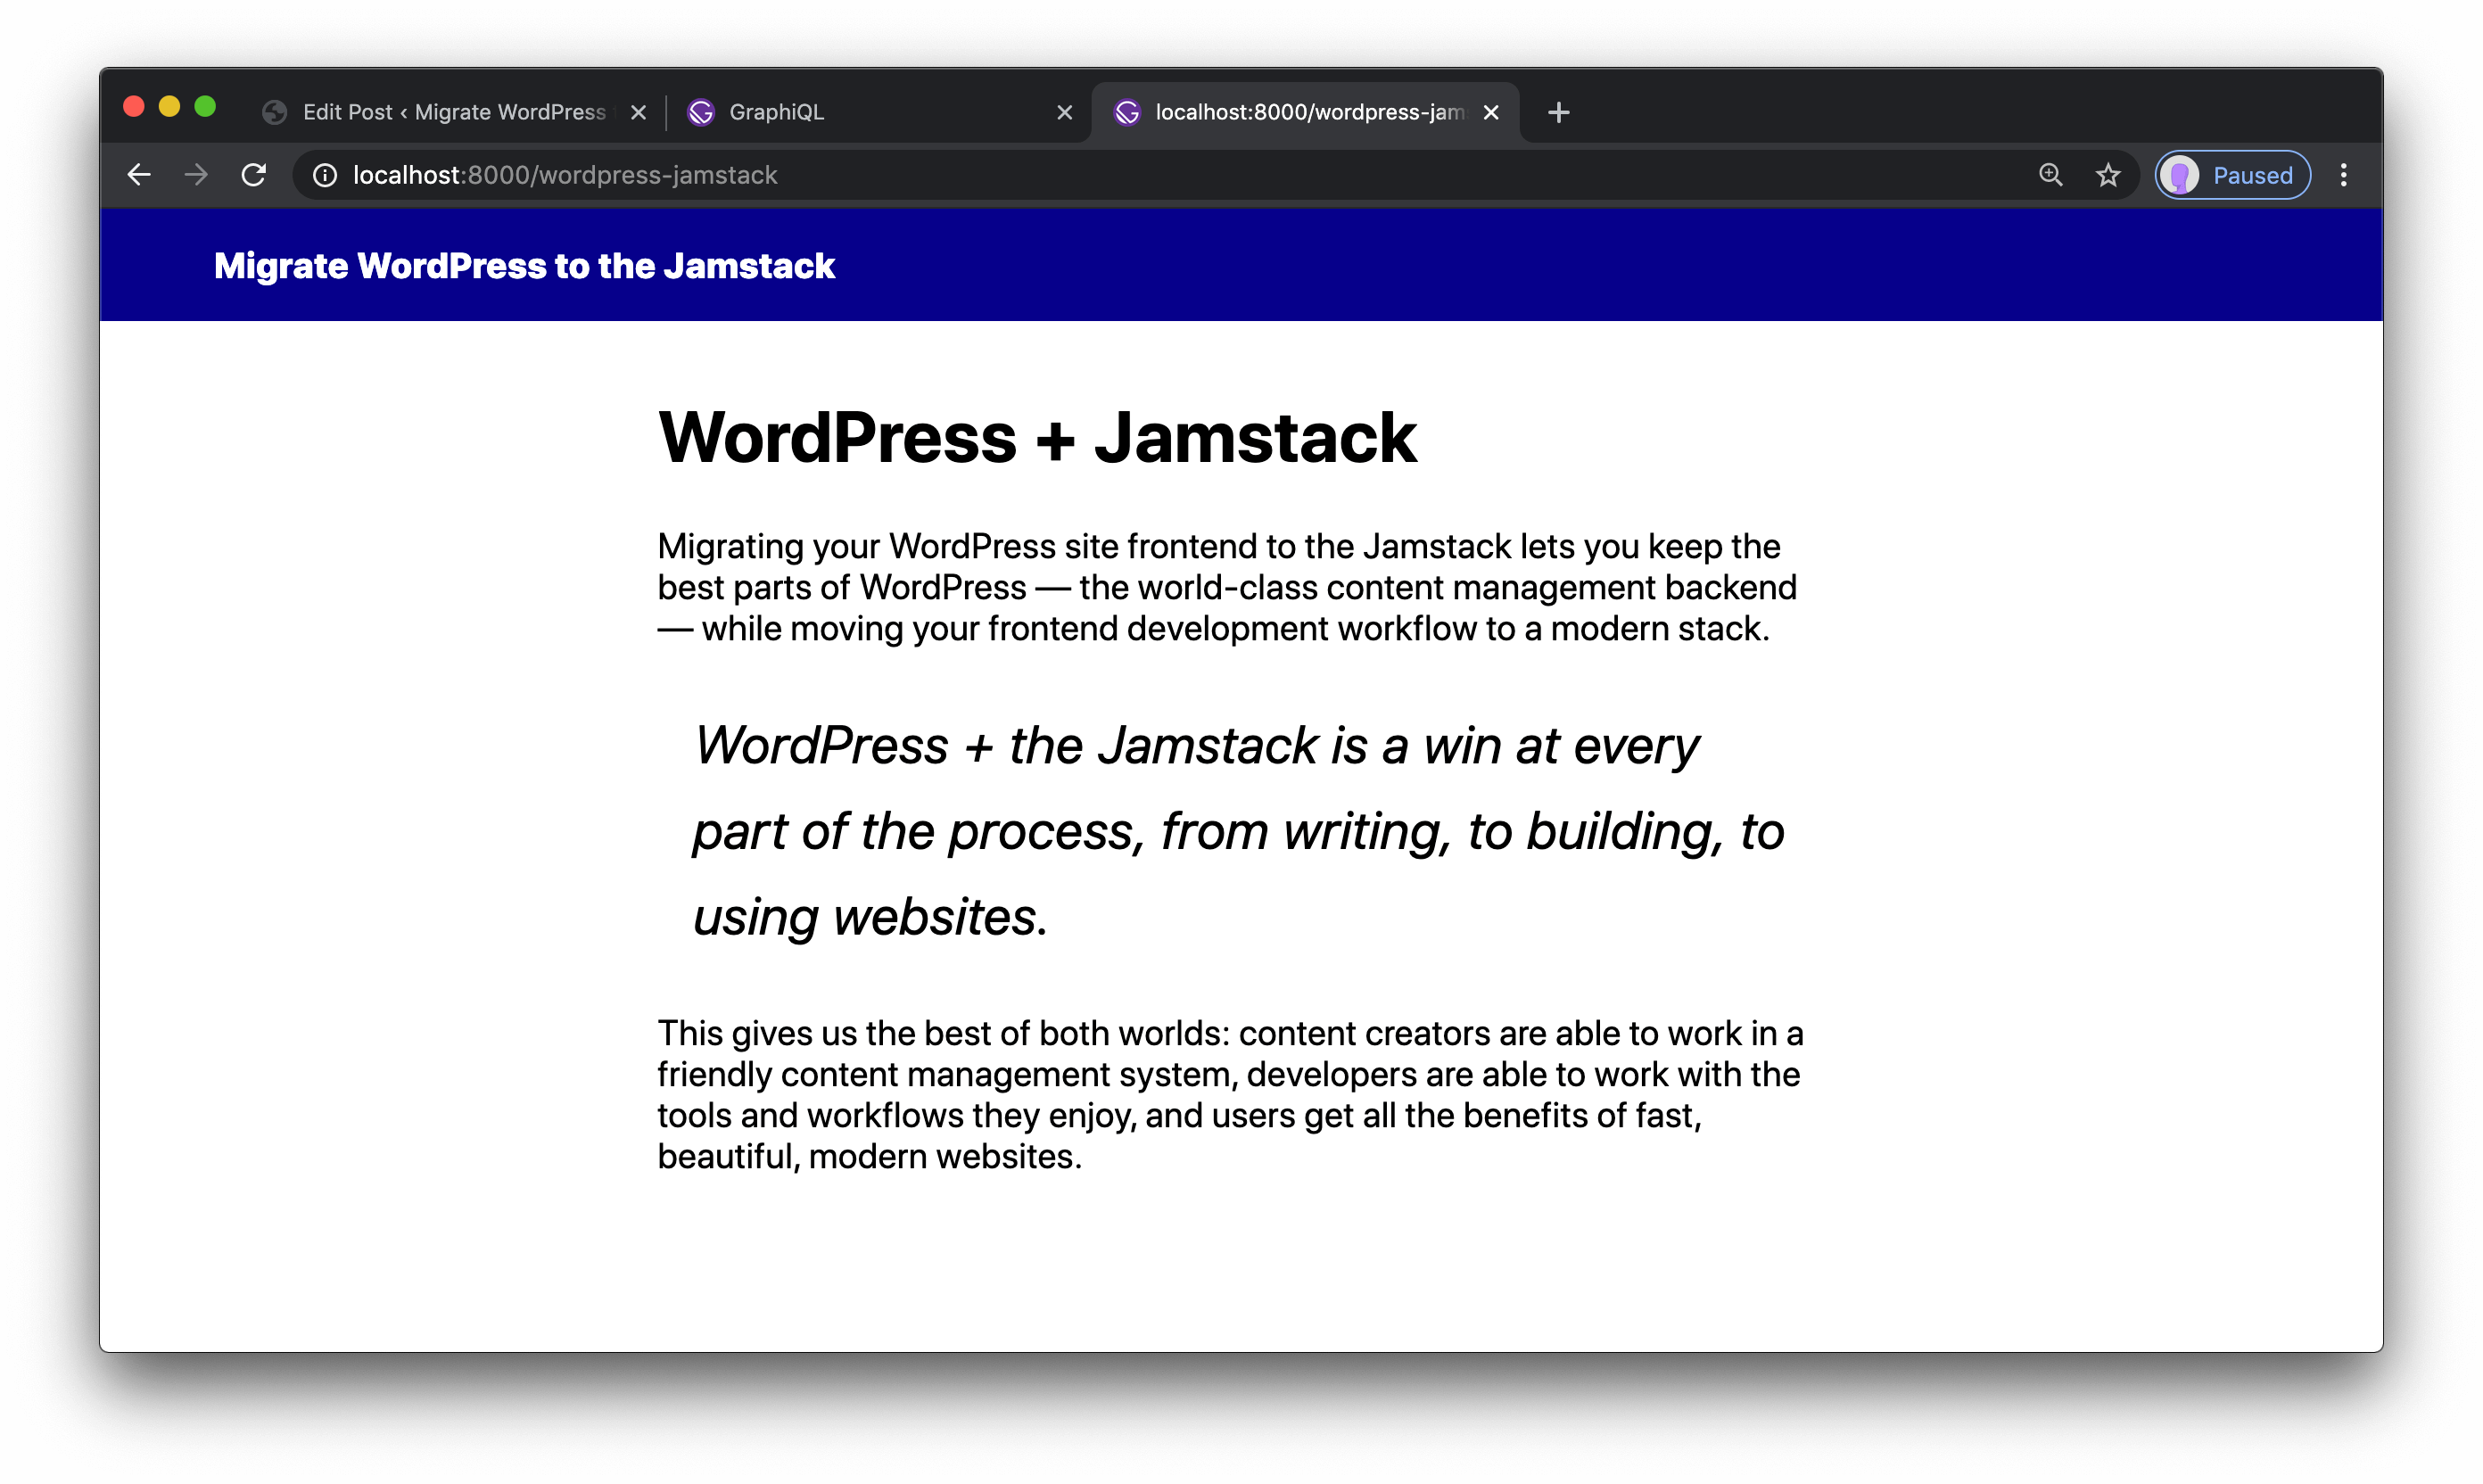
This looks pretty okay considering we didn’t write any custom styles.
Create a page to show blog previews
{% renderFile ”./src/_includes/pages/blog/egghead-embed.vue”, { eggheadVideoTitle: “Create a page in Gatsby to show WordPress blog post previews”, eggheadVideoUrl: “https://egghead.io/lessons/gatsby-create-a-page-in-gatsby-to-show-wordpress-blog-post-previews” } %}
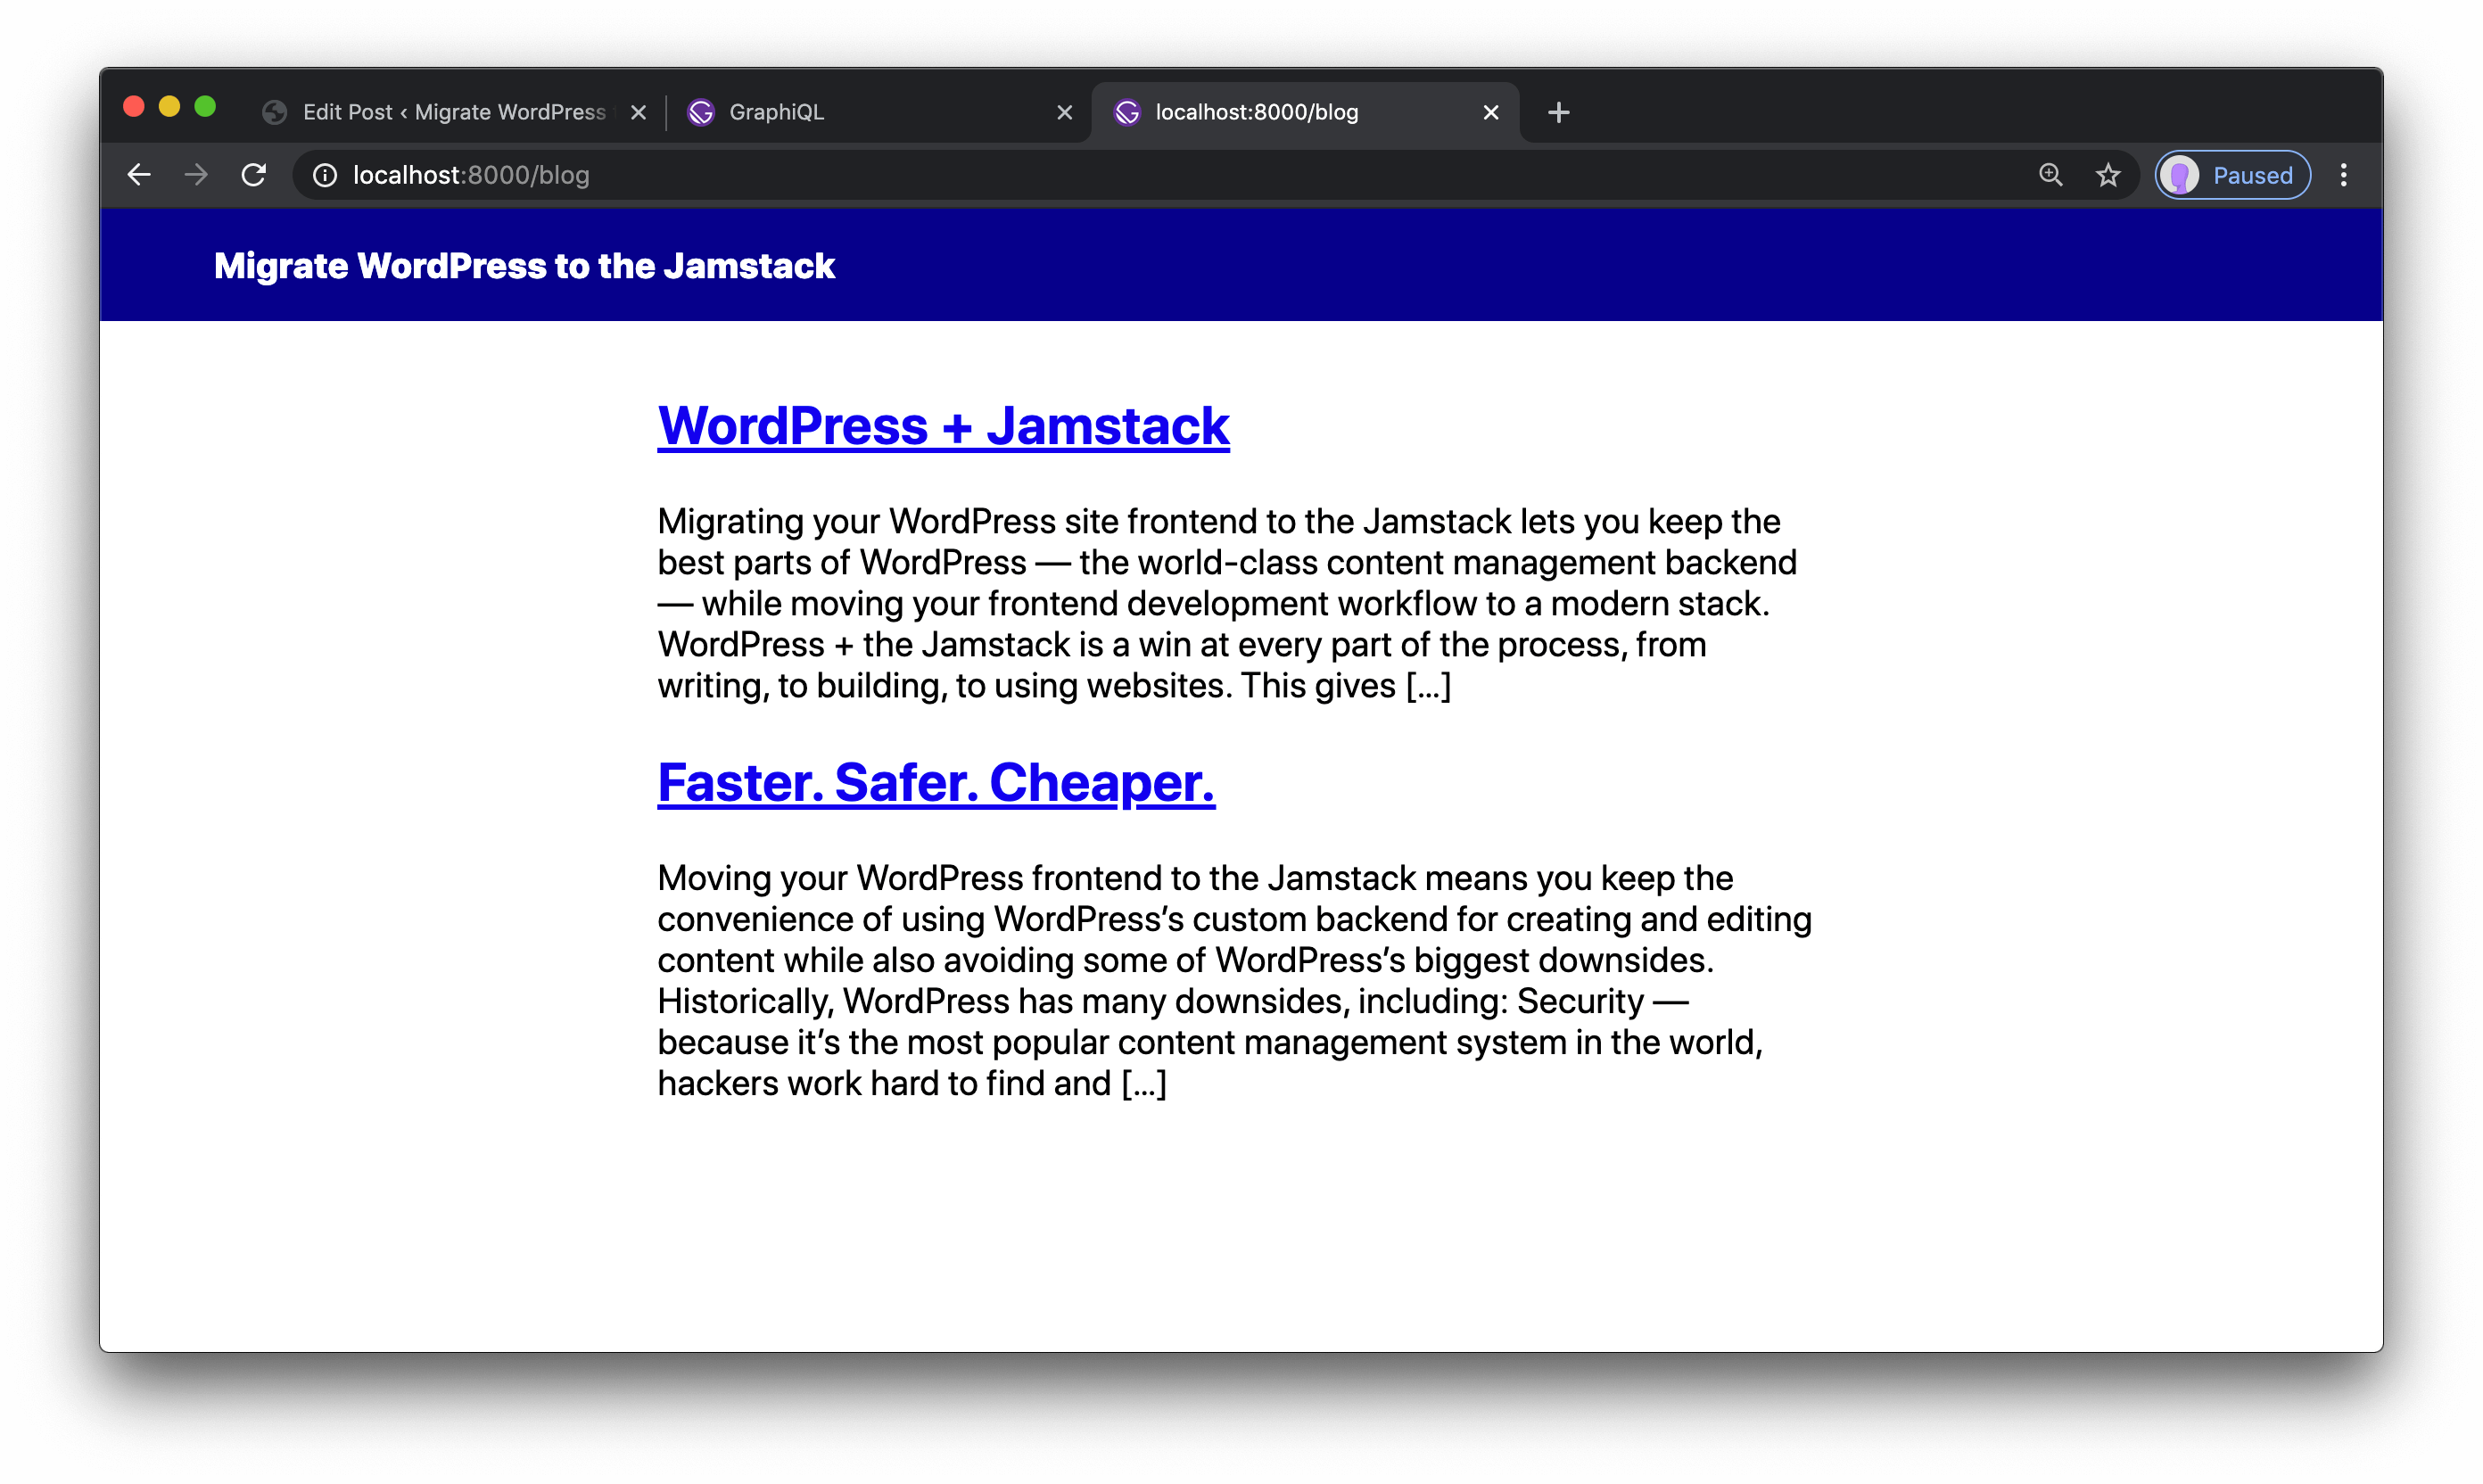
To allow site visitors to browse blog posts, we need to create a page that lists post previews.
To do this, we’re going to create a Gatsby page at src/pages/blog.js, query for post data, and map over the results to create a list of previews:
{% raw %}
import React from "react"
import { graphql, Link } from "gatsby"
import Layout from "../components/layout"

export const query = graphql`
  query {
    wpgraphql {
      posts {
        nodes {
          id
          title
          uri
          excerpt
        }
      }
    }
  }
`

const Blog = ({ data }) => {
  const posts = data.wpgraphql.posts.nodes

  return (
    <Layout>
      {posts.map(post => (
        <article key={post.id}>
          <h2>
            <Link
              to={`/blog/${post.uri}`}
              dangerouslySetInnerHTML={{ __html: post.title }}
            />
          </h2>
          <div dangerouslySetInnerHTML={{ __html: post.excerpt }} />
        </article>
      ))}
    </Layout>
  )
}

export default Blog
{% endraw %}
Save this file, then head to http://localhost:8000/blog to see the previews.
Use WordPress settings to configure your Gatsby site
{% renderFile ”./src/_includes/pages/blog/egghead-embed.vue”, { eggheadVideoTitle: “Use WordPress settings to configure your Gatsby site”, eggheadVideoUrl: “https://egghead.io/lessons/gatsby-use-wordpress-settings-to-configure-your-gatsby-site” } %}
WordPress has a full-featured set of tools for managing site settings that is friendly to non-developers, which means it’s more approachable for site contributors than modifying code.
WP GraphQL makes these settings available to our Gatsby site, so we can take advantage of this workflow to enable non-developers to update settings for our Gatsby site as well.
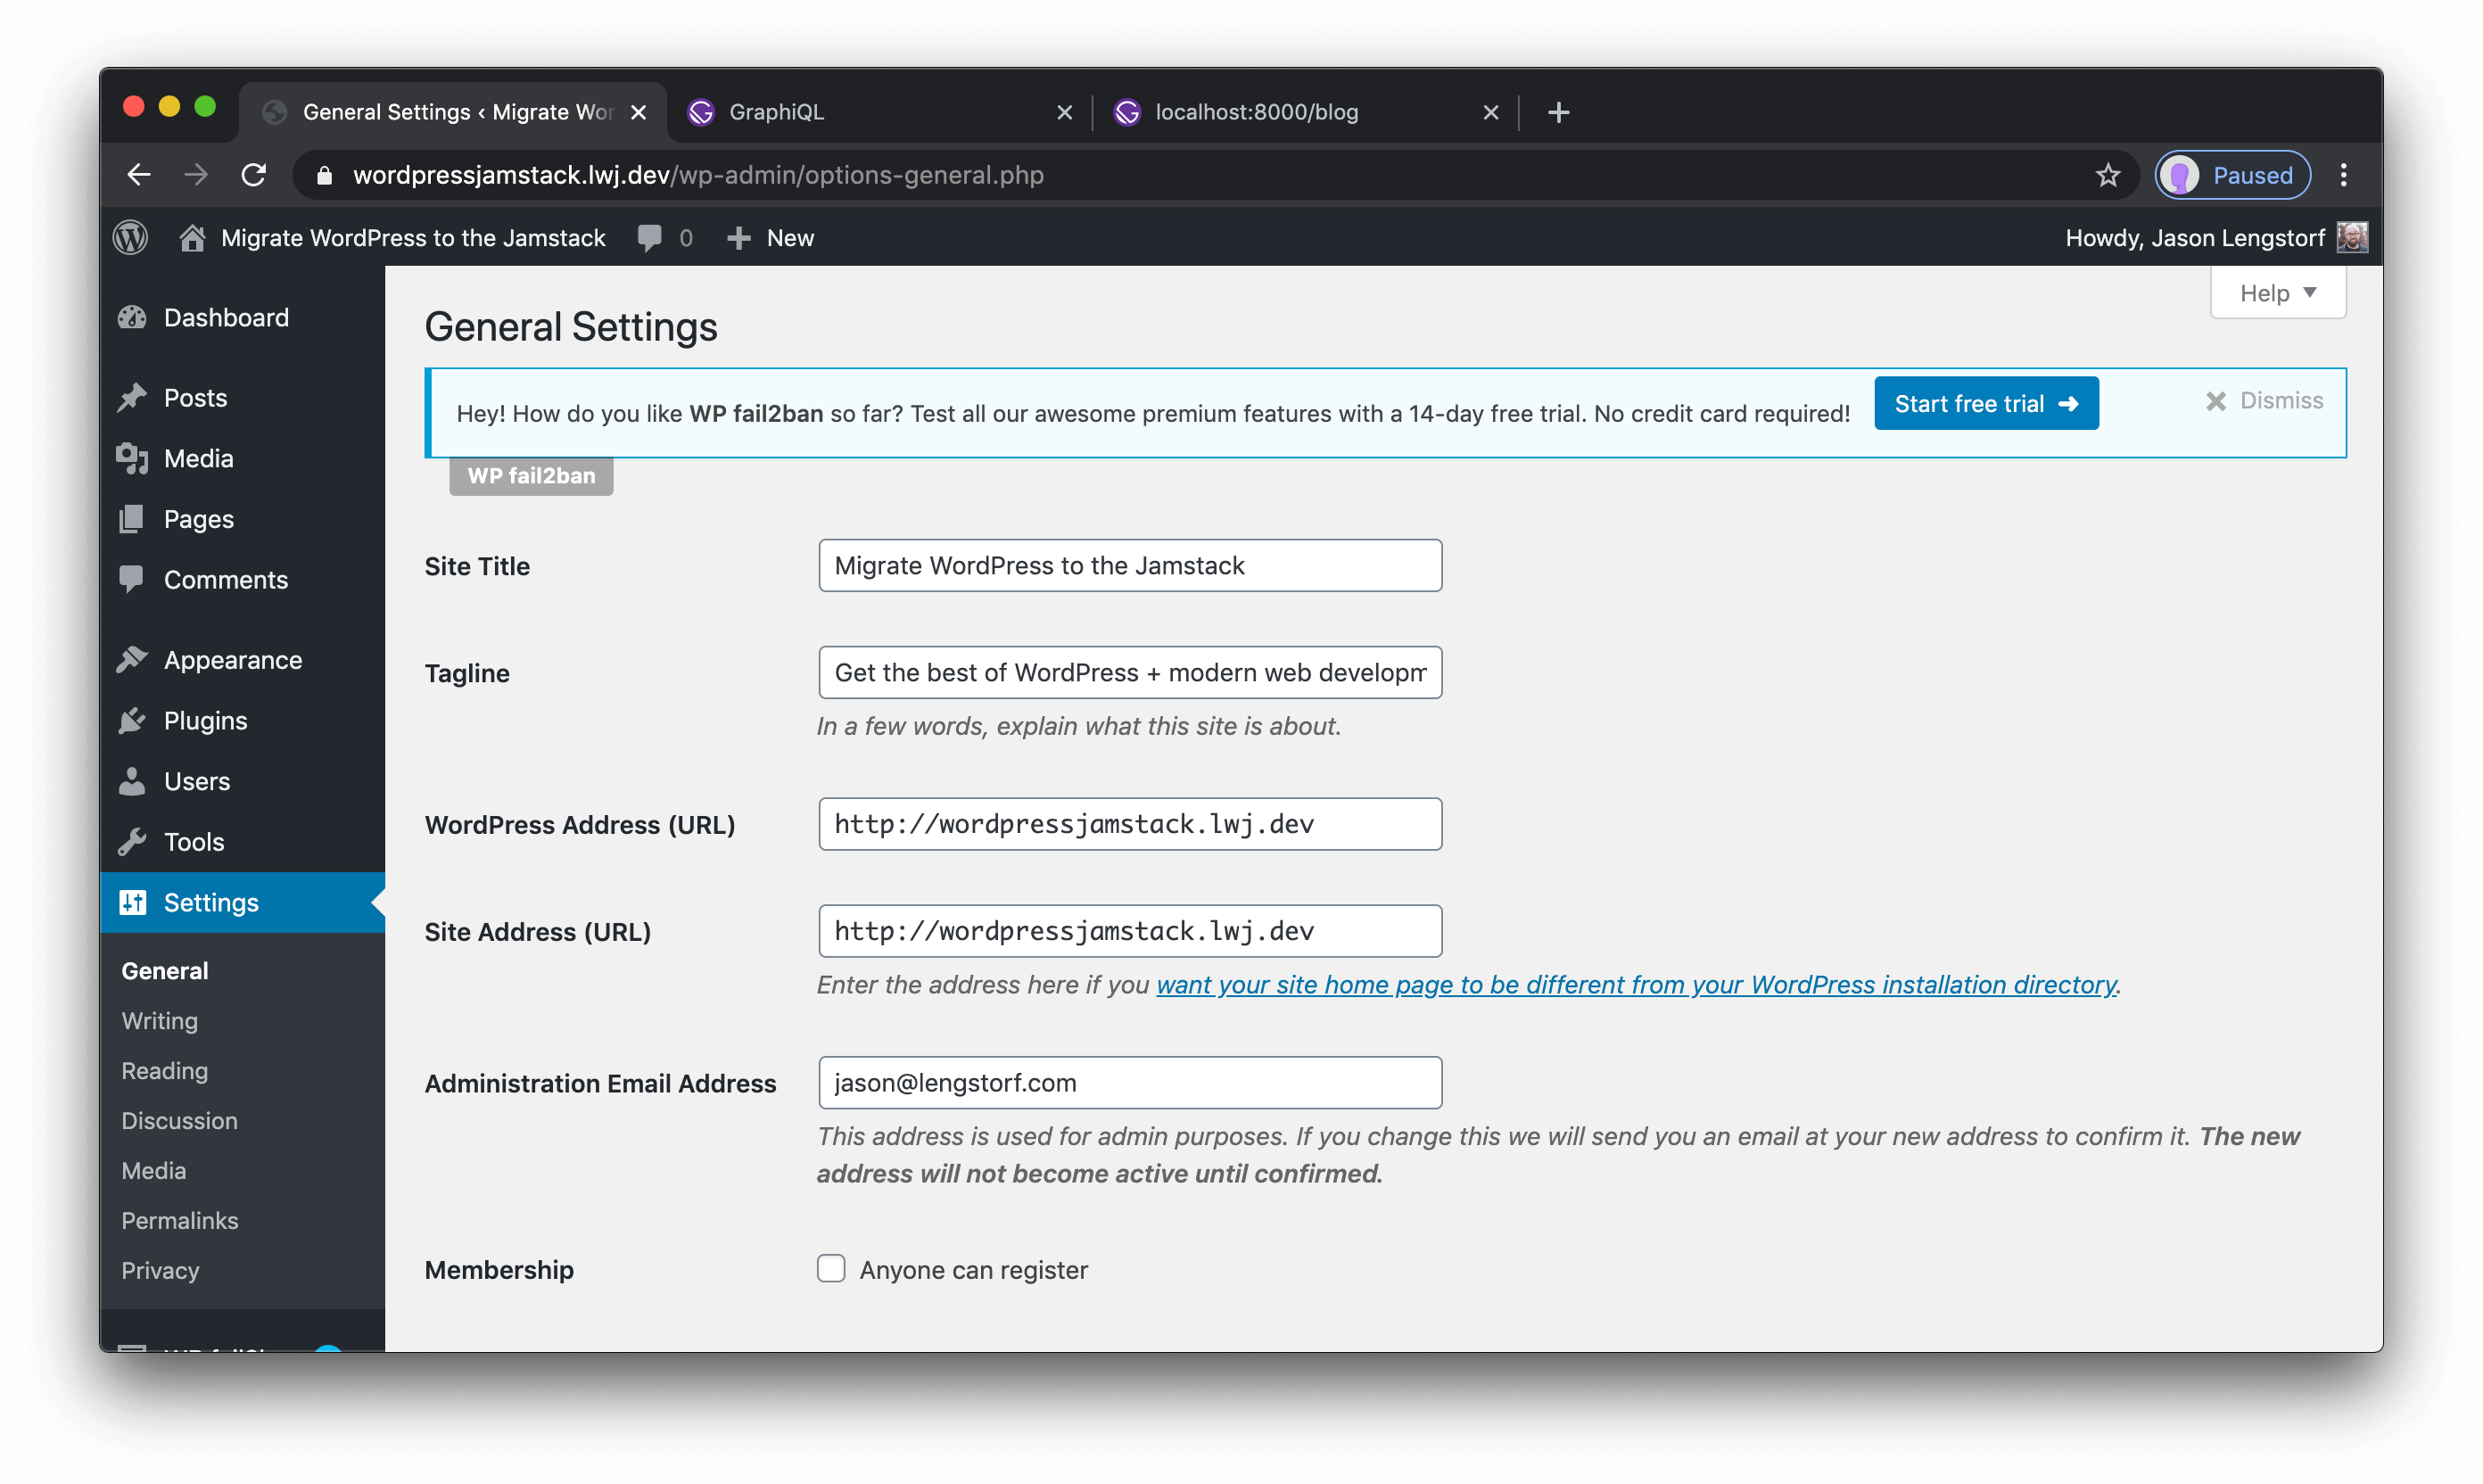
Let’s pull the site title from WordPress’s general settings to show how this can work.
To do this, update src/components/layout.js with the following code:
  import React from "react"
- import { Link } from "gatsby"
+ import { Link, useStaticQuery, graphql } from "gatsby"

  import "@wordpress/block-library/build-style/style.css"
  import "../styles/layout.css"

  const Layout = ({ children }) => {
+   const data = useStaticQuery(graphql`
+     query {
+       wpgraphql {
+         generalSettings {
+           title
+         }
+       }
+     }
+   `)
+
+   const { title } = data.wpgraphql.generalSettings
+
    return (
      <>
        <header>
          <Link to="/" className="home">
-           Migrate WordPress to the Jamstack
+           {title}
          </Link>
        </header>
        <main>{children}</main>
      </>
    )
  }

  export default Layout
Save and check out the site to see that the settings are being loaded. If you want to test this out, make a change in WordPress, then restart the Gatsby development server to see the changes.
Create Gatsby navigation from WordPress menus
{% renderFile ”./src/_includes/pages/blog/egghead-embed.vue”, { eggheadVideoTitle: “Create Gatsby navigation from WordPress menus”, eggheadVideoUrl: “https://egghead.io/lessons/gatsby-create-gatsby-navigation-from-wordpress-menus” } %}
WordPress menus allow content editors to control the navigation settings on the site. If we want to use those menus for our Gatsby site, we can!
Get the menu ID
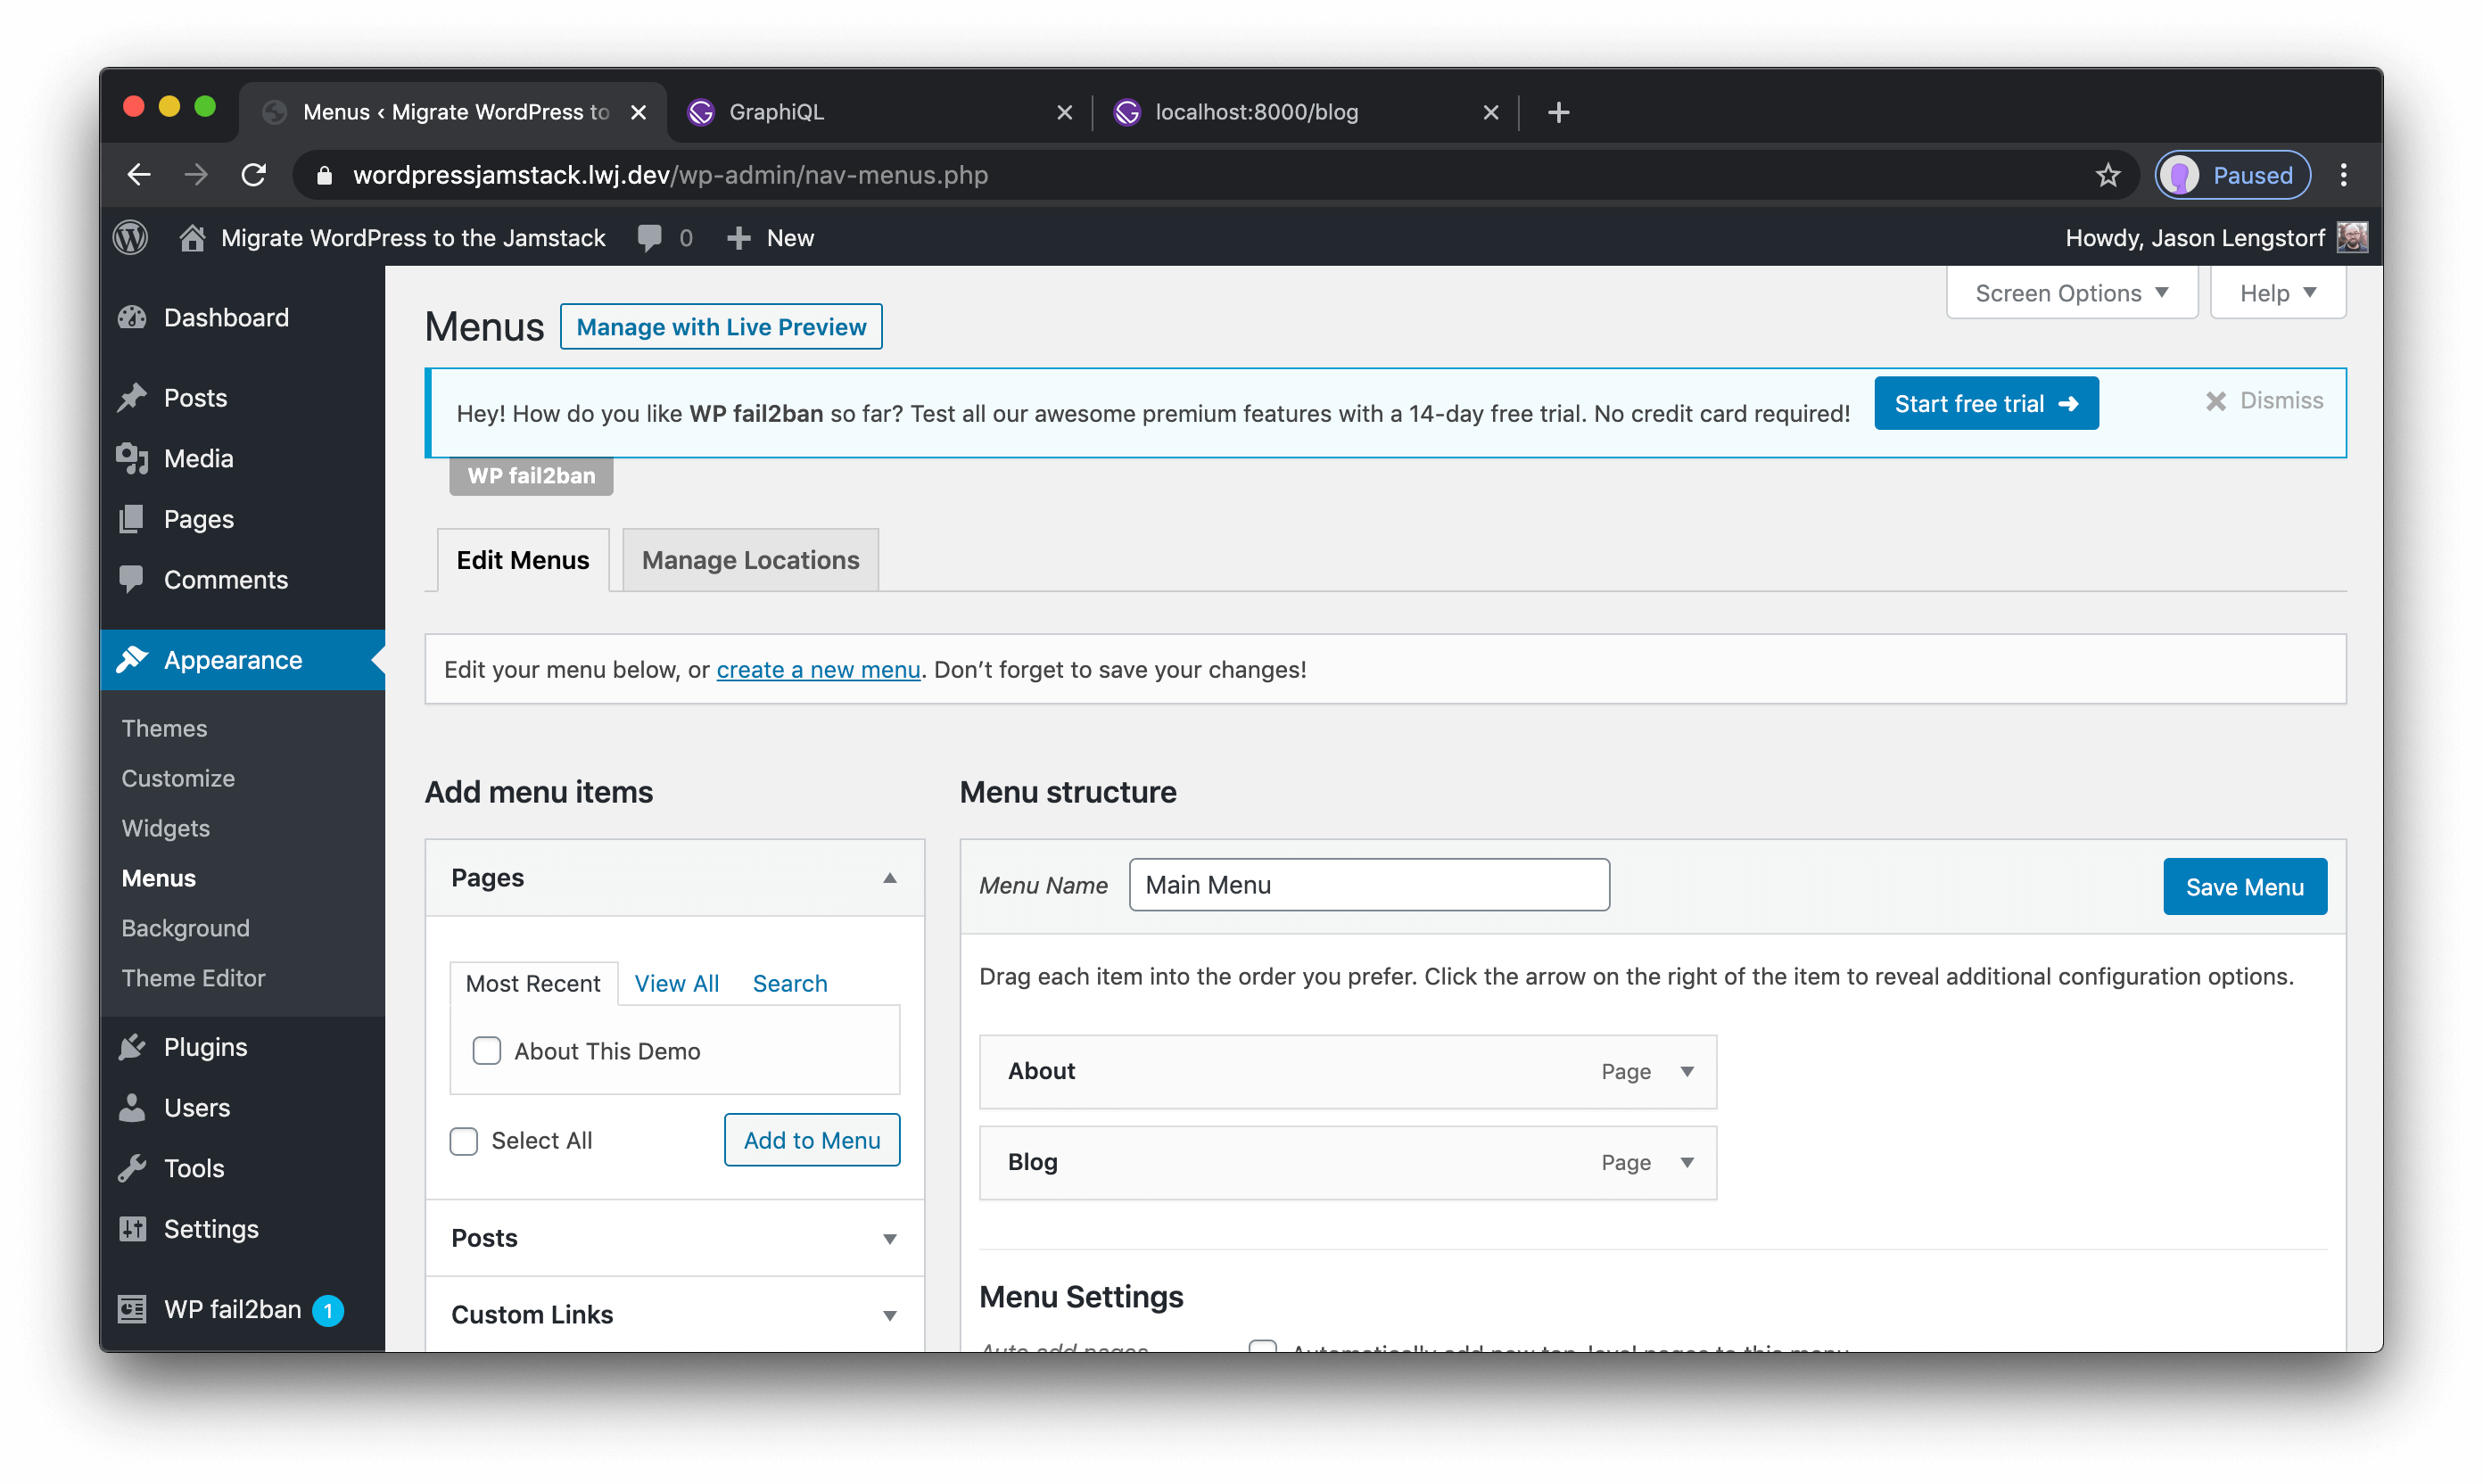
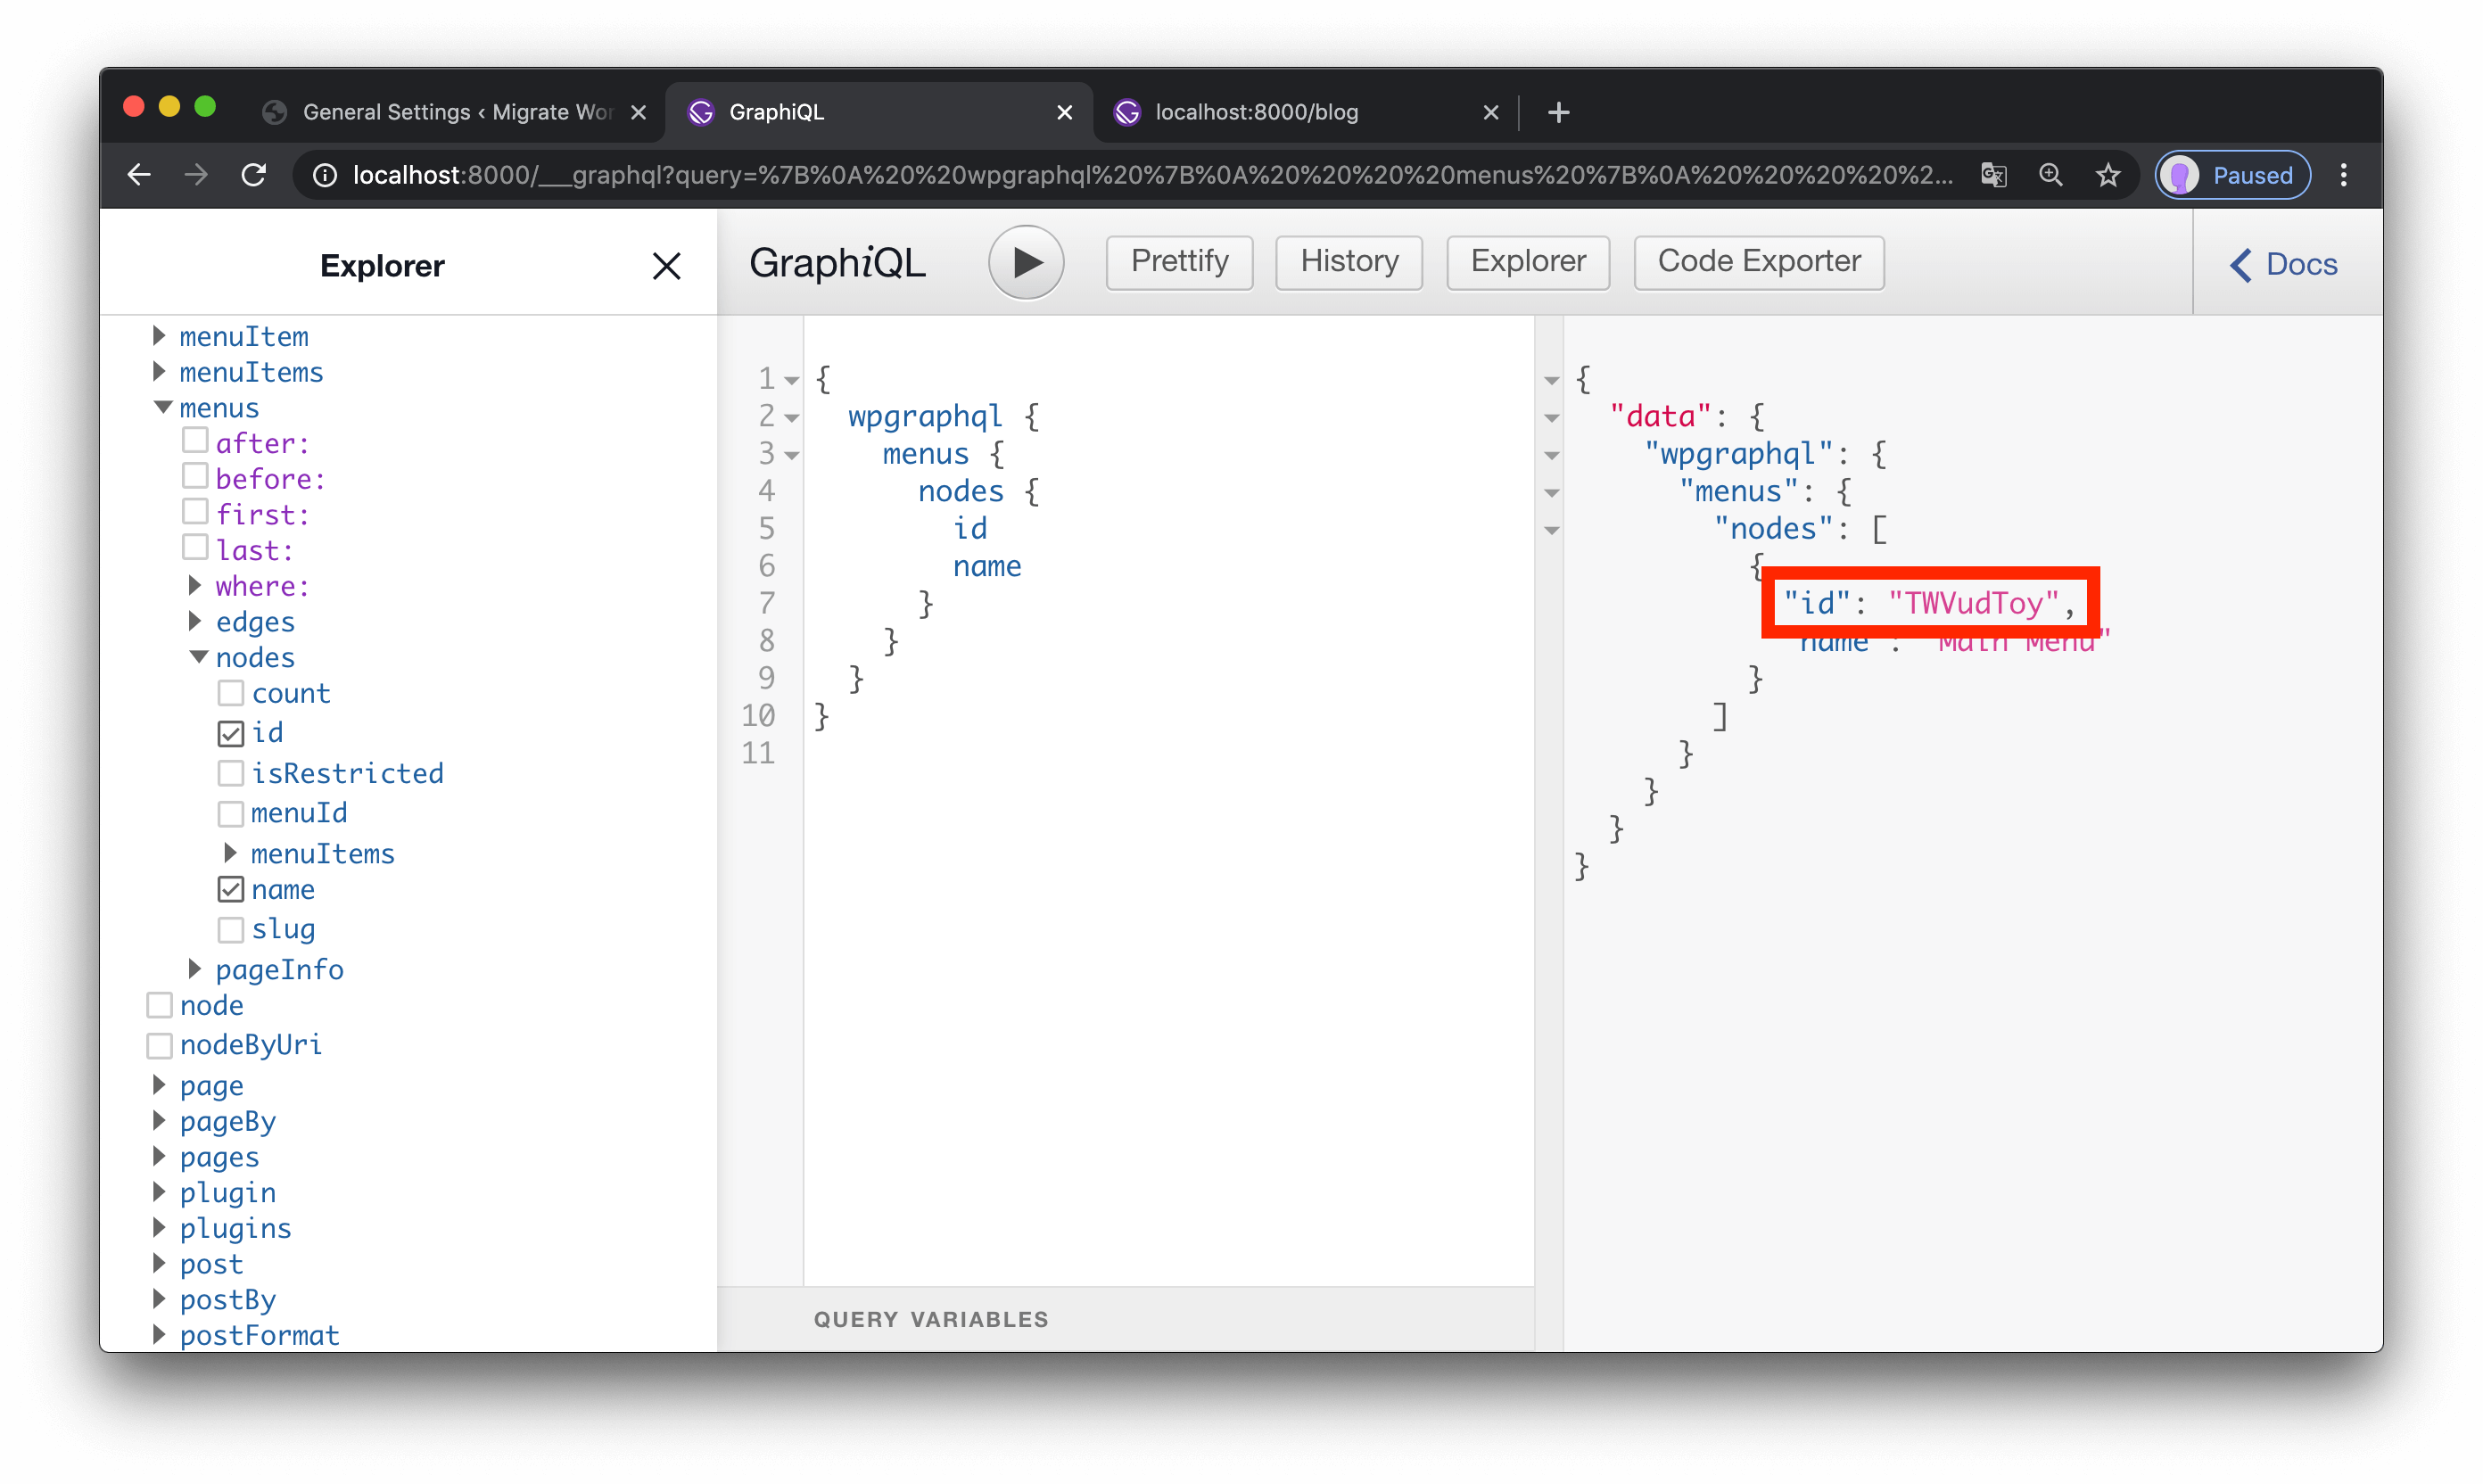
To make sure we’re getting the right menu, we need to find the ID for the menu we want to use.
In GraphiQL (http://localhost:8000/___graphql), run the following query:
{
  wpgraphql {
    menus {
      nodes {
        id
        name
      }
    }
  }
}
Look for the menu with the name value of “Main Menu”, then grab its ID for use in the next section.
Load the menu items and make links relative
Now that we have the menu ID, we can update src/components/layout.js to load the correct menu.
One important thing to note is that we also need to load the site’s URL from the generalSettings query because WordPress makes links absolute by default. Using this value, we can loop through the menu links and remove the URL to make sure we have relative links.
  import React from "react"
  import { Link, useStaticQuery, graphql } from "gatsby"

  import "@wordpress/block-library/build-style/style.css"
  import "../styles/layout.css"

  const Layout = ({ children }) => {
    const menu = useStaticQuery(graphql`
      query {
        wpgraphql {
          generalSettings {
            title
+           url
          }
+         menu(id: "TWVudToy") {
+           menuItems {
+             nodes {
+               id
+               label
+               url
+             }
+           }
+         }
        }
      }
    `)

-   const { title } = menu.wpgraphql.generalSettings
+   const { title, url } = menu.wpgraphql.generalSettings
+   // loop through the menu items and make the links relative
+   const items = menu.wpgraphql.menu.menuItems.nodes.map(item => ({
+     ...item,
+     url: item.url.replace(url, ""),
+   }))

    return (
      <>
        <header>
          <Link to="/" className="home">
            {title}
          </Link>
+         {items.map(item => (
+           <Link key={item.url} to={item.url}>
+             {item.label}
+           </Link>
+         ))}
        </header>
        <main>{children}</main>
      </>
    )
  }

  export default Layout
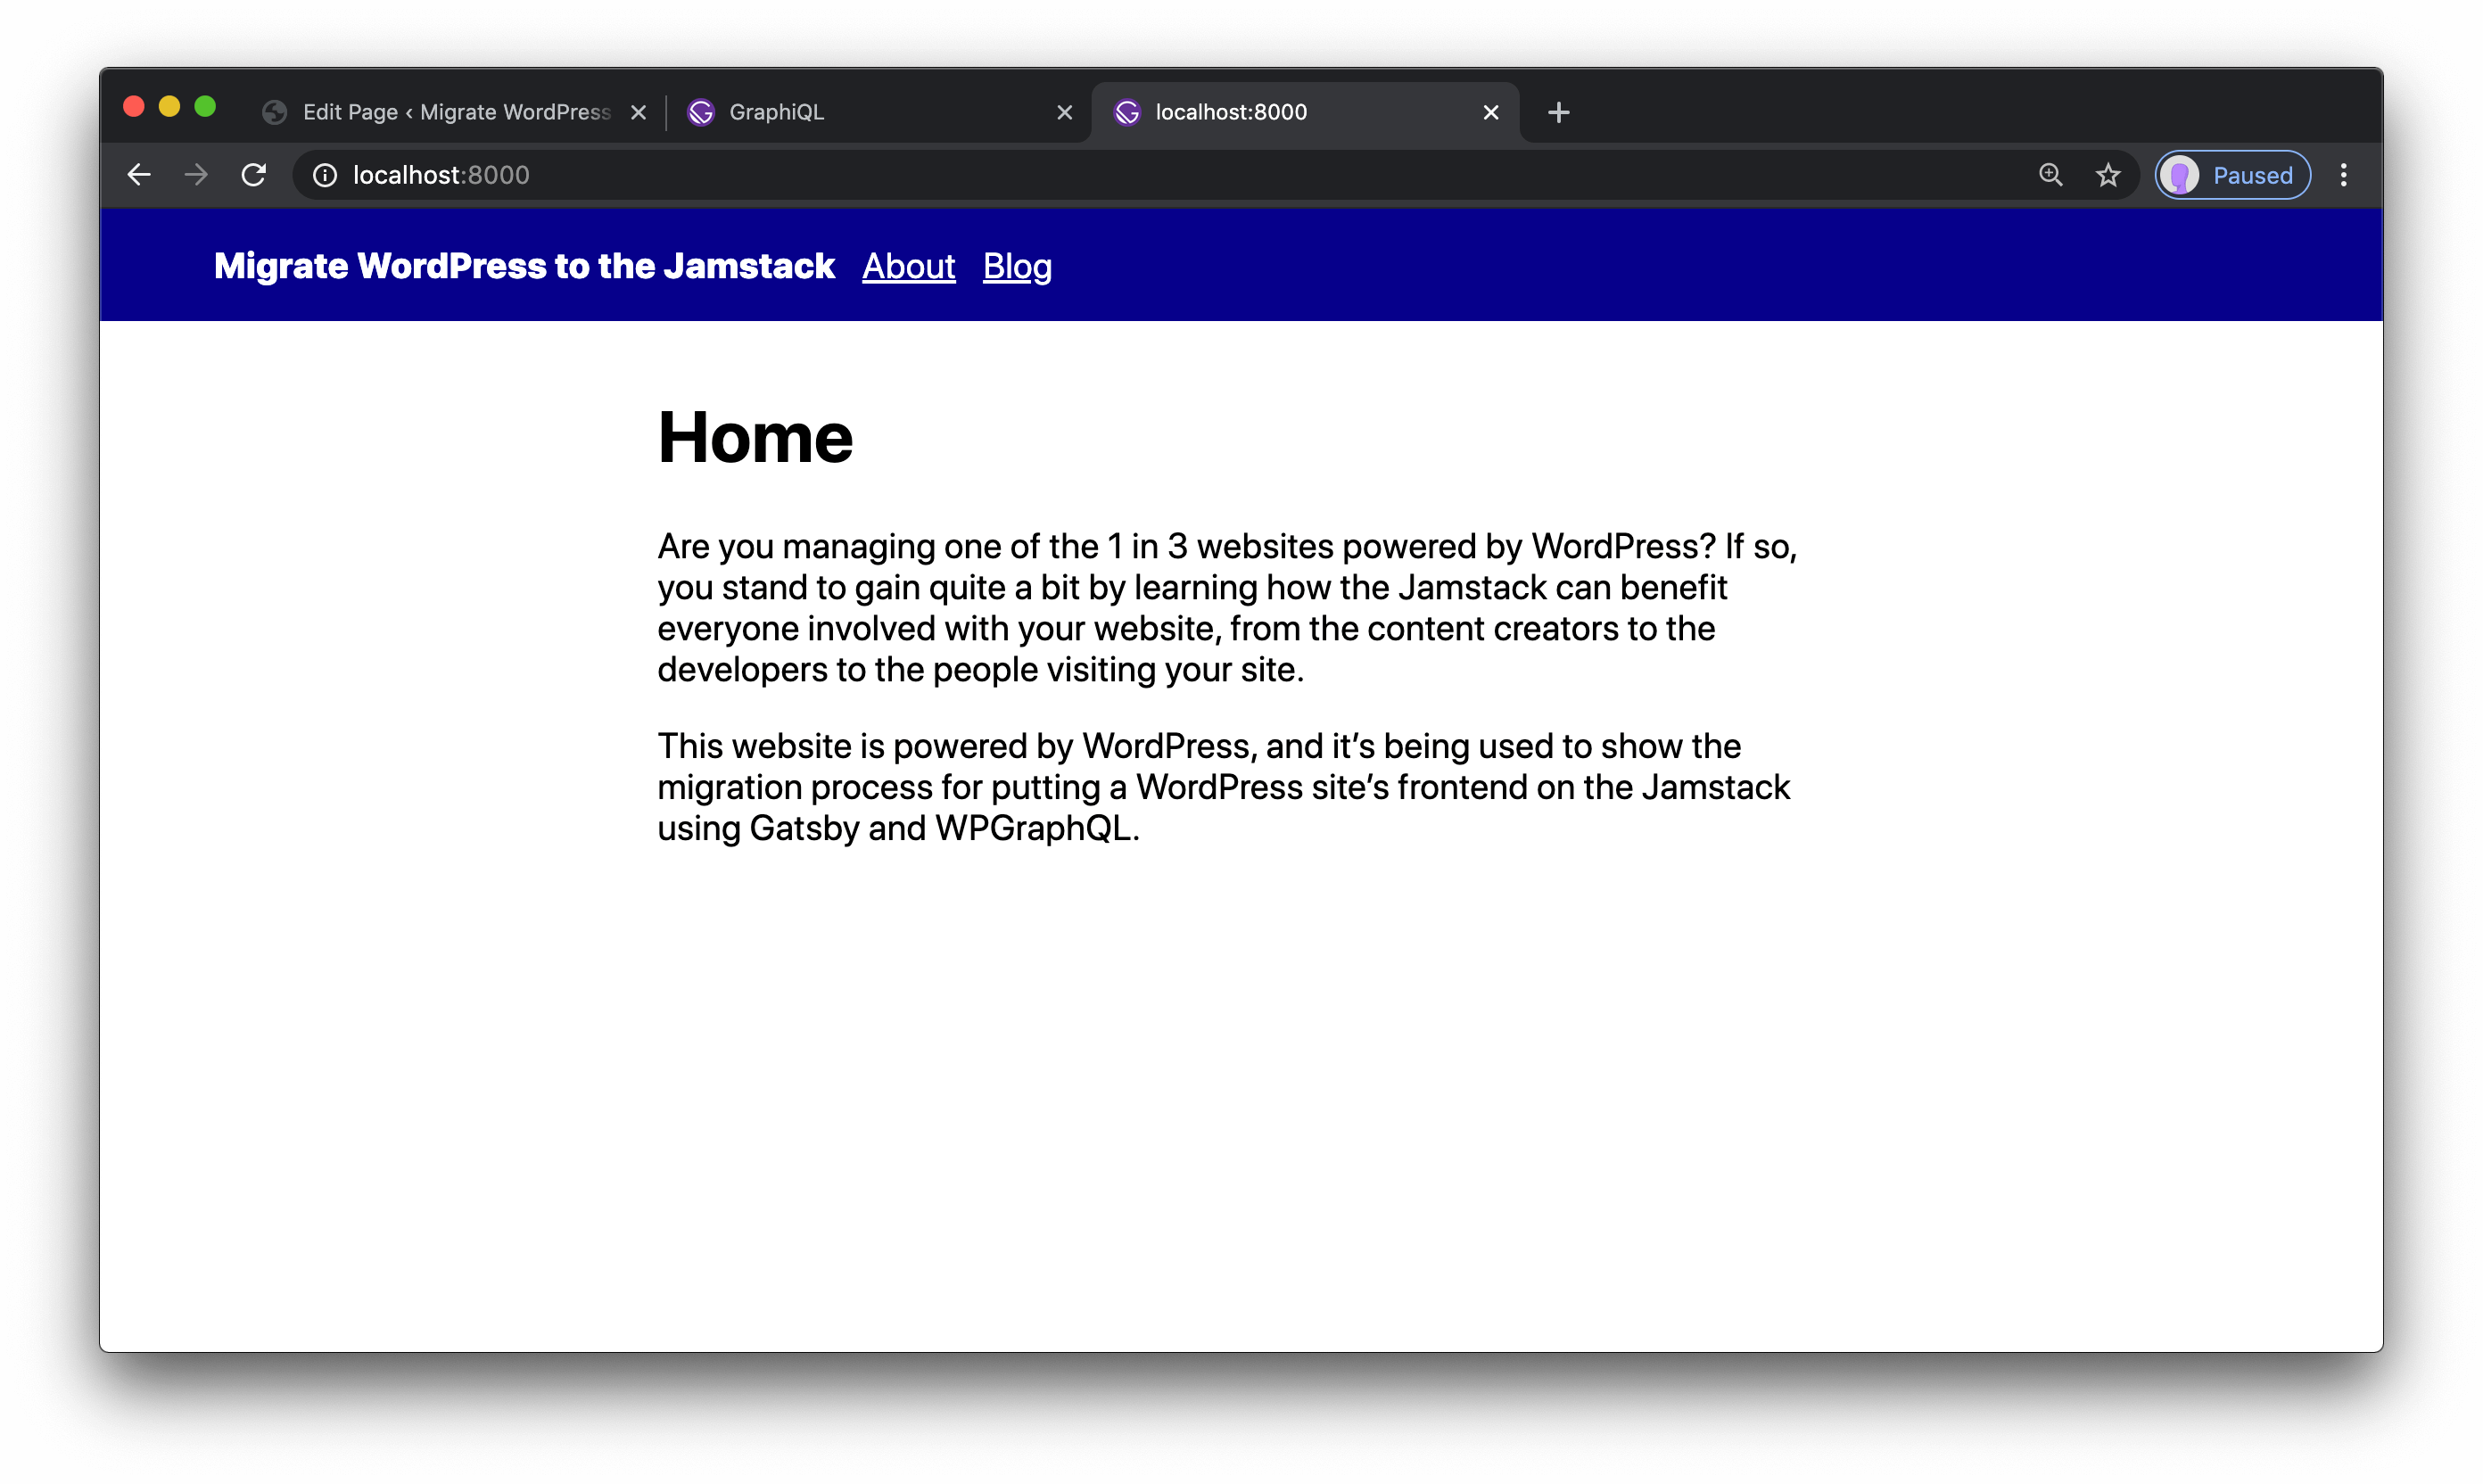
Save these changes and look at http://localhost:8000 — the WordPress navigation is now displayed in the header, and it works to navigate our Gatsby site!
At this point, our WordPress site has been fully migrated to the Jamstack: we’re loading pages, posts, settings, and menus into a fully functional Gatsby site.
All that’s left to do at this point is get this site deployed!
Deploy a WordPress-powered Gatsby site to Netlify using the Netlify CLI
{% renderFile ”./src/_includes/pages/blog/egghead-embed.vue”, { eggheadVideoTitle: “Deploy a WordPress-powered Gatsby site to Netlify using the Netlify CLI”, eggheadVideoUrl: “https://egghead.io/lessons/gatsby-deploy-a-wordpress-powered-gatsby-site-to-netlify-using-the-netlify-cli” } %}
To deploy the site, we need to have the code in a repository on GitHub, Bitbucket, or GitLab.
Once we have a repo available, we can commit our changes and push them to our repository:
# add all of the files in our site to git
git add -A

# commit the changes
git commit -m 'migrate a WordPress site to the Jamstack'

# push the changes to your repo
git push origin master
Next, we can use the Netlify CLI to deploy our site.
To start, we need to install the CLI globally. Then we can run ntl init to connect our site’s repo to Netlify, which means any time we push code changes the site will redeploy.
# install the Netlify CLI on your computer
npm install -g netlify-cli

# set up your site for automatic deployment for new code commits
ntl init
Follow the prompts to finish initializing the site.
NOTE: if this is your first time using the Netlify CLI, you’ll be asked to log in. Follow the directions in the CLI to get logged in, then run
ntl initagain.
Once the site is set up, we can visit the Netlify dashboard and we’ll see our newly deployed site.
Once the site finishes building, which should only take a minute or so, the site is fully live and on the internet!
The site we built in this tutorial is live at https://egghead-wordpress-jamstack.netlify.com.
Automatically trigger Netlify deploys whenever changes are made in WordPress
{% renderFile ”./src/_includes/pages/blog/egghead-embed.vue”, { eggheadVideoTitle: “Automatically trigger Netlify deploys for WordPress changes”, eggheadVideoUrl: “https://egghead.io/lessons/gatsby-automatically-trigger-netlify-deploys-for-wordpress-changes” } %}
Netlify sites automatically rebuild whenever changes are pushed to our code, but we also want the site to rebuild when changes are made to our WordPress content.
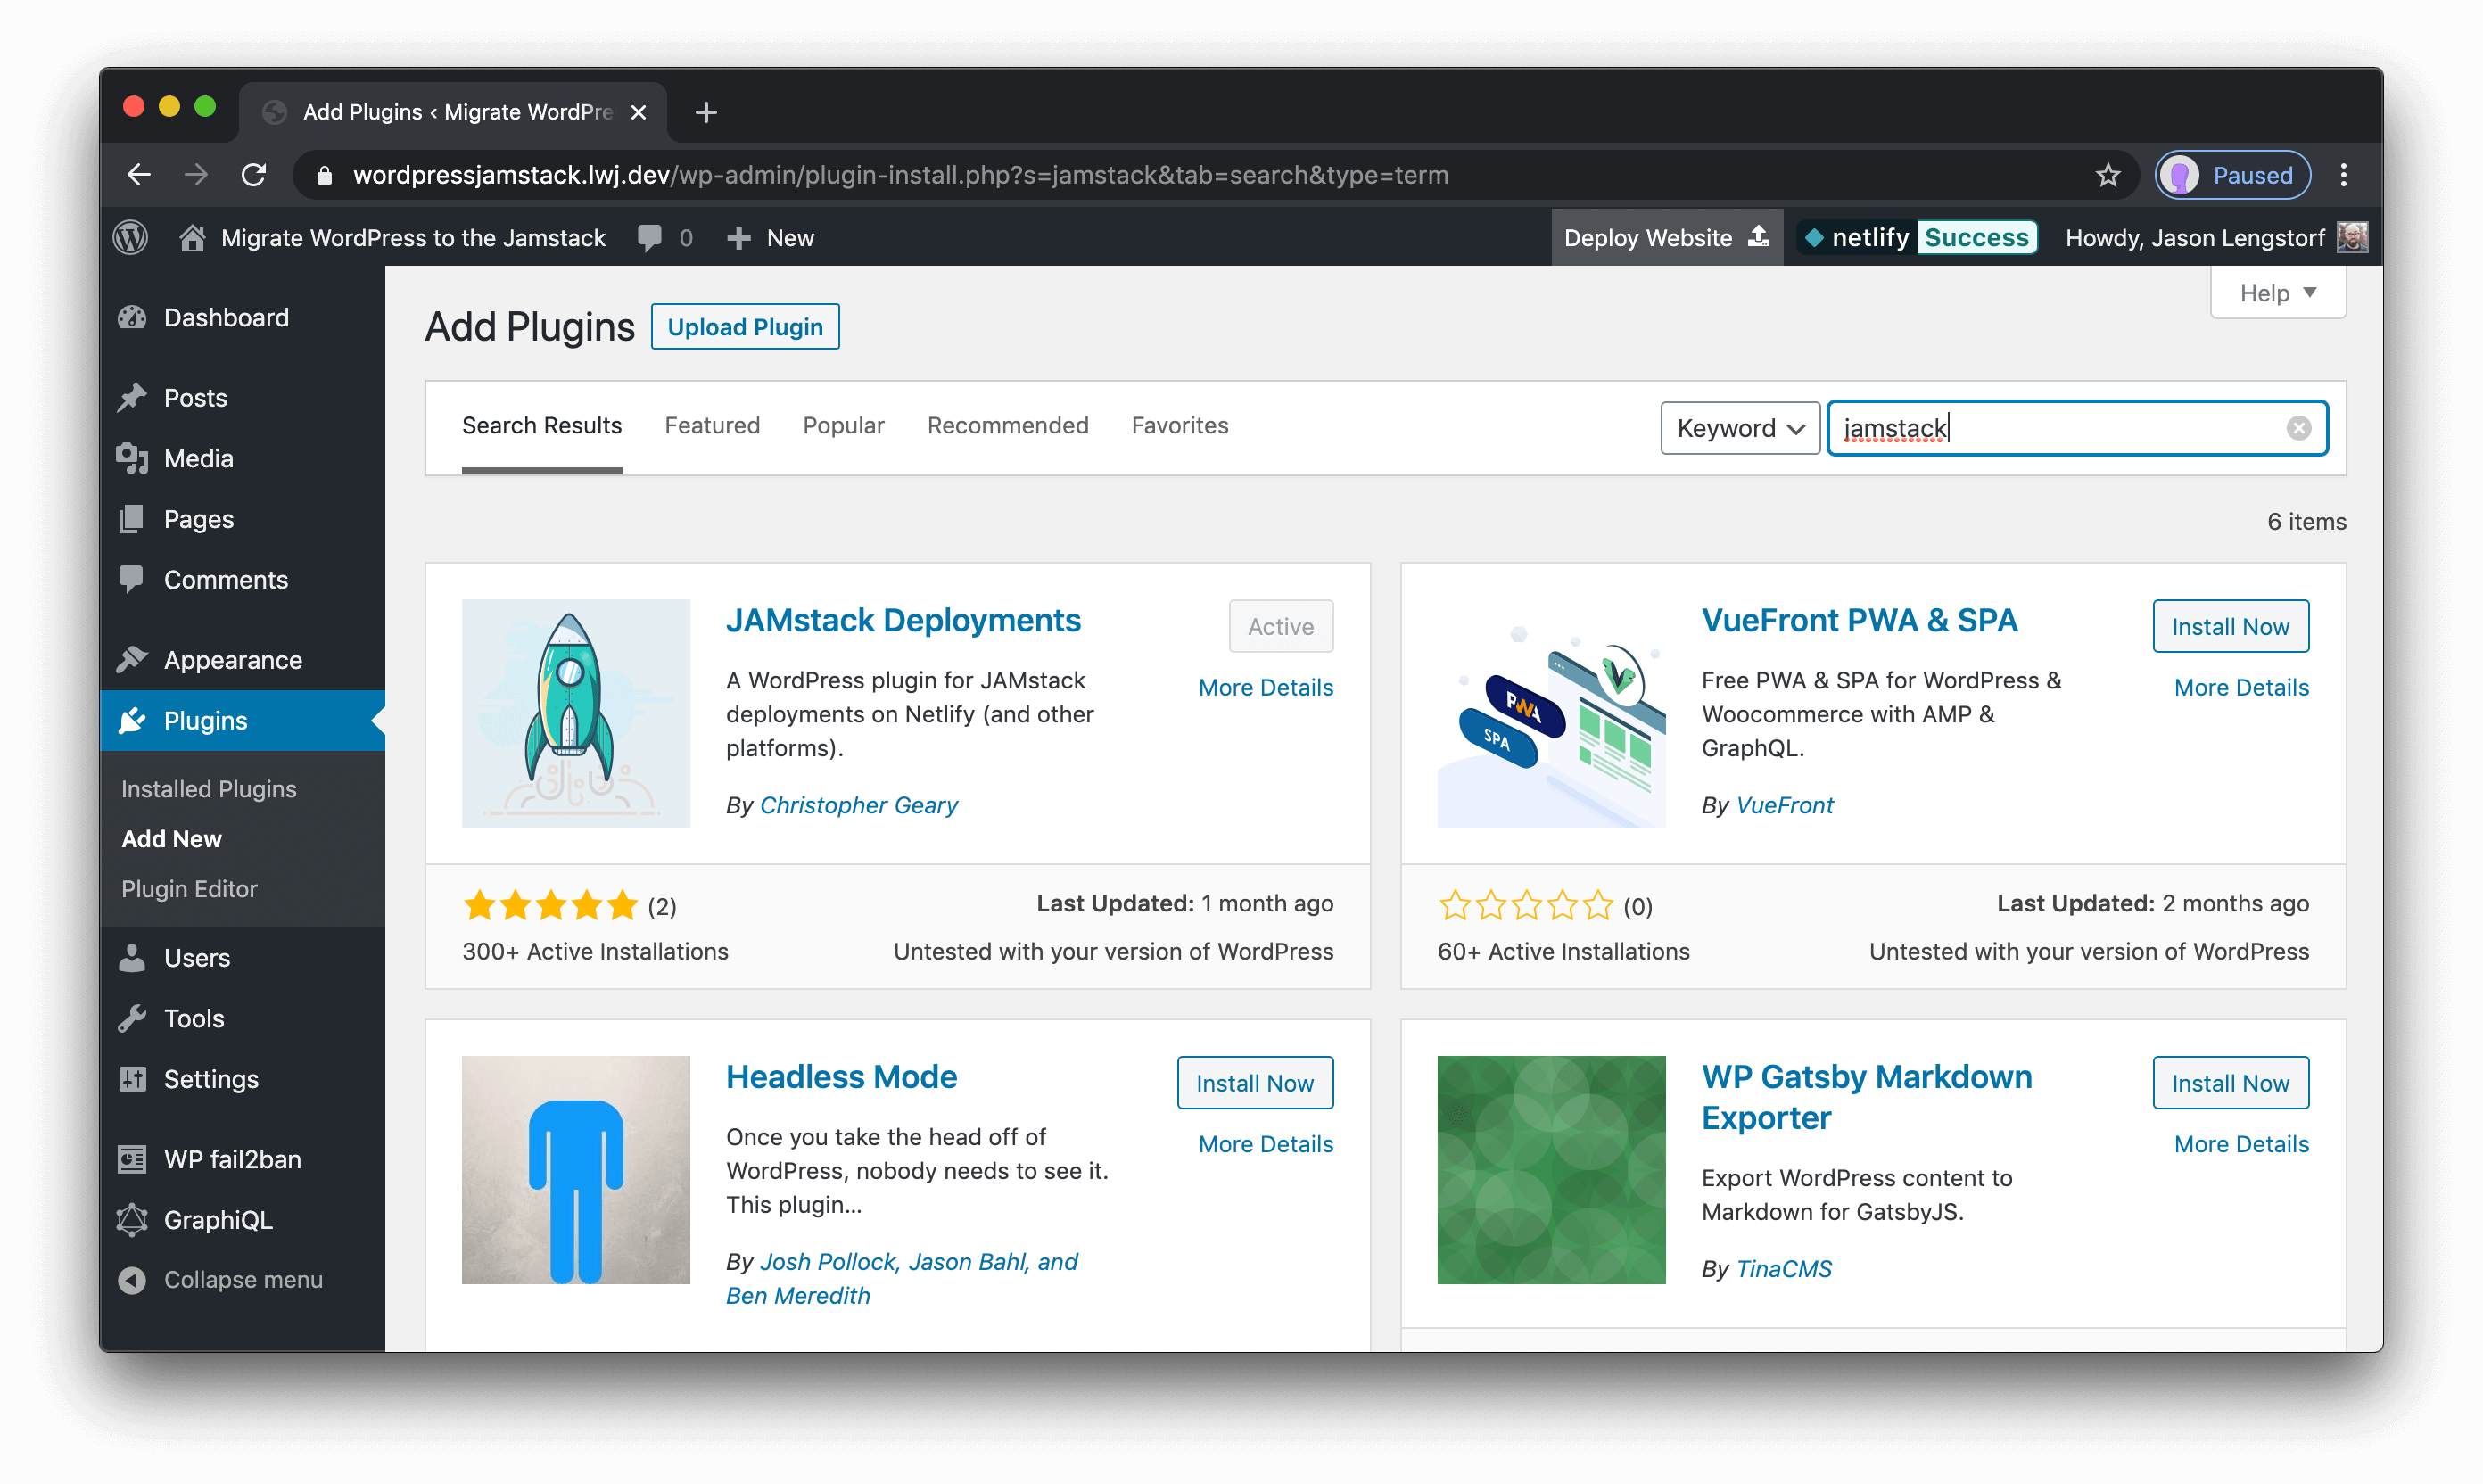
To do that, we need to install a plugin called JAMstack Deployments on our WordPress site. Head to the Plugins section of our WordPress admin, then click “Add New” and search for “jamstack”. JAMstack Deployments will be the first option.
Once the plugin is installed, go to the Settings menu, then choose the new Deployments section. To fill this section out, we need to create a Build Hook in our Netlify settings.
Head to the Netlify dashboard, then click Settings. In the side menu of the Settings page, click “Build & deploy”, then scroll down to the “Build hooks” section and click “Add build hook”.
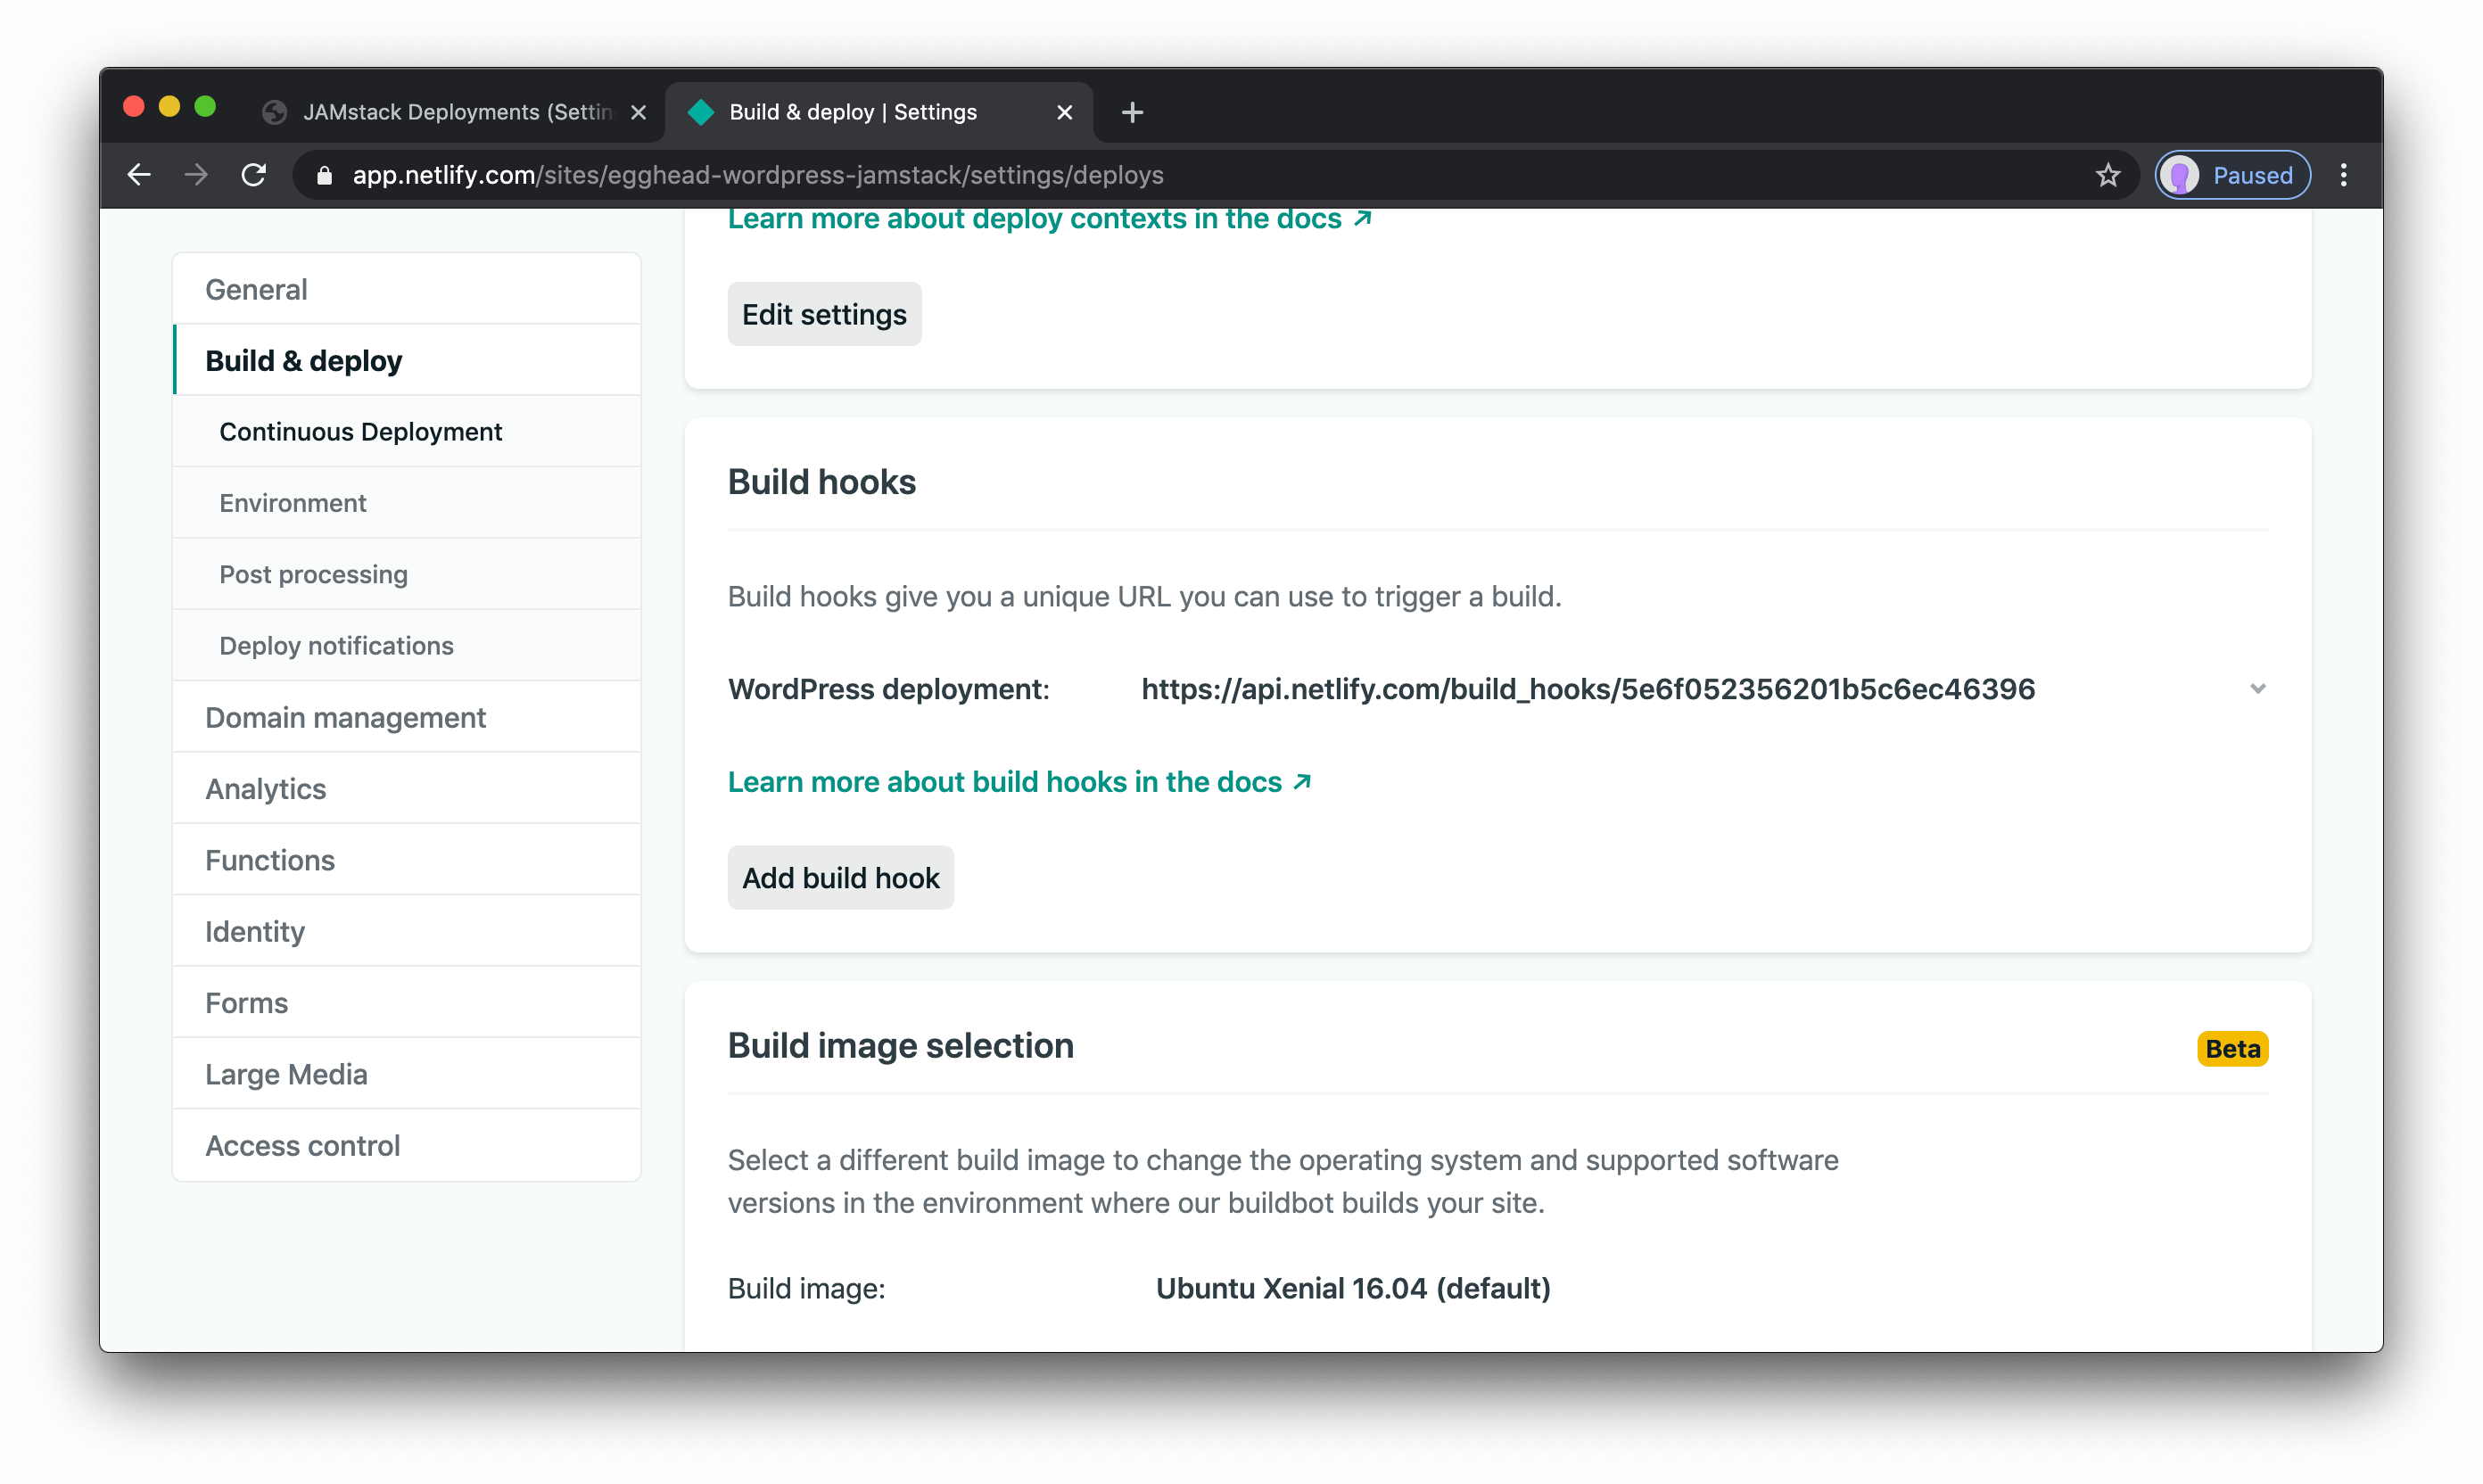
Once you’ve created the hook, copy the URL and paste it into the WordPress Deployment settings field called “Build Hook URL”.
Next, go to the Settings page of your Netlify dashboard and scroll down to the “Status badges” section. The badge has two URLs: the first is the actual image for the badge, and the second is a link to your site’s Deploys page.
![]()
Copy and paste each URL into the respective Deployments settings fields.
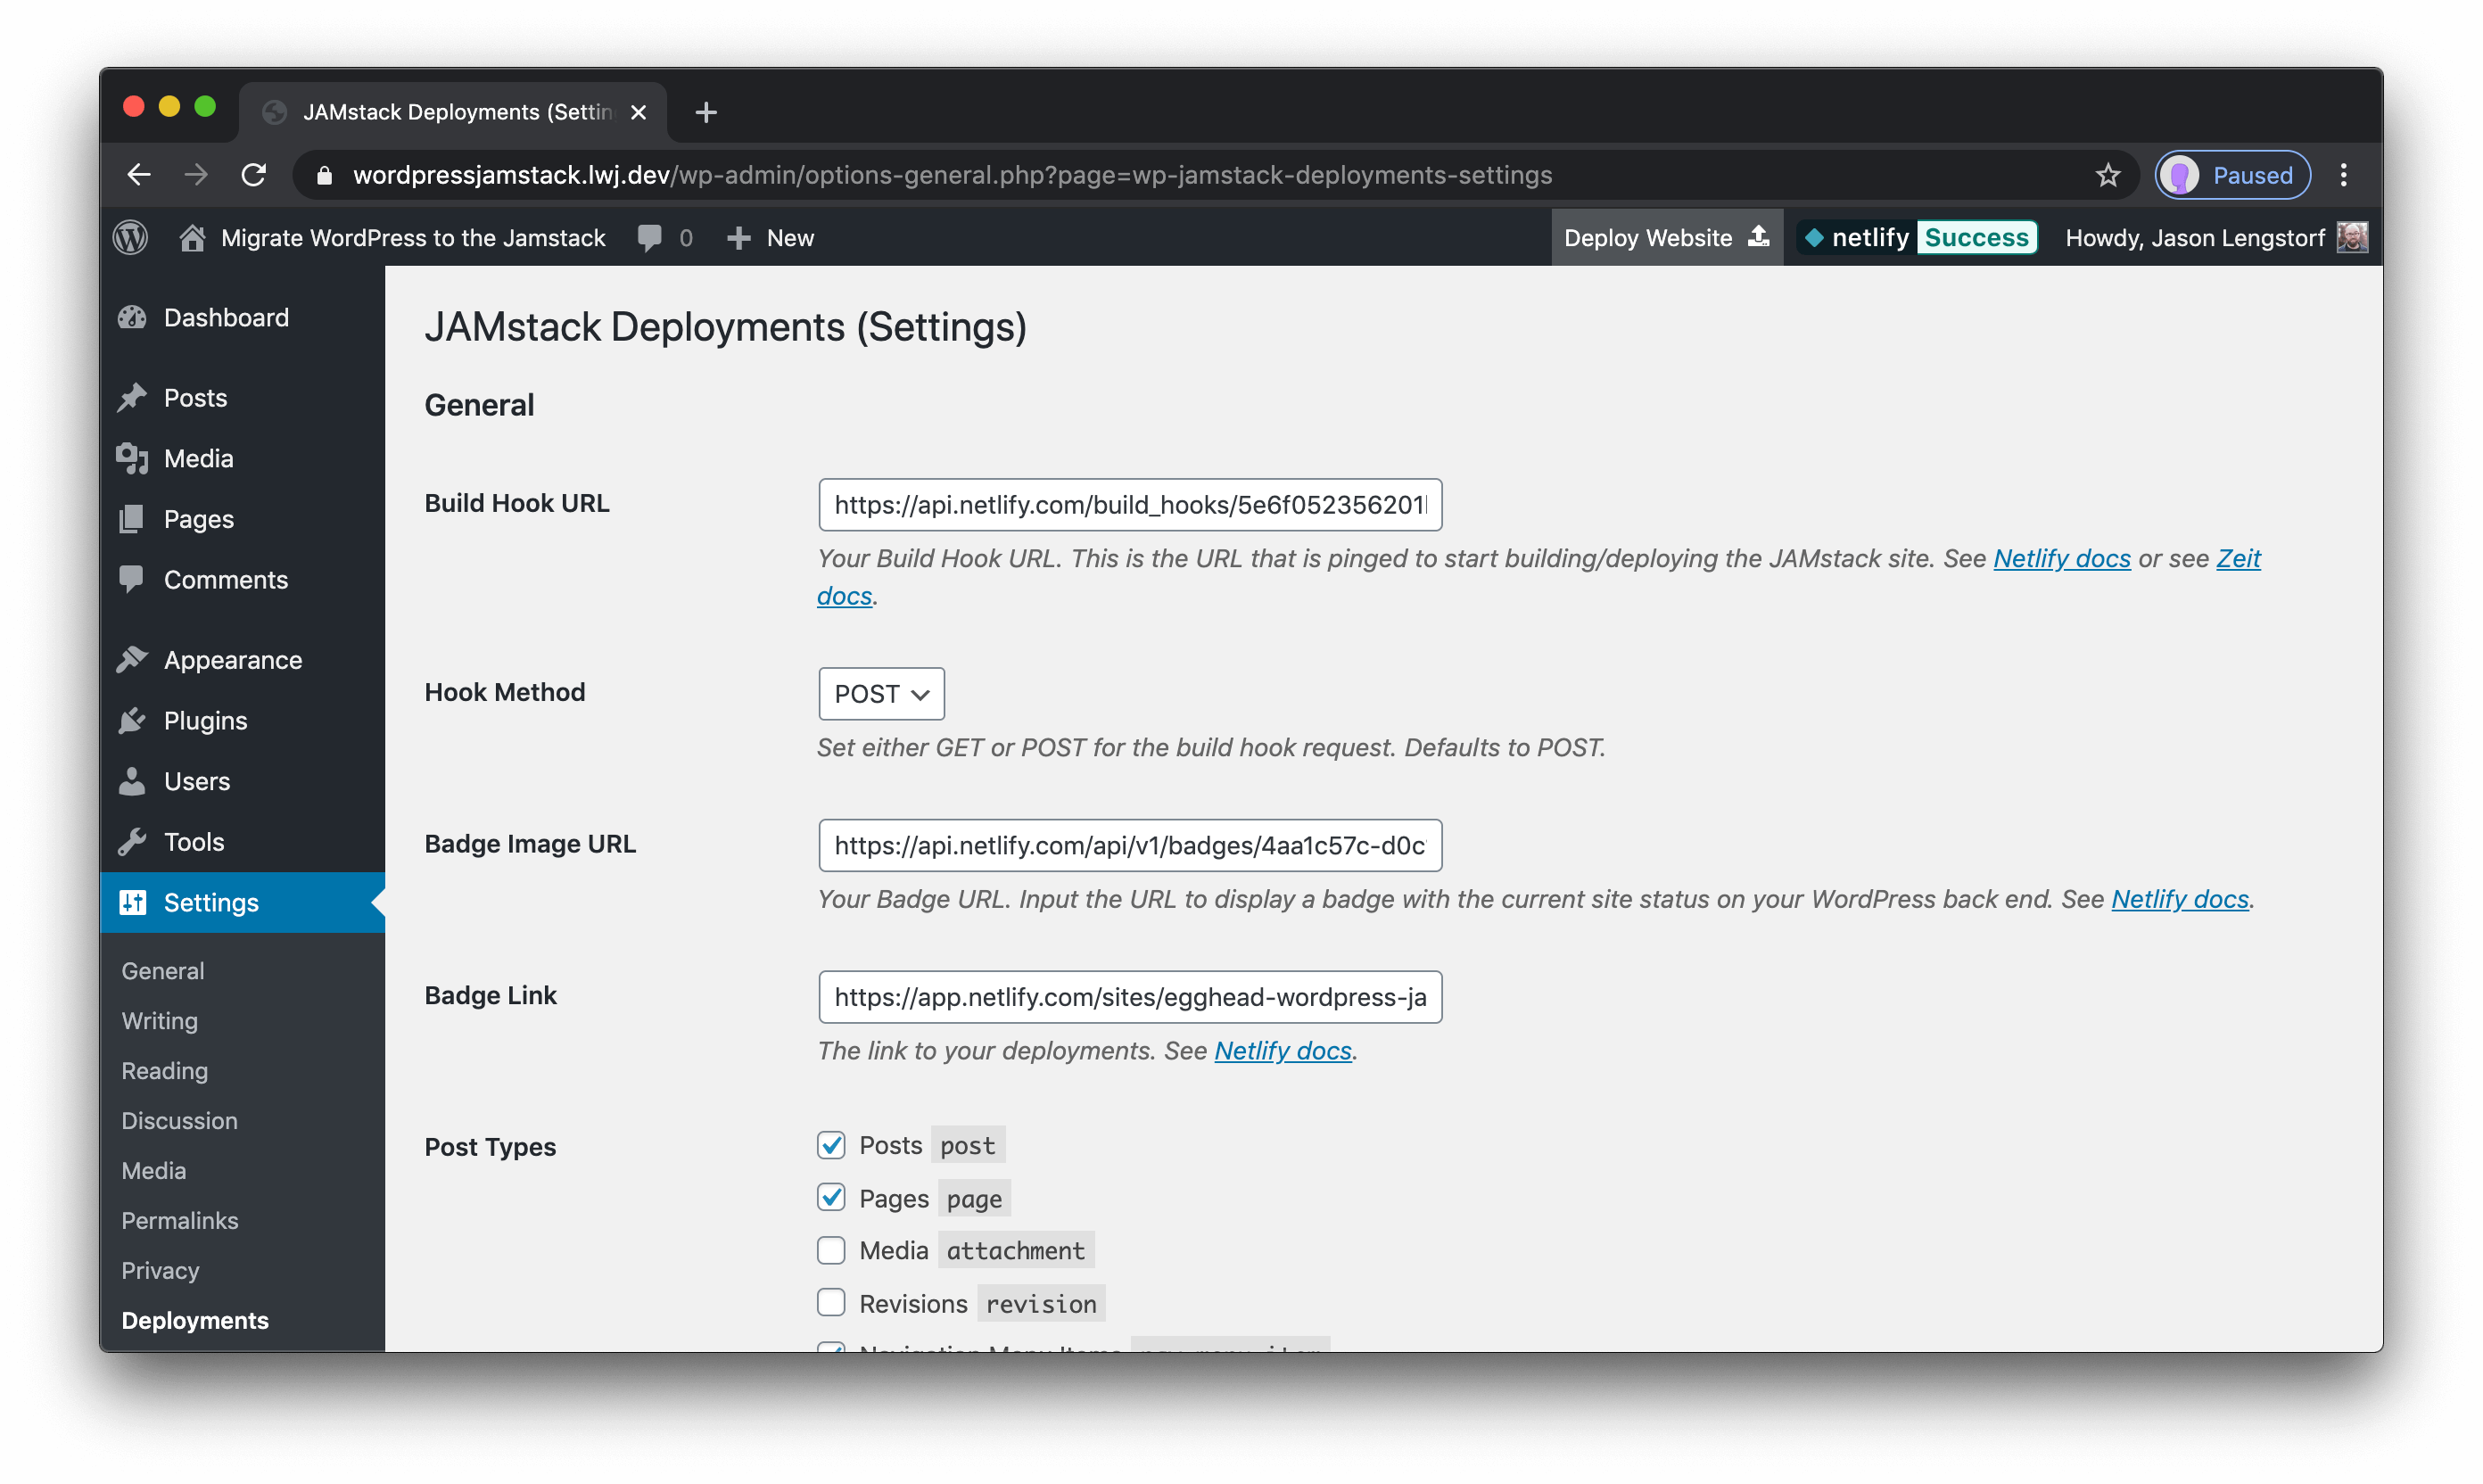
Finally, check boxes for the types of updates that should trigger a rebuild on Netlify. If you’re not sure which ones you need, start with posts, pages, and navigation menu items — you can always adjust these settings later on.
Save these settings, then make an edit to a page in the WordPress admin section.
If you check the Deploys page of your Netlify dashboard, we’ll see that the site is rebuilding!
And that’s it! We now have a Jamstack frontend for our WordPress site that is fully powered by WordPress data and automatically rebuilds whenever the code or content changes. 🎉
What to do next
At this point, we’ve covered all the steps required to migrate a WordPress site to the Jamstack. We can take things much further, but this is enough to get up and running.
If you have specific questions about how to migrate your own WordPress sites to the Jamstack, I’d love to hear about them. Hit me up on Twitter or ask a question in the Netlify Community!


