One of the fundamental elements of creating a site with the Jamstack architecture is pre-rendering content. This allows for faster delivery of your content, fewer security vulnerabilities, and immutable content. For this post, we will be storing static images in Cloudinary, a cloud service for images while also pre-rendering our assets. This means one less thing we have to manage ourselves or worry about. Yay!
Cloud Content
There are many benefits to having your media stored somewhere that isn’t your project. Git is made to manage code, but media files?—Not really their forte. Having a site that is dedicated to that is a great way of delegating tasks to skilled providers. In general, when building for the Jamstack, delegation is the key to a robust site that is easy to manage and maintain. For our use case, we will be offloading the work of image management. We’re using Cloudinary today but there are others too (like Netlify or Imgix).
Premeditative Pre-rendering
The answer to a fast site lies in serving static assets from a CDN. Sites served in this manner are faster because one less trip to the server means latency is drastically reduced. The sites that we make with Angular haven’t really been that. You can tout a lot of things about Angular, but size isn’t at the top of the list. The Angular community has been asking for a path to pre-rendering for quite some time now.
To be fair, there has been one. Angular Universal gave you the option to pre-render. So, there was that. With the Angular 9 release there have been updates to the pre-render process in Universal. This indicates that the Angular team is hearing and heeding the requests of developers, which is a positive sign for a mature community like Angular. Nonetheless, people were still eager for a Static Site Generator for Angular.
The Angular SSG is Out There
Finally! HeroDevs to the rescue. At the end of last year the team at HeroDevs released the alpha version of Scully, Angular’s first, designated Static Site Generator (SSG). Not only does Scully make it ridiculously easy to pre-render any Angular site with familiar Angular commands (even with Angular.js apps). We’ve been waiting for this for a while and the team keeps improving it everyday. They are super open to feedback, so join the fun on GitHub!
This was a clear signal that the Angular community is invested in being a part of the Jamstack architecture and ecosystem. For much too long (in my opinion), Angular had not been heavily involved in the Jamstack ecosystem. This might very well be due to the Angular community not being aware of all that a Jamstack app is capable of. But it’s clear that the tools to create a clear path of Angular integration haven’t existed before. The creation of Scully was a huge step on this path and I can not wait to see what comes next.
Now that Angular has finally cemented its place in the Jamstack landscape with Scully, let’s dive into coding some pre-rendered Angular together!
Time to Code
In this exercise we’re going to start by adding a few images and some text. Basically, we want to populate the page and get comfortable with optimizing and adding content from the cloud. Then we’ll use Scully to create a pre-rendered, static version of our site.
🐙 Here’s a link to the repository of the final project in all its coded glory.
Here are the steps to today’s coding adventure:
- prepare assets in Cloudinary
- fill home component with content
- use
ng addto incorporate Scully - get whiplash from our site speed
Code with me!
Getting Setup
To get started let’s clone this base project that will set up some styling and base navigation.
git clone https://github.com/tzmanics/base-project_finalWith the cloned project we’ll want to install dependencies,
npm iset the remote to your own Git repository, and push an initial commit setting the upstream.
git remote rm origingit remote add origin <the link to your repo>git push --set-upstream origin masterTo take advantage of Netlify’s git-integrated CI/CD you can also connect your project to your Netlify account using the Netlify CLI. Here are all the magical commands for all these steps:
netlify initBingo, bango, done-zo! We’re ready to start adding content.
There’s also a little walkthru on getting started with Angular and Netlify if that piques your interest.
Adding Content
The first thing we’ll do is fill the page with some content. There are many ways to optimize images and serve them up. For our example, we’ll just squoosh & store. Feel free to use your own images. For this example I’ll be using images from Upsplash that I cropped to squares for uniformity. The number of pictures you choose to use is completely optional but four pictures will fit the project best.
Squoosh & Save
Next, let’s create an account with Cloudinary. To do this, we’ll navigate to this link and follow the generic signup flow. With an account created, let’s focus on putting those images on Cloudinary. Before we do this, let’s make sure our images are optimized for the web. To do this, we’ll be using Squoosh.
- download and crop locally
- open up https://squoosh.app/editor and drag the picture into the editor, resize to a reasonable size (images for this project are 300x300), then hit the download icon (this app automatically compresses the images but you can change the settings for that too)
- I then open Cloudinary in another (or the same) tab and, since the image is in the bottom shelf of the browser window, I just drag it up into my Cloudinary media library
Now you can either save those links in a document or you can keep you Cloudinary tab open for future reference.
Component Content
Now we’re going to start filling up our home page template. First let’s go ahead and serve up the project and keep it open in a browser window so we can watch the magic happen. Run the serve command and append it with the --open flag to automatically open a window to localhost:4200](http://localhost:4200/).
ng serve --openWe should see a site that has a navigation bar up top with a few links. The background picture is taken at Flims, Switzerland. A beautiful place I was fortunate enough to visit thanks to Front Conf. I highly recommend it!
Inside of src/app/home/home.component.html we’ll add a few divs and some text to start.
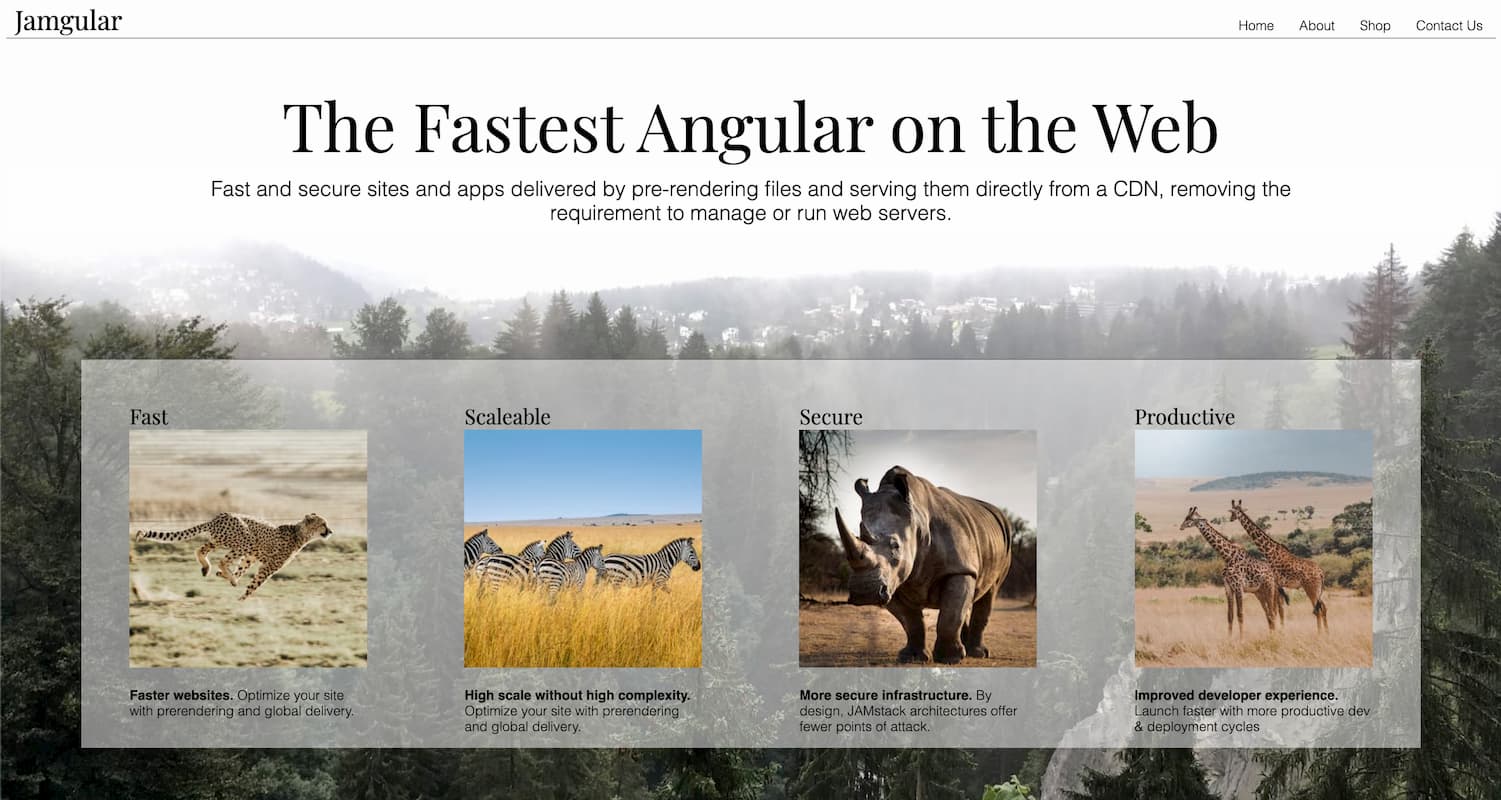
<div class="app-home"> <h1 class="motto">The Fastest Angular on the Web</h1> <div class="home-words"> <p> Fast and secure sites and apps delivered by pre-rendering files and serving them directly from a CDN, removing the requirement to manage or run web servers. </p> </div></div>Next, we’ll start adding cards to hold and order the content that’s going in. After the top content we’ll make a div for the cards called home-box (I know, such creative). Inside of that div we’ll create a div for each card under class home-card.
...
<div class="home-box">  <div class="home-card">    <h1 class="home-card-header">Fast</h1>    <img      class="home-card-image"      src="https://res.cloudinary.com/dzkoxrsdj/image/upload/v1585107167/cara-fuller-34OTzkN-nuc-unsplash_1_anhvwp.jpg"      alt="running cheetah"    />    <p class="home-card-content">      <b>Faster websites.</b>      Optimize your site with pre-rendering and global delivery.    </p>  </div></div>
As you can see, each card has a
h1header,home-card-headerimgthat uses the Cloudinary link as itssrc- and a short blurb, class
home-card-content
This card is repeated four times more with different content. You can see the full file here.
🐙 tip: I like to commit and commit often. After adding all the content to the template, it would be a great time to add and commit your code.
Serving Styles on Styles
Now to make sure things line up we’re going to flex on this file 💪. There’s a lot going on in the file so I’ll walk through each block then link the full file at the end.
In src/app/home.component.scss, we’ll start with styling the little blurb under the header, a.k.a. .home-words. For better legibility we’ll make the background a semi-transparent white and bump up the font size to 25px. We use a margin at 0 auto to center, then add padding to pull the text away from the edges of the box. Finally, we’ll center p and remove its margins.
.home-words { background-color: rgba(255, 255, 255, 0.5); font-size: 25px; margin: 0 auto; padding: 10px 10%; p { margin: 0; text-align: center; }}Next up, .home-box. Flexbox is a wonderful css value to help us line things up and make it responsive. We set display to flex, set flex-wrap to wrap, and use justify-content: space between to make the cards flow well. Everything else in here is pretty self-explanatory.
.home-box { display: flex; background-color: rgba(255, 255, 255, 0.5); border-top: 1px solid rgba(0, 0, 0, 0.5); flex-wrap: wrap; justify-content: space-between; margin: 150px auto; padding: 0; width: 90%; p { margin-top: 20px; }}The last two settings are just to space out the cards, set the header text and make the images fit in the cards well.
.home-card {  max-width: 285px;  margin: 0 auto;  h1 {    font-size: 25px;    text-align: left;  }}
img {  margin: 0 !important;  width: 100%;}
Finally, we have a section to set the widths, margins, and font-sizes for mobile devices or display widths no larger than 480px.
@media (max-device-width: 480px) {  .app-home {    min-width: 0;    h1 {      font-size: 40px;    }  }
  .home-box {    margin: 0 auto;    width: 95%;  }
  .home-words {    font-size: 20px;    padding: 0;  }
  .home-card {    font-size: 20px;    width: 100%;    h1 {      font-size: 25px;    }  }}
That’s it for styling! You can see the whole file here. If you take a look at what we have being server on localhost:4200 you should have a responsive layout of cards with titles, images, and blurbs.
Want to see it live? Just commit and push your code to your repository. This will trigger a Netlify build and you can run Netlify’s open command to see the build in your project dashboard.
git add .git commit -m 'adds amazing content'git push
netlify open
Introducing Scully
Now that we have all the content where we want it and how we want it on our home page let’s pre-render it! We’ll add Scully to our project then run it to find and pre-rendering all the pages. After that we’ll just need to change our build command in out netlify.toml file to make sure we deploy the new static content.
Adding Scully
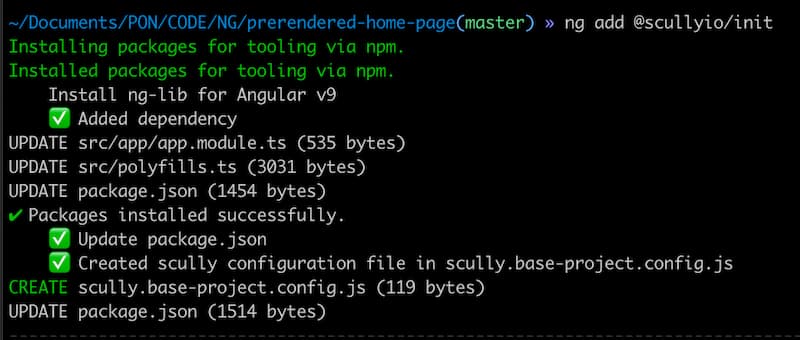
We can use the ng add command to integrate Scully into our project.
ng add @scullyio/initAs you can see from the output, the Scully schematics updated a few files (app.module.ts, polyfills.ts, and package.json) and created a scully.base-project.config.js file. Since this project is a clone of the our base project it has taken the name information from the angular.json file to set this file name.
We want to make sure we run the build command ng build (or ng build --prod) before we run Scully with npm run scully. Scully traverses the project to get information on the routes and pre-renders the content, so we build the project to have the most up-to-date version ready for Scully. Instead of having to run these commands each time we can make two scripts, jam and jam-prod in the package.json file.
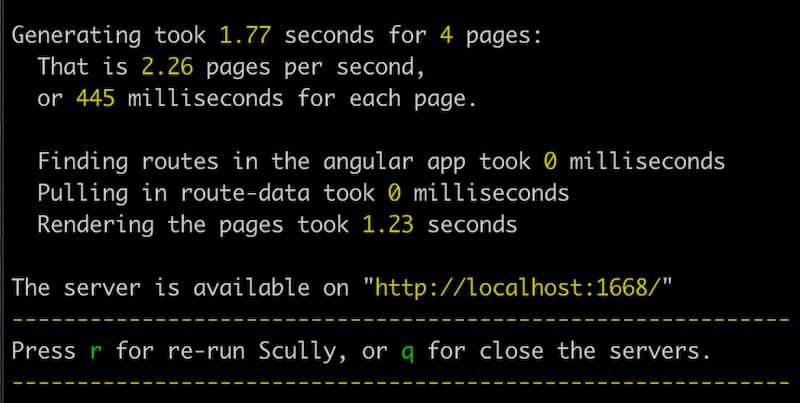
{ "name": "base-project", "version": "0.0.0", "scripts": { "ng": "ng", "start": "ng serve", "build": "ng build", "test": "ng test", "lint": "ng lint", "e2e": "ng e2e", "scully": "scully", "scully:serve": "scully serve", "jam": "ng build && npm run scully", "jam-prod": "ng build --prod && npm run scully -- --nw" }, ...To make local checks easier the jam script can be run with npm run jam. That will build out the project, run Scully, and also open up a local server to check the output at localhost:1668. We can see the stats from running Scully including how many routes it created and how long it took.
The script we made for the production build is a little different. First off we append the --prod flag to ng build to set the build configuration to production target. Then we pass two different flags to Scully. The first -- is there to let npm know you’re are about to pass parameters and the second --nw is to turn Scully’s watch feature off. This is the feature that is turned on by default and starts up the local server (at localhost:1668). We don’t want that in our production build on Netlify because it will make it so the build never completes.
Reconfiguration
We have a new build command but we also have a new directory where Scully builds out the static version of our site, dist/static. In order to tell Netlify to build out the site with Scully and to serve the newly made pre-rendered content we need to change out netlify.toml configuration file.
[build] publish = "dist/static" // <-- new project directory command = "npm run jam-prod" // <-- new build command[[redirects]] from="/*" to="/index.html" status=200We can simplify the command by just passing that nifty production script we made, npm run jam-prod. If you connected to your Netlify project in the beginning with netlify init you will still be hooked into your Netlify project. So, if you commit your code and push it up to GitHub, it will trigger a Netlify build using this new build information. If you run the command netlify open in your terminal you can check out the new build in your Netlify dashboard.
If it all worked correctly, you should be able to go to your site at <project-name>.netlify.com and see that absolutely nothing has changed. That means we didn’t break anything, woo hoo! You can even go into the developer tools and disable JavaScript to see that since you’re serving the pre-rendered content everything still works.
Want to learn more about Scully? Here are two posts for your viewing pleasure, Building an Angular Jamstack App with Scully and Update on Scully: Angular’s Static Site Generator
Would Ya Look At That
Congratulations! You’ve just created a totally pre-rendered static site with Angular! You can see the complete finished product in this repo. We were able to compress our image assets and deliver them using a cloud-base image service. Then we used, Scully, the Angular SSG, to pre-render our whole site. Go us!
Resources for the Road
Check out these resources to learn more!


