Welcome to part two of our ‘What’s a Netlify Build Plugin’ Series. In this series, we introduce you to Build Plugins by showing you how to use them, make them, and share them. Here’s a quick rundown of what each of the posts entail:
- Part 1: Using Build Plugins We dig into the process of enabling Build Plugins through the UI. Then we take a look at how to incorporate them into our project both locally and in production builds. To round it out, we also look into how to disable Build Plugins and remove them from our projects.
- Part 2: Making Build Plugins (you are here) This post will walk through how to make a Build Plugin and touch on each build event we can utilize. The Build Plugin we make will be the one we used in Part 1 (so meta, I know). This plugin will showcase other features like using inputs, handling errors, pulling in project constants, and more.
- Part 3: Sharing Build Plugins It helped me to see what awesome Build Plugins other developers were making. So, for this post not only will we point to other Build Plugins in the ecosystem but we’ll also see how to publish and share the Build Plugin we create. Sharing is caring after all.
Now that we covered what’s in the series, let’s look at what we’ll be working on today. We’ll be creating a Build Plugin that triggers every build event and utilizes some other features like inputs and error handling. Here’s the rundown of our goals today:
- Triggering different build events
- Grabbing user inputs
- Using inputs for dynamic events
- Accessing constants
- Handling errors
The code for the completed Build Plugin lives in this repo. I’ll reference different commits that showcase what we’re working on in each section. Unlike most tutorials where we’ll have an app we can watch come alive, all the work we’ll do today will show up in the build output. Let’s jump into the code!
Netlify CLI Setup
The first thing we need today is the Netlify CLI. To install it globally we’ll run this command in the terminal:
npm install -g netlify-cliWe’ll use the netlify build and netlify build --dry commands to run through the build process locally. The --dry flag will give us a summary without taking the time to run a full build. I’ll show an example of this once we have code to run it on.
Speaking of code to run it on, we’ll need a test project to sic our Build Plugin on. Since we’ll mostly be logging information to see how the plugins work, a simple, single index.html site with a netlify.toml Netlify configuration file will do. Wouldn’t you know it, we have one right in the example build plugin folder: 🐙 here is the link to the example site’s folder.
This project is a thing of beauty, I know.
🌥 Although we’ll be running the build locally to see outputs, we can also use the
netlify init&netlify deploycommands to see what the output looks like in the Netlify deploy dashboard. Here’s more info on deploying with the CLI. We’ll also want to use the published version of the plugin (netlify-plugin-to-all-events) if we want to see it deployed, more info on how to do that here.
The CLI and the test project are the only two items we need to start working through building our plugin. Let’s jump into creating the plugin by starting with the main files needed for every Build Plugin.
Build Plugin Building Blocks
There are three main files that each Build Plugin should have:
index.js: this is the entry point for the pluginmanifest.yml: a file to hold information about the pluginpackage.json: a file containing the metadata of the plugin
index.js
The heart of a Build Plugin is a JavaScript file, index.js, that exports all the functionality we want to apply to the build events. Yup, just a friendly, familiar, JavaScript file 😍. As Build Plugins get more detailed we can add helper functions imported from other files. However, the index.js will always be what Netlify reads first.
module.exports = {};manifest.yml
Each plugin needs to have a manifest.yml file that provides information about the plugin. This file will also describe the information it expects to receive from the project using the plugin. At the very least, the manifest.yml file needs to list the plugin name. It’s generally best practice to have the plugin name begin with ‘netlify-plugin’. So, if our plugin was named ‘cool-plugin’ it would then become ‘netlify-plugin-cool-plugin’. Plug it in, plug it in.
name: netlify-plugin-to-all-eventspackage.json
We can setup the package.json file by running npm init and answering the questions to the prompts. It’s best practice to have netlify and netlify-plugin in the keywords of this file. Also, we recommend having the repository and bugs fields filled out to guide users to the Build Plugin’s repository. Here’s the package.json for the plugin we’re creating:
{ "name": "netlify-plugin-to-all-events", "version": "1.3.0", "description": "An example project to plugin to all the Netlify build events 🔌!", "main": "index.js", "scripts": { "test": "echo \"Error: no test specified\" && exit 1" }, "repository": { "type": "git", "url": "git+https://github.com/tzmanics/netlify-plugin-to-all-events.git" }, "keywords": ["netlify", "netlify-plugin", "build", "plugins"], "author": "Tara Z. Manicsic <tzmanics@gmail.com> (https://tzmanics.dev)", "license": "MIT", "bugs": { "url": "https://github.com/tzmanics/netlify-plugin-to-all-events/issues" }, "homepage": "https://github.com/tzmanics/netlify-plugin-to-all-events#readme"}🔬 If you want some more information about the
package.jsonfiles in general, here’s a great post from the npm team.
Now that we have all the essential files we can start digging into functionality. Here’s a link to the 🐙 initial commit in the project repo where these base files have been created.
The Build Events
We can access seven different build events:
onInit: runs before anything elseonPreBuild: runs before build commands are executedonBuild: runs while build commands are being executedonPostBuild: runs after build commands are executedonSuccess: runs once build is completed successfullyonError: runs if there is a build erroronEnd: runs on build error or success when the build process ends
With each of these events, you get access to stages of the build process so you can fine tune and add processes to your build. For our build plugin we’ll log out information for every build event because we’re so extra 👩🏻🔬.
module.exports = { onInit: () => { console.log('onInit: I run before anything else 🐣'); }, onPreBuild: () => { console.log('onPreBuild: I run_before_ build commands are executed 🌤'); }, onBuild: () => { console.log('onBuild: I run while build commands are being executed ⚙️'); }, onPostBuild: () => { console.log('onPostBuild: I run _after_ build commands are executed ✅'); }, onSuccess: () => { console.log('onSuccess: I run on build success 🎉'); }, onError: () => { console.log('onError: I run on build error 🚒'); }, onEnd: () => { console.log( 'onEnd: I run on build error or success when the build process ends 🎬' ); },};🐙 Check out this repo commit to see what we changed.
Like we talked about before, this is just a JavaScript file. So, inside of these events we can do all the things we’re used to: check parameters in if statements, run functions, call on third-party libraries, etc. The possibilities are endless.
Build Plugins Locally
To test that our build plugin is working as expected, let’s run it locally. To do this we’ll need to add the path to the build plugin to our test-project/netlify.toml file like so:
[[plugins]]package = "../netlify-plugin-to-all-events"We signify that we’re adding a plugin with [[plugins]]. Then we add the path to the plugin as the value to the key package. It is relative to the project, since this test project is living in the plugin’s folder we just needed to back up one level. If it was a Build Plugin that was published on npm we would just need to write the plugin name.
📓 I cover adding plugin information to configuration files in more detail in Part 1: Using Netlify Build Plugin.
Now that we have the plugin added to our project why don’t we dry it out, ahem, I mean try it out with the netlify build --dry CLI command. This command will just show us that there is something that is listening to each build event. Since we’re using the --dry flag it’s just a summary and won’t actually follow-through on the actions that would be triggered by the build events (it’s not actually running the build.)
cd test-project/netlify build --dry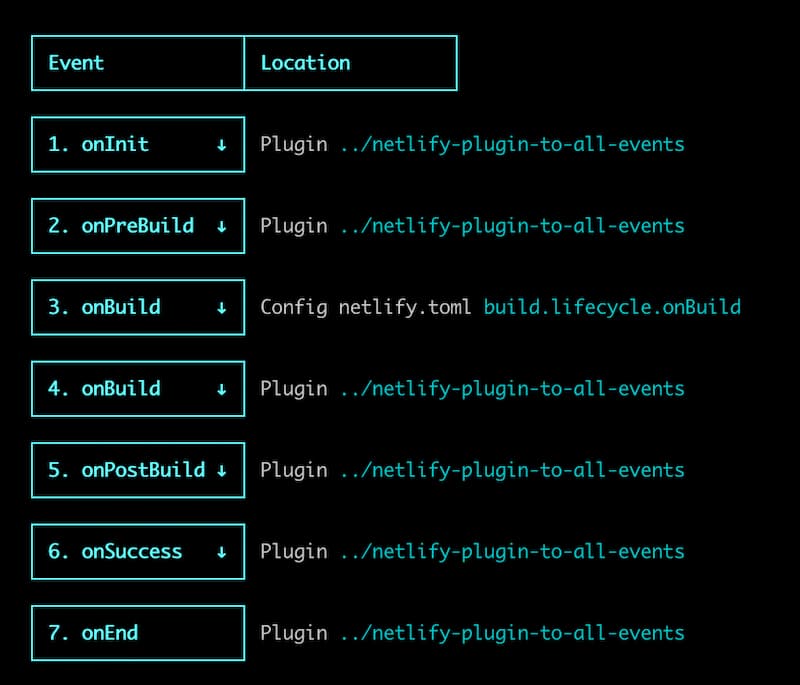
This output confirms that our Build Plugin is being triggered at all the build events. We can now turn this into a real build, Pinocchio. To do this we’ll just drop the --dry flag.
🔑 Bonus tidbit: if you get tired of typing
Netlifyin the CLI you can type the shorter version,ntl!
ntl build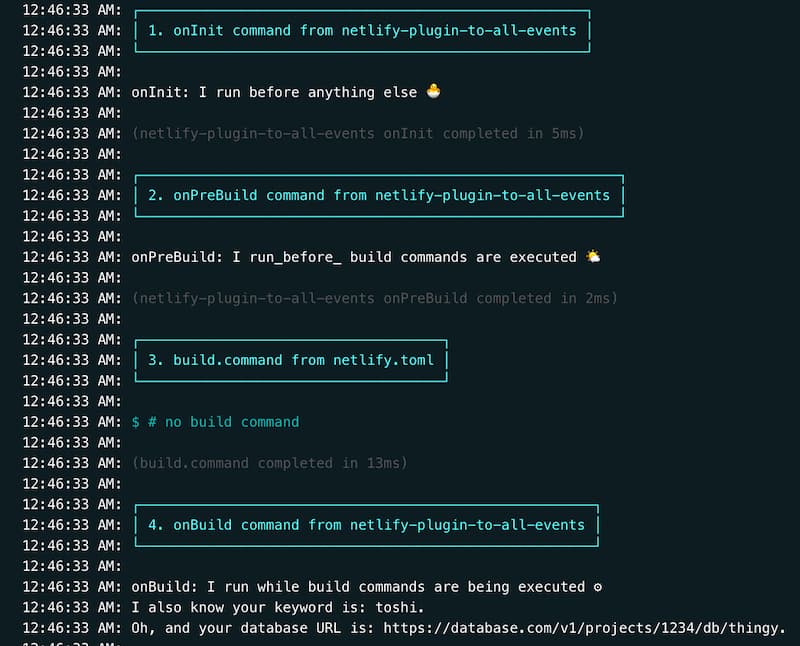
One thing you may notice from these logs is that the output for onError didn’t show up. That’s because we had no errors, woohoo! Later on, we’ll intentionally add an error so we can see this event triggered and look into how to handle errors.
User Inputs
Each plugin has an inputs property. With inputs, users can assign variables via their project’s netlify.toml configuration file. If we look back at part 1 of this series, we can see how the user sets the input values in detail but here’s what it looks like in the test project’s netlify.toml file:
[[plugins]]package = "netlify-plugin-to-all-events" [plugins.inputs] triggerAll = true keyword = "toshi" databaseUrl = "https://database.com/v1/projects/1234/db/thingy"We want to provide a few details for each input being passed to the plugin in the plugin’s manifest.yml file. Every input must have a name and description. It is also best practice to have a default value and mark if it is required. To recap, each input should have:
name: {string} an identifying name that will be used for referring to the inputdescription: {string} a short explanation of the inputdefault: {any} a value that will be set if none is providedrequired: {boolean} to signify if a user must provide this input value
For our plugin we’ll be asking for three inputs: triggerAll is a boolean asking if we want to trigger all events, keyword is just a string we’ll log, and databaseUrl is also a string that we’ll log. In an IRL application we could use keyword to search files or a database for a certain word or item, and use databaseUrl to aid in loading database information. We will add the information needed of each input to the plugin’s manifest.yml:
name: netlify-plugin-to-all-eventsinputs: - name: keyword description: Describe what keyword to look for default: toshi - name: databaseUrl description: The URL of the database, duh required: true - name: triggerAll description: Boolean to decided whether to run all the event code default: true required: true🐙 Here’s a link to the
manifest.ymlfile in the project repo
Accessing User Input
With everything properly declared we can now use inputs inside of our Build Plugin. We can pass the inputs object as a parameter to whichever event we plan to use it in. We have the option of either passing in the whole inputs object or a specific input. Here’s what it looks like for each of those scenarios:
...onPreBuild: ({ inputs: { keyword } }) => { console.log('onPreBuild: I run_before_ build commands are executed 🌤'); console.log('I will only use the keyword input: ', keyword);},onBuild: ({ inputs }) => { console.log( 'onBuild: I run while build commands are being executed ⚙️' ); console.log(`I also know your keyword is: ${inputs.keyword}.`); console.log(`Oh, and your database URL is: ${inputs.databaseUrl}.`);},...🐙 This link takes you to the commit where we added inputs to the
onPostBuildevent
Dynamic Events
Do you remember how Build Plugins can take input from the user via input? Well, I really hope so because we just talked about it. One way in which inputs can be handy is to check when or if the logic in our build plugin should run at all. Let’s examine what that looks like:
module.exports = function runPlugin(inputs) { if (!inputs.triggerAll) { return { onInit: () => { console.log(`triggerAll set to ${inputs.triggerAll}, no fun 🤷🏻♀️!`); }, }; } else { return { onInit: () => { console.log('onInit: I run before anything else 🐣'); },...The code above checks to see if the user set the input triggerAll to false with !inputs.triggerAll and only runs code for onInit if so. With this functionality we can conditionally choose what to do at different stages of the build. This doesn’t have to be a boolean, we could ask the user for a variable that delineates the framework their project is using and run different onBuild code for each type. With this process you can dynamically adapt your plugin specifically to each project’s needs.
This is one of the Build Plugin features that makes me really excited to see what devs, like you, will create! Before you get started let me point out a few more goodies.
Netlify Constants
Netlify isn’t going to send us on our Build Plugins journey empty-handed. This isn’t an episode of Survivorman. Netlify provides us with accoutrements called [constants]. Just like inputs we can pass these constants as an object or individually into our events. Here’s what we have to work with:
CONFIG_PATH: the path to the project’s Netlify configuration filePUBLISH_DIR: the directory the user lists to publish their project fromBUILD_DIR: the directory that contains the files and assets generated by the buildFUNCTIONS_DIST: the directory of Netlify Functions source codeCACHE_DIR: where the project’s cache will liveIS_LOCAL: a boolean signifying if the build is local or notSITE_ID: the project’s Netlify site ID
Let’s go ahead and add some constants to our code in the index.js file.
...onPostBuild: ({ constants }) => { console.log( 'onPostBuild: I run _after_ build commands are executed ✅'); console.log('Here are some other things I know thanks to constants:'); console.log(constants);...If we run ntl build now we’ll see all the constants and their values for our test project.
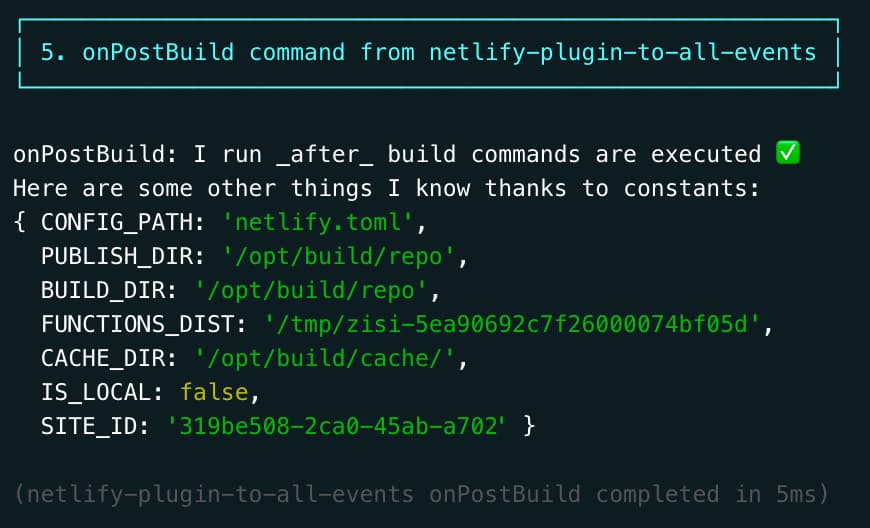
These logs are from the deployed version of the test project. The SITE_ID has been edited because it’s sensititve information and not everyone out there is as nice as you 😘. The other values are the true, unedited information. We can access this individual information for each project that uses our plugin. In another plugin I built, Brand Guardian, I use the PUBLISH_DIR to get the route to all project’s HTML files and check for spelling errors of uniquely spelled brand words.
Now that we have all these tools that broaden the horizon of Build Plugin ideas that I’m sure you’re just brimming with by now, let’s dig into some utilities.
Handling Errors
There are a few utils that we can take advantage of when creating a Build Plugin:
build: this is a pretty hefty library, today we’ll be using this utility for handling errorscache-utils: is the utility for accessing the Netlify cache and caching files (the Gatsby cache and Fetch Feeds plugins showcase this utility well)config: this library lets us read netlify configuration filesfunctions-utils: this utility allows plugins to dynamically inject Netlify Functiongit: using this utility you can link actions or get information about modified, deleted, or created files since a git commitrun: this utility allows you to run commands inside Netlify Build but currently there is only theruncommand
All of these are documented in the Netlify build repo if you’d like to delve a little deeper into the code. Did I already say the possibilities are endless? Well, these utilities make them even more endlessy (not a word but tell me it didn’t make sense).
As I pointed out earlier we’ll be looking at handling errors using a few functions from build/errors. Thankfully, we have three different options for handling the build if our plugin has an error.
utils.build.failBuild('message'): will fail the build completelyutils.build.failPlugin('message'): will not fail the build but will fail the pluginutils.build.cancelBuild('message'): the build will stop and show up as canceled on the project dashboard
In our Build Plugin we can add an error handler like so:
... onSuccess: ({ utils }) => { console.log('onSuccess: I run on build success 🎉'); try { throw new Error('This is the error 🚨'); } catch (error) { utils.build.cancelBuild(`This will cancel the build ${error}.`); } }...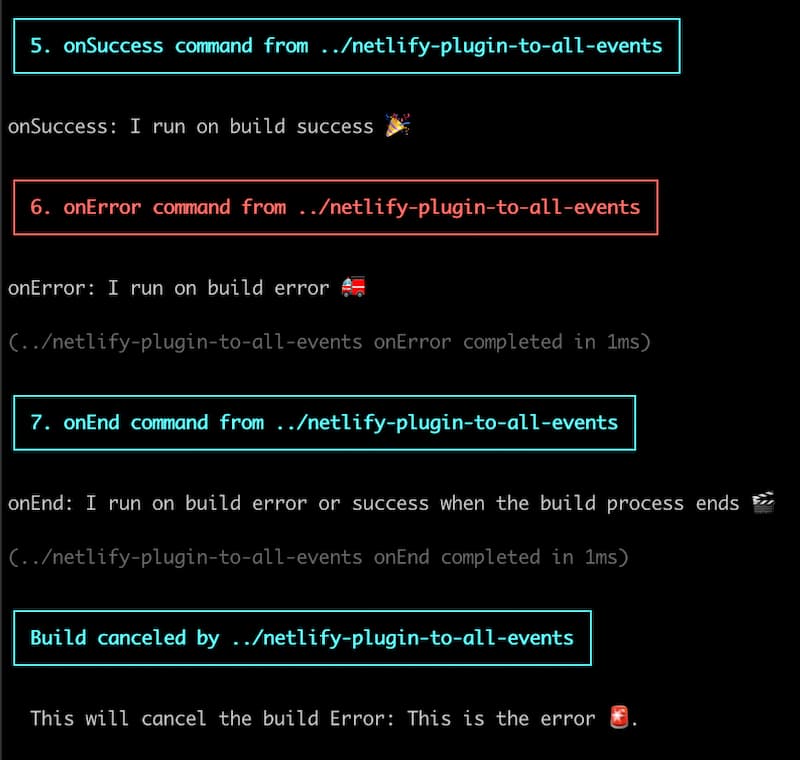
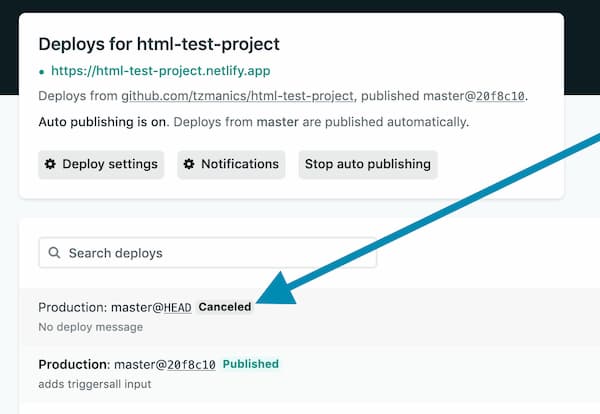
There’s a lot going on in these logs. First, we see that onSuccess was triggered because technically the build happened before we triggered an error so the build was successful. Because we triggered an error we finally got to see the, hopefully often elusive, onError event get triggered. The very last line we see the main event, the message that the build has been canceled along with the error we passed in. If we run this on a deployed application the build will also show up as canceled in thr deploy dashboard.
🐙 In this repo commit we add the different types of error handling to the Build Plugin.
Better Builds, Boom! 💣
That’s it, you now have the building blocks of Build Plugins! I hope this will help you customize or automate your build in a way you’ve been hoping to. If not, maybe it will spark an idea for a Build Plugin you didn’t even know you’ve always wanted.
We have a designated section of our Netlify Community on Build Plugins, so join us if you have any questions. The next part of this series will focus on how to publish and share the amazing Build Plugins you create with the community so more devs can prosper from your hard work. Until we code together again, happy coding 👩🏻💻!