This post was contributed by our friends at Kentico Kontent.
If you’re a .NET or C# developer, the Jamstack approach to building websites might have fallen off your radar over the years. With the development of the Jamstack ecosystem, now might be the right time for you to build on a Jamstack architecture and utilize all your well-deserved .NET skills.

What marmalade cake are you talking about?
Jamstack—one of the key concepts is pre-rendering. In Jamstack sites the entire front end is prepared at the build time, and the resulting static output is served from a content delivery network (CDN).
As a Jamstack developer, you don’t want to write all the logic for transforming your project into static files. Instead, you want to use some tools for this pre-rendering. These tools are doing a lot of fancy stuff for you—usually they allow you to apply templates, handle all the bundling and minification, and provide you with a rich ecosystem of plugins for specific use cases like data fetching from CMS, site map generating, or optimizing images. These tools are called static site generators. But let’s talk .NET now, where a generator called Statiq is quickly becoming a popular option.
U jokin’? Why would I want to build a static site in the 2020s?
Glad you asked! These are not static sites full of GIFs and WordArt from the `90s—though I love those retro feeling ones like on my university programming teacher’s site. Browsers, JavaScript, and APIs have all advanced in capabilities since then. These days you can implement dynamic functionalities like authentication, payments, or search even on static sites.
So, how to jam on .NET?
With Statiq! Statiq is a static site generator for .NET. It brings the first-class experience of both Visual Studio and VS Code - including Intellisense and debugging - to the Jamstack world. In combination with the .NET platform and many built-in features like pipelines, modules, preview server, and shortcodes, it is a great entry ticket for .NET developers and teams into Jamstack.
The Statiq project contains a general-purpose static generation framework called Statiq Framework and a convention-based static site generator called Statiq Web that’s built on top of it. From now on, we will be referring to Statiq.Web when talking about Statiq.
The basics of Statiq
For a start, let’s explain some key concepts and specifics of Statiq. I believe these are essential to having a solid base when starting with this static site generator.
Documents
A document is a primary unit of information in Statiq. It consists of content and metadata. Imagine that Statiq is like a document database that can process these documents. To be more precise, these documents are immutable. When a document is processed, it’s returned a new instance of the document. Documents are manipulated by modules.
Modules
A module is a component that performs a specific action with documents. A module takes documents as input, does an operation based on those documents (possibly transforming them), and outputs documents as a result of whatever operation was performed. Modules are typically chained in a sequence called a pipeline.
Pipelines
A pipeline is a document processing unit. A pipeline consists of one or more modules. Basically, the pipeline is a workflow blueprint of how your modules should handle documents. One might find a slight analogy with a controller in .NET MVC, nevertheless, it’s good to think about pipelines in a more declarative way. You just specify what your output should be rather than how to transform and produce it.
Pipelines have their own lifecycle process defined by phases. When pipelines and modules are executed, the current state is passed in the execution context.
Gimme code!
In this section, we’ll create a new static site powered by Statiq from scratch. The site will contain one root page, a listing of the articles, and article detail pages. The example will showcase rendering using Razor pages as well as Handlebars templates. Then we’ll use a third party module for fetching and rendering content from the headless CMS Kontent. In the end, we’ll publish our site to Netlify, with preview functionality.
Note: If you just want to see working code published on Netlify, you can fork my repository and start from Step 7.
Prerequisites
Installing the .NET Core SDK is the only prerequisite. This tutorial assumes you are familiar with the basics of frontmatter, markdown formatting, and the .NET ecosystem.
Step 1: Create a new project
- Run
dotnet new console --name StatiqTutorialfrom the command line. - Navigate to your newly created
StatiqTutorialdirectory and rundotnet add package Statiq.Web --version 1.0.0-beta.14(you can find the latest version of the framework on Nuget). - Create a bootstrapper in your
Program.cs.
using Statiq.App;using Statiq.Web;
namespace StatiqTutorial{ public class Program { public static async Task<int> Main(string[] args) => await Bootstrapper .Factory .CreateWeb(args) .RunAsync(); }}- In your project, create an
inputfolder with anindex.mdfile with the following content. The input directory is a default path where Statiq looks for input files.
---Title: My First Statiq page---# Hello World!
Hello from my first Statiq page.- Run
dotnet run. This command will create an output folder with the generated page. - By running
dotnet run -- previewStatiq will generate theoutputcontent (same as in the previous step). In addition, it’ll start your server and will serve content from the output directory. - You should see your rendered site at
http://localhost:5080.
What just happened?
All the magic happened in the CreateWeb(args) method that created a bootstrapper with Statiq functionality. Default configuration runs your app with several modules. The most important one is default processing of your input markdown files and generating a page with the same name with content in HTML.
Step 2: Create an index page with a custom Razor template
- Go to
Program.csand replace it with the code below. With this bootstrapper setup, you tell Statiq you don’t want all the default magic, and you’d rather take care of the content rendering on your own. However, theAddHostingCommands()is still providing you with preview functionality.
using System.Threading.Tasks;using Statiq.App;using Statiq.Web;
namespace StatiqTutorial{ public class Program { public static async Task<int> Main(string[] args) => await Bootstrapper .Factory .CreateDefault(args) .AddHostingCommands() .RunAsync(); }}- In the
inputfolder removeindex.mdand create acontentdirectory. In this directory, we’ll have our input files for content. In theinput/contentcreate a newhome.mdfile with the following code.
---Title: Hello World from Statiq!Content: This is a root page of the statically generated site powered by Statiq. This page is rendered by Razor view template. Statiq Web is a powerful static website generation toolkit suitable for most use cases. It's built on top of Statiq Framework, so you can always extend or customize it beyond those base capabilities as well. This is an example of how to render one single page.---This will be your local content data source file for your home page. It’s a basic frontmatter markdown content with the Title and Content properties.
- In the
inputdirectory createHome.cshtmlfile with content. - Create
HomeViewModel.cs. - When you check the
Home.cshtmlyou’ll find out that your HomeViewModel is not visible from this view. To fix it, create new_ViewImports.cshtmlin the input directory. - Now we need to tell Statiq how we want to process and handle our input file. Create a
HomePipeline.csfile. In the Input phase, this pipeline reads ourcontent/home.mdfile. The Process phase usesExtractFrontMatterandParseYamlmodules that get content from this file. We need to somehow connect our input document with our view. We achieve this by using theMergeContentmodule in theRenderRazormodule, where we specify how to create an appropriate view model. TheSetDestinationmodule determines where your files will be written. In the last Output phase, we use theWriteFilesmodule for writing our output files. - Run
dotnet run -- preview. You should see your markdown content rendered on the Razor page similar to this deployed on Netlify.
Step 3: Create a listing page with a Razor template
- In
input/content/featurescopy the following markdown files. These will be our content data source for the listing page. You can find content and structure for these files on GitHub. - In the
inputfolder createFeaturesListing.cshtml. - Create
Feature.cs,FeaturesListingViewModel.cs, andFeaturesListingRazorPipeline.cs. It’s worth mentioning that in the Process phase we are using the execution context of the current pipeline, where we are adding content from our markdown files as children of the document. In the Output phase, we are iterating through the document’s children, and we are creatingList<Feature>features object, which is used byFeaturesListingViewModel. Other principles are similar to those described in Step 2. - After running
dotnet run -- previewyou should see your features listing athttp://localhost:5080/features-razor. 5.If you’d like to use the HandleBars template instead, you can find the pipeline and template on GitHub. The principles are the same.
Step 4: Create a detail page with default markdown rendering
- Create
FeatureDetailPipeline.cs. In the Process phase, this pipeline uses theRenderMarkdownmodule that renders markdown. - Run
dotnet run -- preview. Now your links from both (Razor and HandleBars) listing pages leading to the detail one should work.
Step 5: Prepare content in the headless CMS Kontent
When you want to enable content authors to create and manage content, it’s more convenient to provide them with the capabilities of Headless CMS than to edit your codebase directly. In this step, we’ll create a project in headless CMS Kontent. Moreover, we’ll create a new home page, which will use content from this CMS.
-
Go to kontent.ai and create a new project.
-
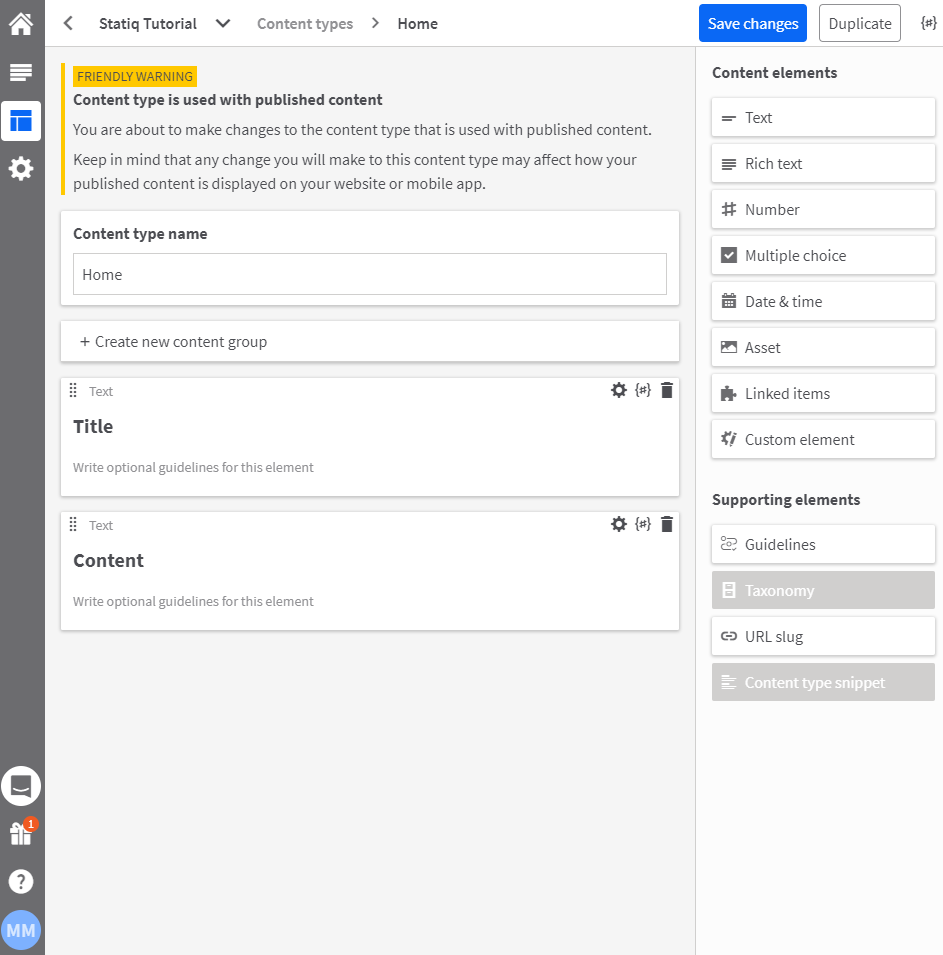
Go to Content Types and create a new Home content type. Add Title and Content text elements. Save changes.
-
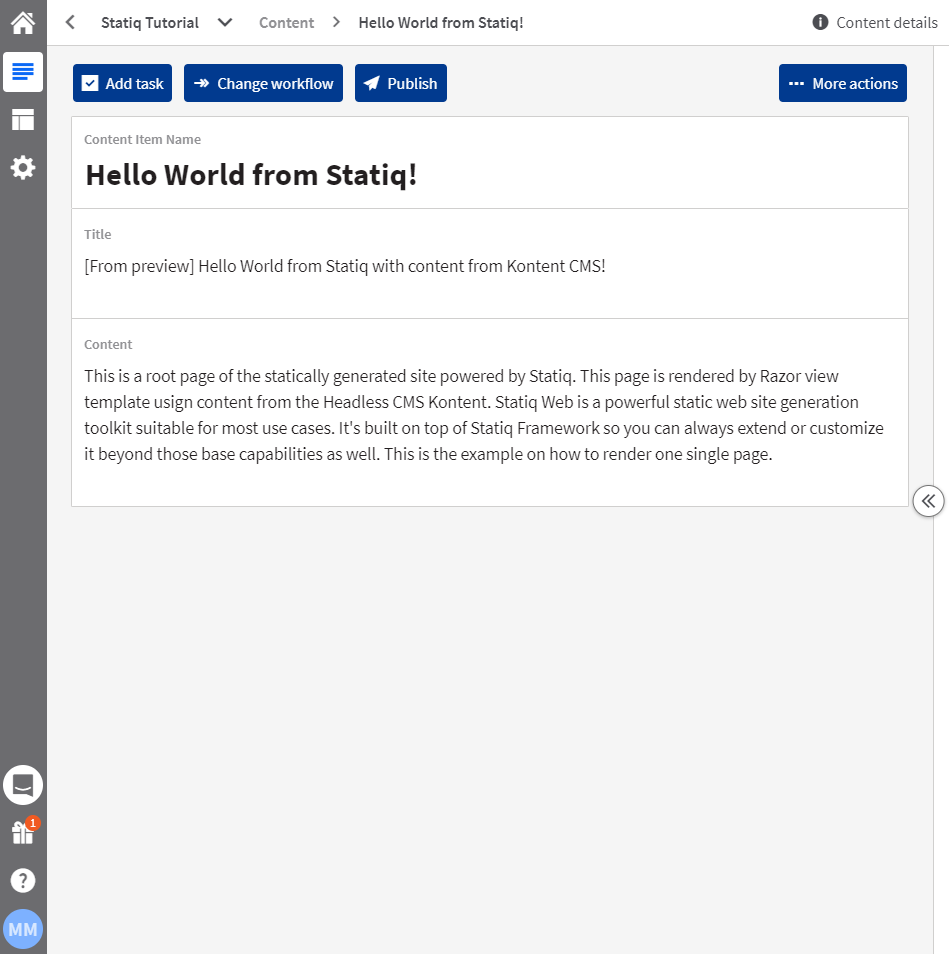
Go to the Content & Assets section and create a new content item Hello World from Statiq! based on Home content type. Fill in Title and Content elements. Publish the content item.
-
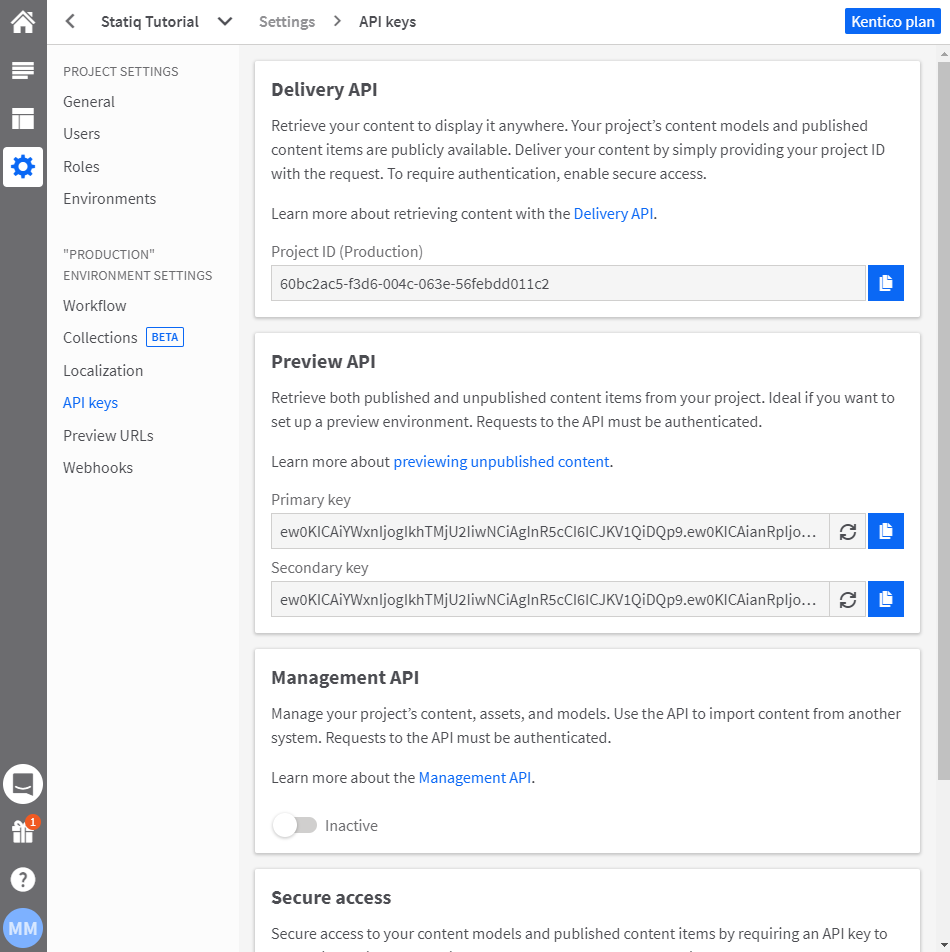
In the Settings section, you will find your ProjectId and Preview API keys. You will need them in the next step.
Step 6: Integrate content from the CMS into our Statiq site
First, we’ll generate strongly typed classes for our content types. This helps us to work with content from the headless CMS in a safe, strongly typed way. Then we’ll use the Kontent.Statiq module to fetch and use our content in the new pipeline.
- Install Kentico Kontent Generator utility.
- In the root of your project, create a PowerShell script file named
GenerateModels.ps1. - For the local configuration in the root of your project, create
appsettings.json. Replace projectId with the one from the previous step. - When you run this script, it generates strongly typed models together with ITypeProvider in the Models folder.
- Add Kontent.Statiq module to your project.
- Register CustomTypeProvider and DeliveryClient in the bootstrapper.
- Create
HomeFromCmsPipeline.csfile. This pipeline uses the Kontent.Statiq module in the Input phase. In the Process phase, we are reusing theHome.cshtmlrazor view. All the magic happens in the Process phase. We are creatingHomeViewModelusing an already created new constructor. The parameter of the constructor is Statiq’s document created with content from the headless CMS. - Run
dotnet run -- preview. Athttp://localhost:5080/index-from-cmsyou should see your rendered content from the headless CMS.
Pro tip: You can also check how your site looks and behaves with unpublished content. Just enable preview mode in appsettings.json and use the Preview API key from the previous step.
{ "DeliveryOptions": { "ProjectId": "YOUR_PROJECT_ID", "PreviewApiKey": "YOUR_API_KEY", "UsePreviewApi": true }}Step 7: Let’s publish it on Netlify
We will create two sites on Netlify. While one will build our production site with published content, the other one will use unpublished preview content. Netlify’s built machines got installed .NET5 framework by default. Make sure in your project’s .csproj file you are targeting net5.0 as a target framework.
-
Push the whole project to your GitHub repository. Do not include
appsettings.json. We will provide these settings in the form of environment variables. If you don’t want to follow all the previous steps, you can fork my repository and start from here. -
Go to Netlify and create a new site from Git, select your repository.
-
Fill in
dotnet runas a Build command andoutputas a Publish directory. Add a newDeliveryOptions\_\_ProjectIdvariable and enter your projectId. Note: Netlify uses double underscore (__) as the delimiter for the nested environment variables.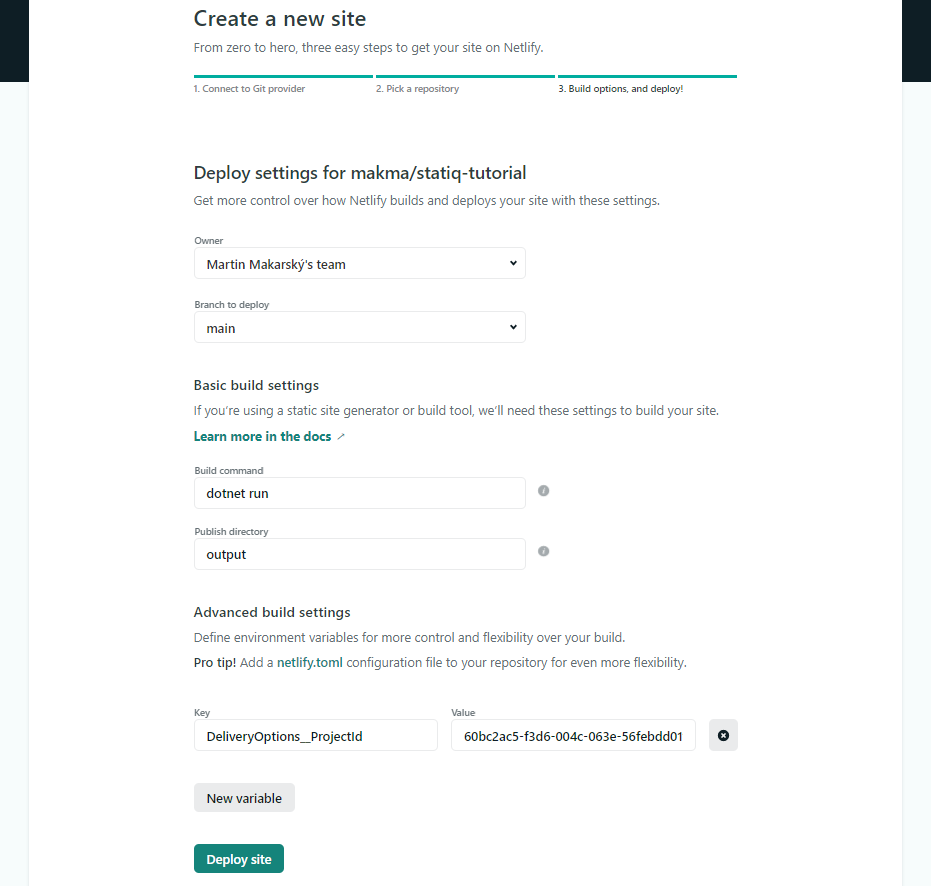
-
Click Deploy site. Your site will be ready within minutes.
Step 8: Unpublished preview content on Netlify
-
For previewing unpublished content, create a new site following steps from Step 7. In addition, you will have to provide a PreviewApiKey and UsePreviewApi flag.
-
Besides
DeliveryOptions\_\_ProjectIdadd two new environment variablesDeliveryOptions\_\_PreviewApiKeywith your Preview API Key value andDeliveryOptions__UsePreviewApiwith true value.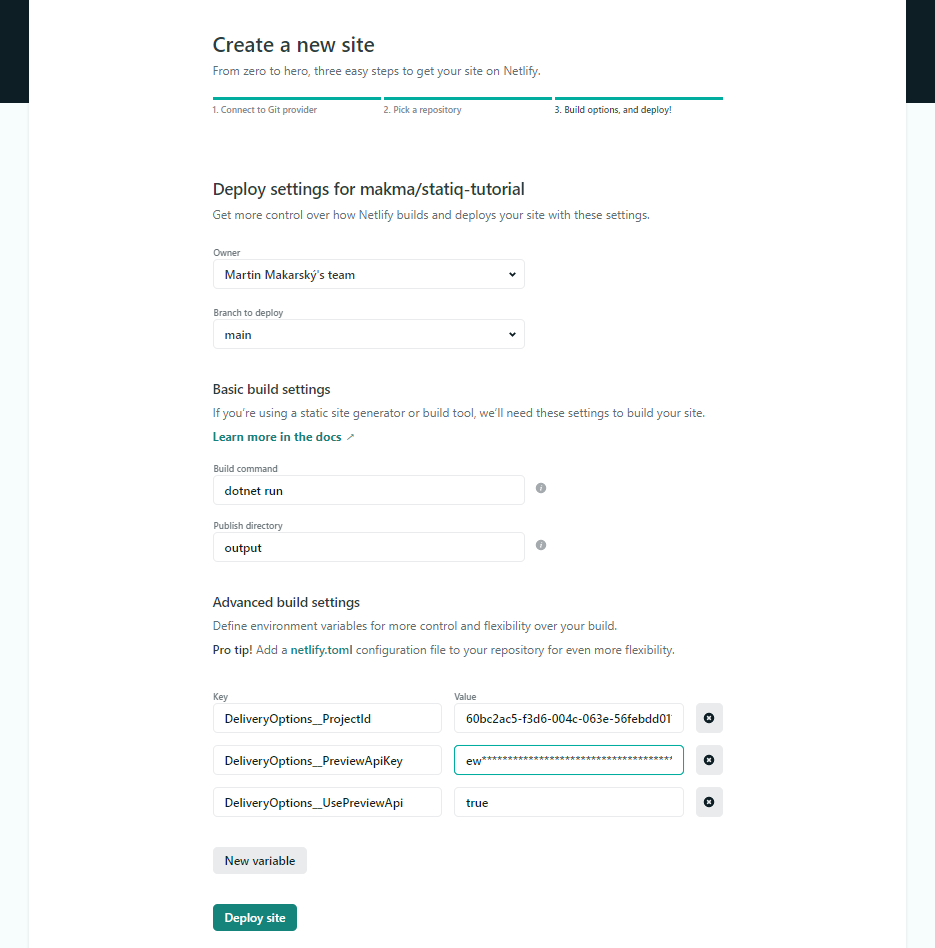
-
Click Deploy site. Your preview site will be ready within minutes.
Pro tip: Add webhooks for rebuilding your site when content is changed. You can learn more about Kontent webhooks and Netlify build in this article.
Wrap-up, next steps, and resources
This tutorial is meant to be an introduction to the Statiq static site generator. There are opportunities for you to make additions to the code around styling, SEO, and even adding JavaScript for more capabilities. If you would like to use a more complete template, I’d recommend the Statiq Lumen starter, which is a blog site built with Statiq and Kentico Kontent that uses SEO best practices and had a great Lighthouse score. Another resource on connecting Statiq with the CMS is Jamstack on .NET: From zero to hero with Statiq and Kontent.
About the author
Martin Makarsky is a developer advocate and hacker at Kentico. During the day he tries to find ways to help people with code. At nights, he’s hacking at first glance incompatible pieces into meaningful structures. He writes at https://martinmakarsky.com
About Kentico Kontent
Kontent is a cloud-native headless CMS that lets you build websites and applications fast. Integrate Kontent directly into your Netlify site for faster deployments and unrestricted design possibilities. Reach out about using Kontent with your next production Netlify project.