This article is intended for those who are new to creating APIs with AWS. It assumes no prior knowledge, and we’ll link off to any additional features that are out of scope. By the end, you’ll set up an entire API using DynamoDB and Lambda for your application! APIs have become an important piece of modern application development, we can use them to create full stack apps, performing all CRUD operations using the technologies in this tutorial.
Today, we’ll incorporate this API into a Jamstack app and deploy it using Netlify, including using environment variables to store the key. Let’s get started!
If this is your first time creating an AWS account, chances are you will log in and feel a little overwhelmed. AWS is great because it has a ton of options. AWS is disorienting because it has a lot of options. If you ever get lost, have no fear. You can log into the console, https://us-east-2.console.aws.amazon.com/, and search for the service you’re looking for. Once you’ve looked for it a few times, they will “pin” your usual suspects to the search, which is handy.
Why are we using these tools?
-
DynamoDB is a fully managed, highly available distributed database. It takes care of replicating your data across many regions without a lot of administration. It offers fast performance and scalability without hiccups in your service, which makes it an excellent tool for our use in an application.
-
Lambda is so well-known for Serverless Functions that it’s a bit like Kleenex, sometimes people say Lambda when they mean Functions. :) Lambda lets us execute event-based logic without having to manage or provision servers. We’ll be using Lambda to express in a function what shape of data we’d like to retrieve from DynamoDB.
-
API Gateway is pretty well named :) It integrates with Lambda or other backend services to provide a proxy to accept API calls, aggregate the services to fulfill them, and return the appropriate result. It provides tools for the requests, such as testing and modeling.
Let’s Store Some Data with DynamoDB
Go to the AWS management console and search for DynamoDB, or follow this link. You’ll be brought to an overview screen with a big blue button that says “Create Table”, go ahead and click that.
We’re going to name our DynamoDB table, “restaurants”, and use an “id” as a string as the primary key. You don’t have to name it “id”, but I do suggest using a string for the ID. Click “create” when done.
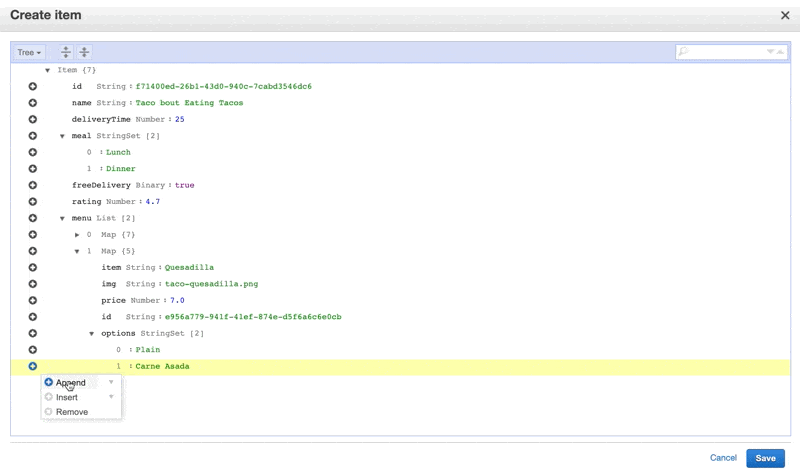
After it’s finished being set up, we’ll click on the “Items” tab. We’ll start filling out the items I’m going to store and their types by clicking “Create Item”.
We’ll add in some fields, you can see I’ve made it a little complex to show all of the different types we can have, and because that’s more true to real life. I’ve used this quick UUID generator for the IDs, which I have given to each item as well as each nested item I might retrieve. You can use the command line for this task, there are a few tools that help you do so like this one for VS Code. For the purposes of this tutorial, we’ll mainly show things in the console.
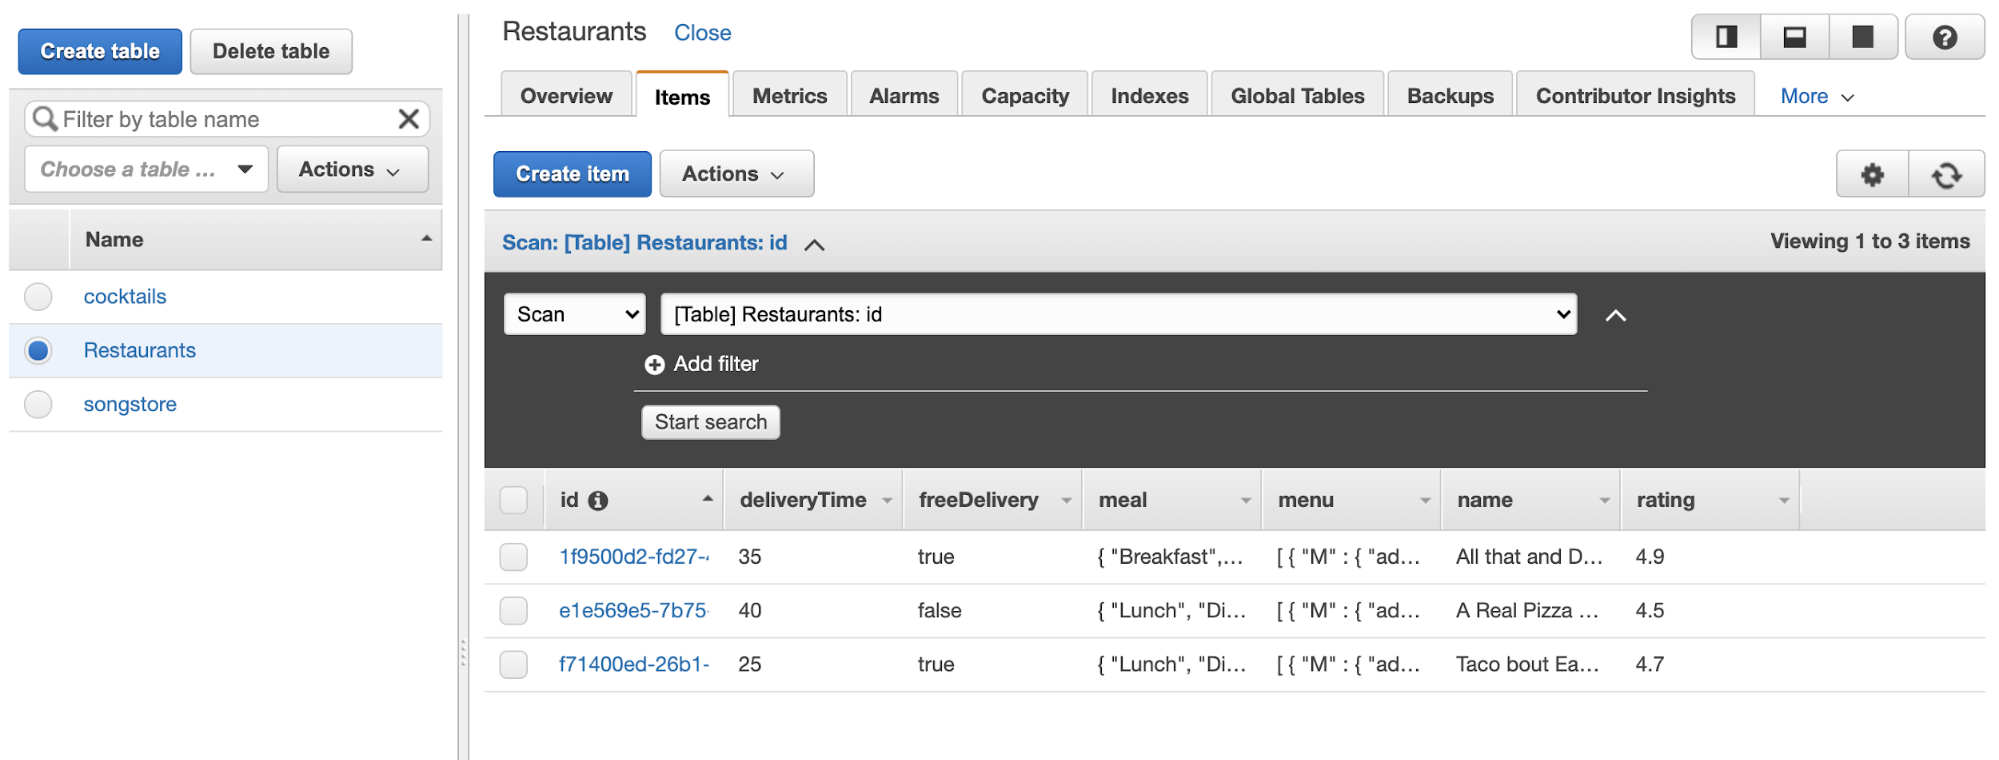
Now you can see the table populated with items:
Of course, if you work with DynamoDB a lot, you probably don’t want to enter this all manually in the GUI. AWS has a command line tool, the instructions for installation are here.
Once you have it installed you can run:
aws dynamodb helpAnd it will output a ton of useful methods available to you.
In order to create a new table, we can run:
aws dynamodb create-table \ --table-name Restaurants \ --attribute-definitions \ AttributeName=Name,AttributeType=S \ --key-schema \ AttributeName=Name,KeyType=HASH \ --provisioned-throughput \ ReadCapacityUnits=10,WriteCapacityUnits=5Which will return something like this:
{ "TableDescription": { "AttributeDefinitions": [{ "AttributeName": "Name", "AttributeType": "S" }], "TableName": "Restaurants", "KeySchema": [{ "AttributeName": "Name", "KeyType": "HASH" }], "TableStatus": "CREATING", "CreationDateTime": "2020-08-20T22:27:32.530000-06:00", "ProvisionedThroughput": { "NumberOfDecreasesToday": 0, "ReadCapacityUnits": 10, "WriteCapacityUnits": 5 }, "TableSizeBytes": 0, "ItemCount": 0, "TableArn": "arn:aws:dynamodb:us-east-2:442583039243:table/Trial", "TableId": "d6d6337e-0052-4f69-a30b-160155071e97" }}If you log back into the console, you’ll see your new table in the UI! This created the table, we have not yet put anything into it.
aws dynamodb put-item \--table-name Trial \--item \ '{"Name": {"S": "All That and Dim Sum"}}'Now we have our first row of data! There’s more you can do here, but the scope gets expansive, and we still have a lot to cover. For more information on working with DynamoDB through the CLI, the docs have everything you need to know.
From here, we have a few things we’re going to need to do to make sure our API GET works properly with what we’ve just created. We’ll have to:
- Create a Lambda function that gathers all the data from DynamoDB and returns it
- Make sure the Lambda has the proper permissions- reading from DynamoDB, and nothing more
- In API Gateway, we’ll proxy the Lambda to a GET method and configure it to make sure we don’t run into any CORS errors
- Create an API key and usage parameters so that we control how our API is consumed
Let’s start with the permissions with IAM.
Creating roles in IAM
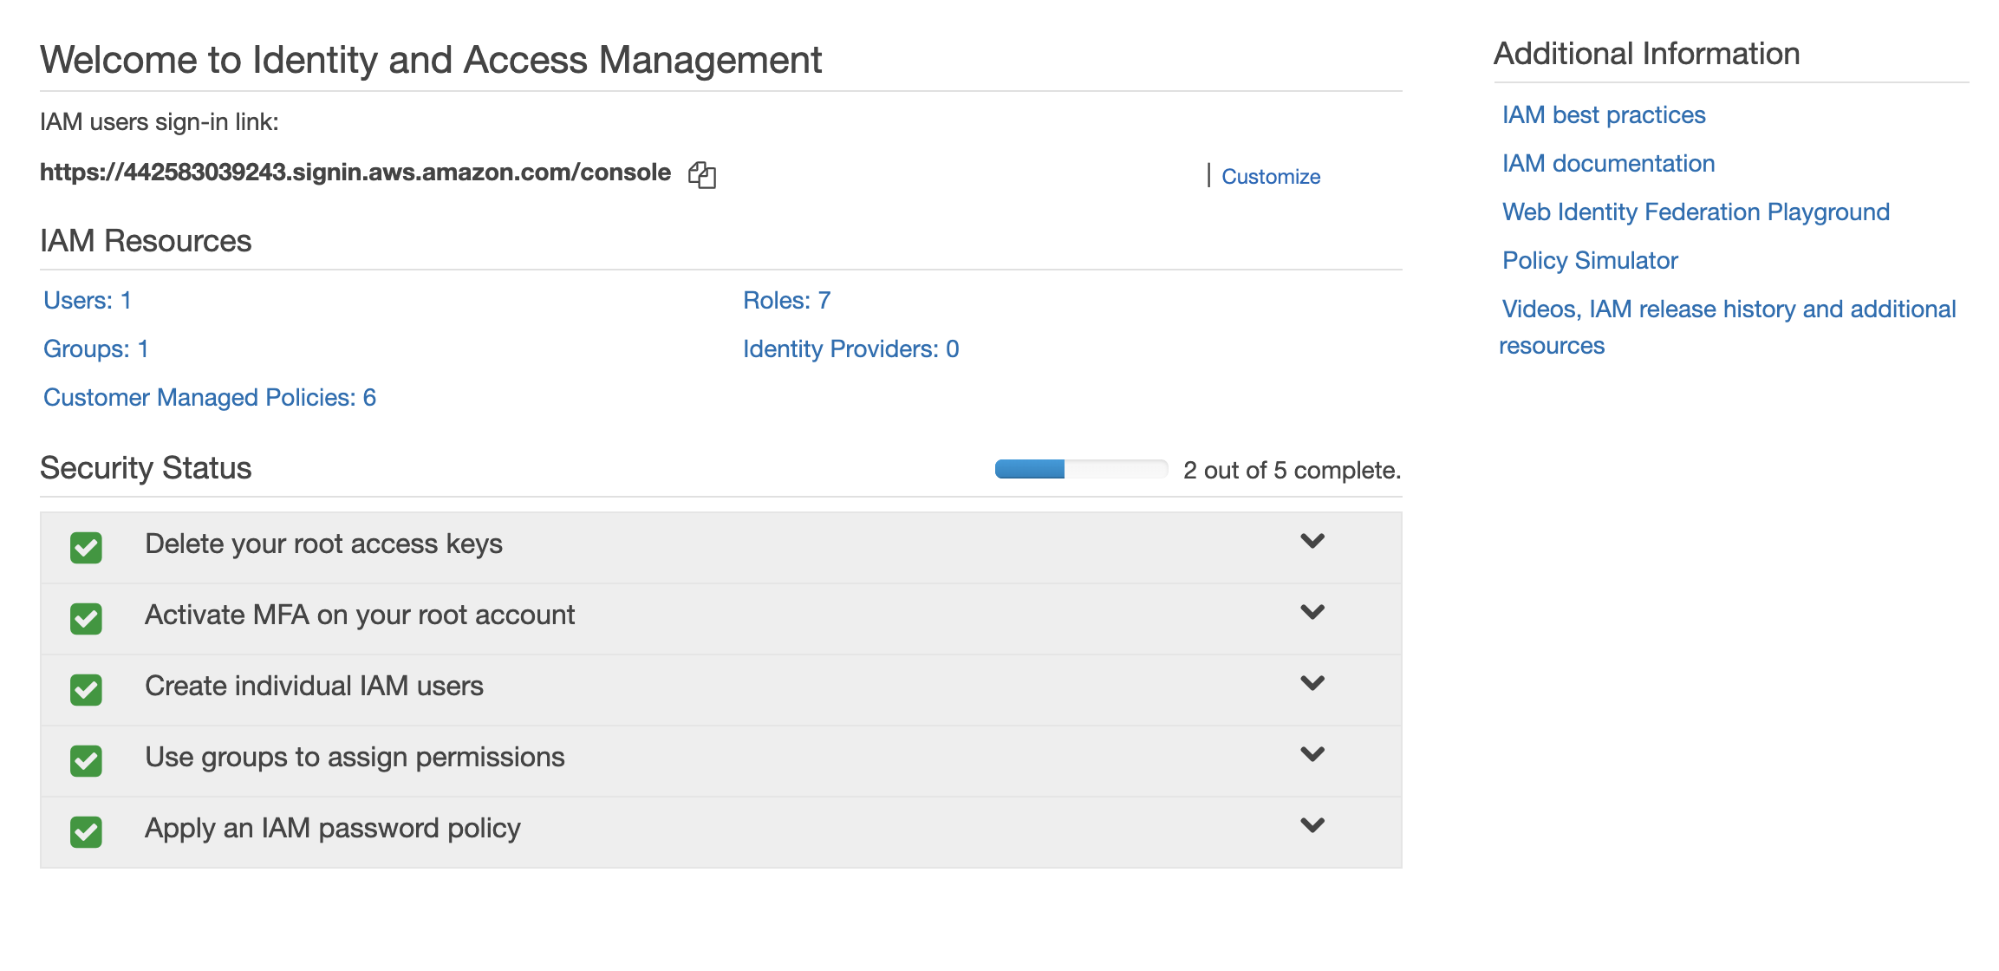
First, we’ll search for IAM, short for Identity and Access Management, and we’ll be taken to a page like this:
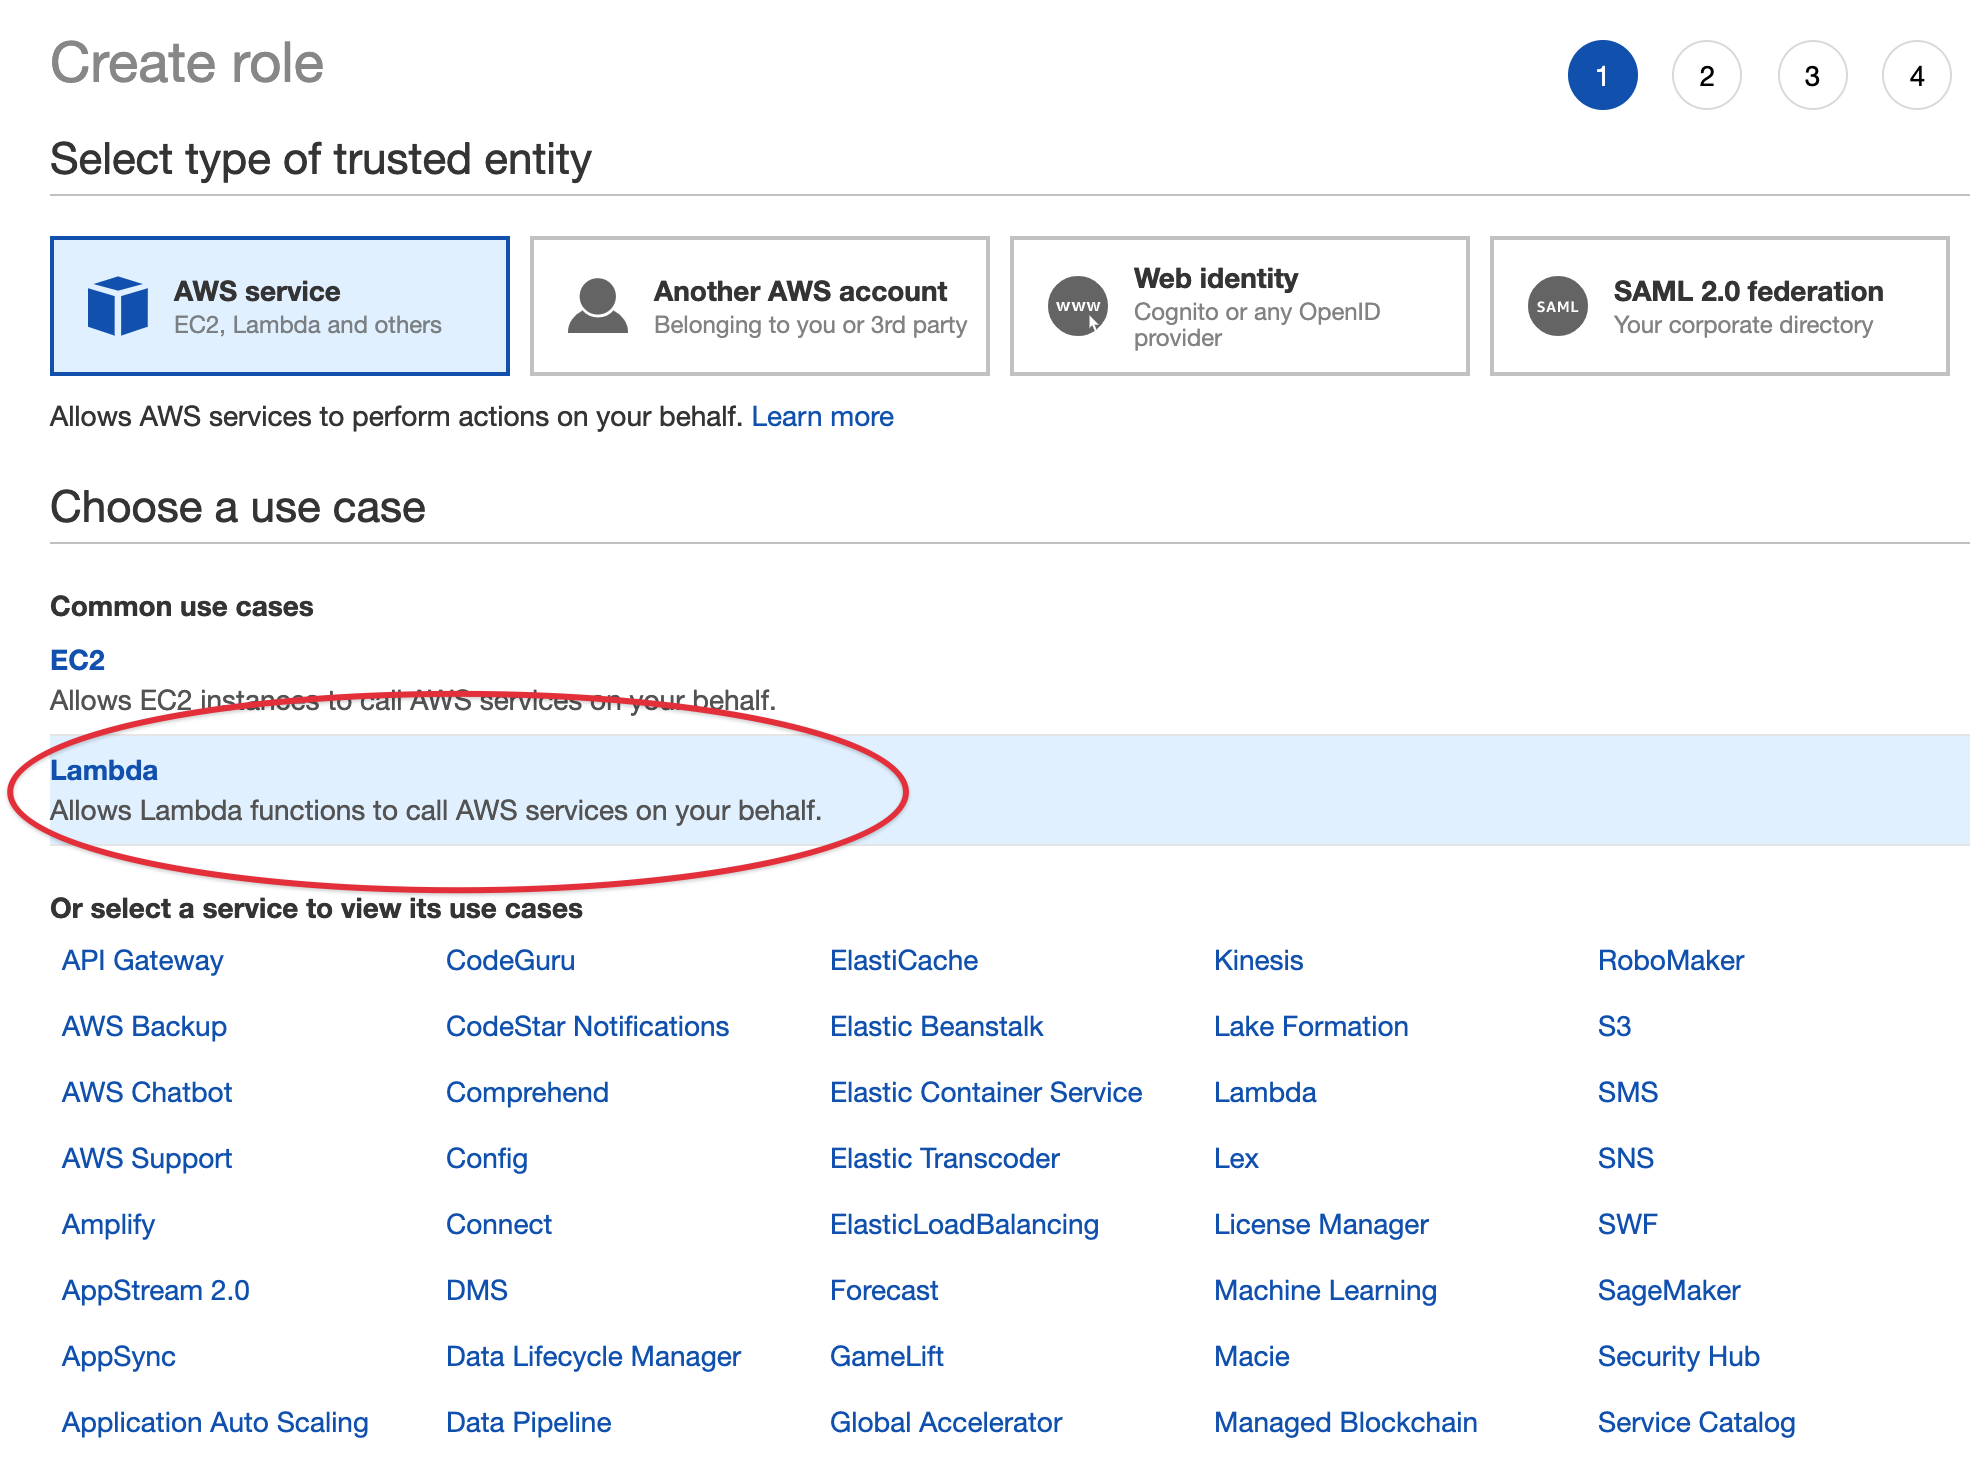
Underneath IAM Resources, click the “Roles” link. On the following screen, click the blue button that says “Create role”, and then choose Lambda.
From there, we’re going to attach the permission policy we need. You might be tempted to select “AmazonDynamoDBFullAccess” but that gives extremely broad permissions, which will give permissions to absolutely all permissions within Dynamo, and will present a security risk.
Instead, we’ll create our own policy that is specific both to this exact DynamoDB table and also to what we intend to do with it. Go to the main IAM page and select “policies” from the sidebar, and then click the big blue “create policy” button.
From here I will select “DynamoDB” as the service. Then under Actions, I’ll define what I need to do- for this purpose I’ll select “Read” and open the dropdown- from here what I need is “scan”, as that’s the method I’ll use for retrieving information from our table with Lambda.
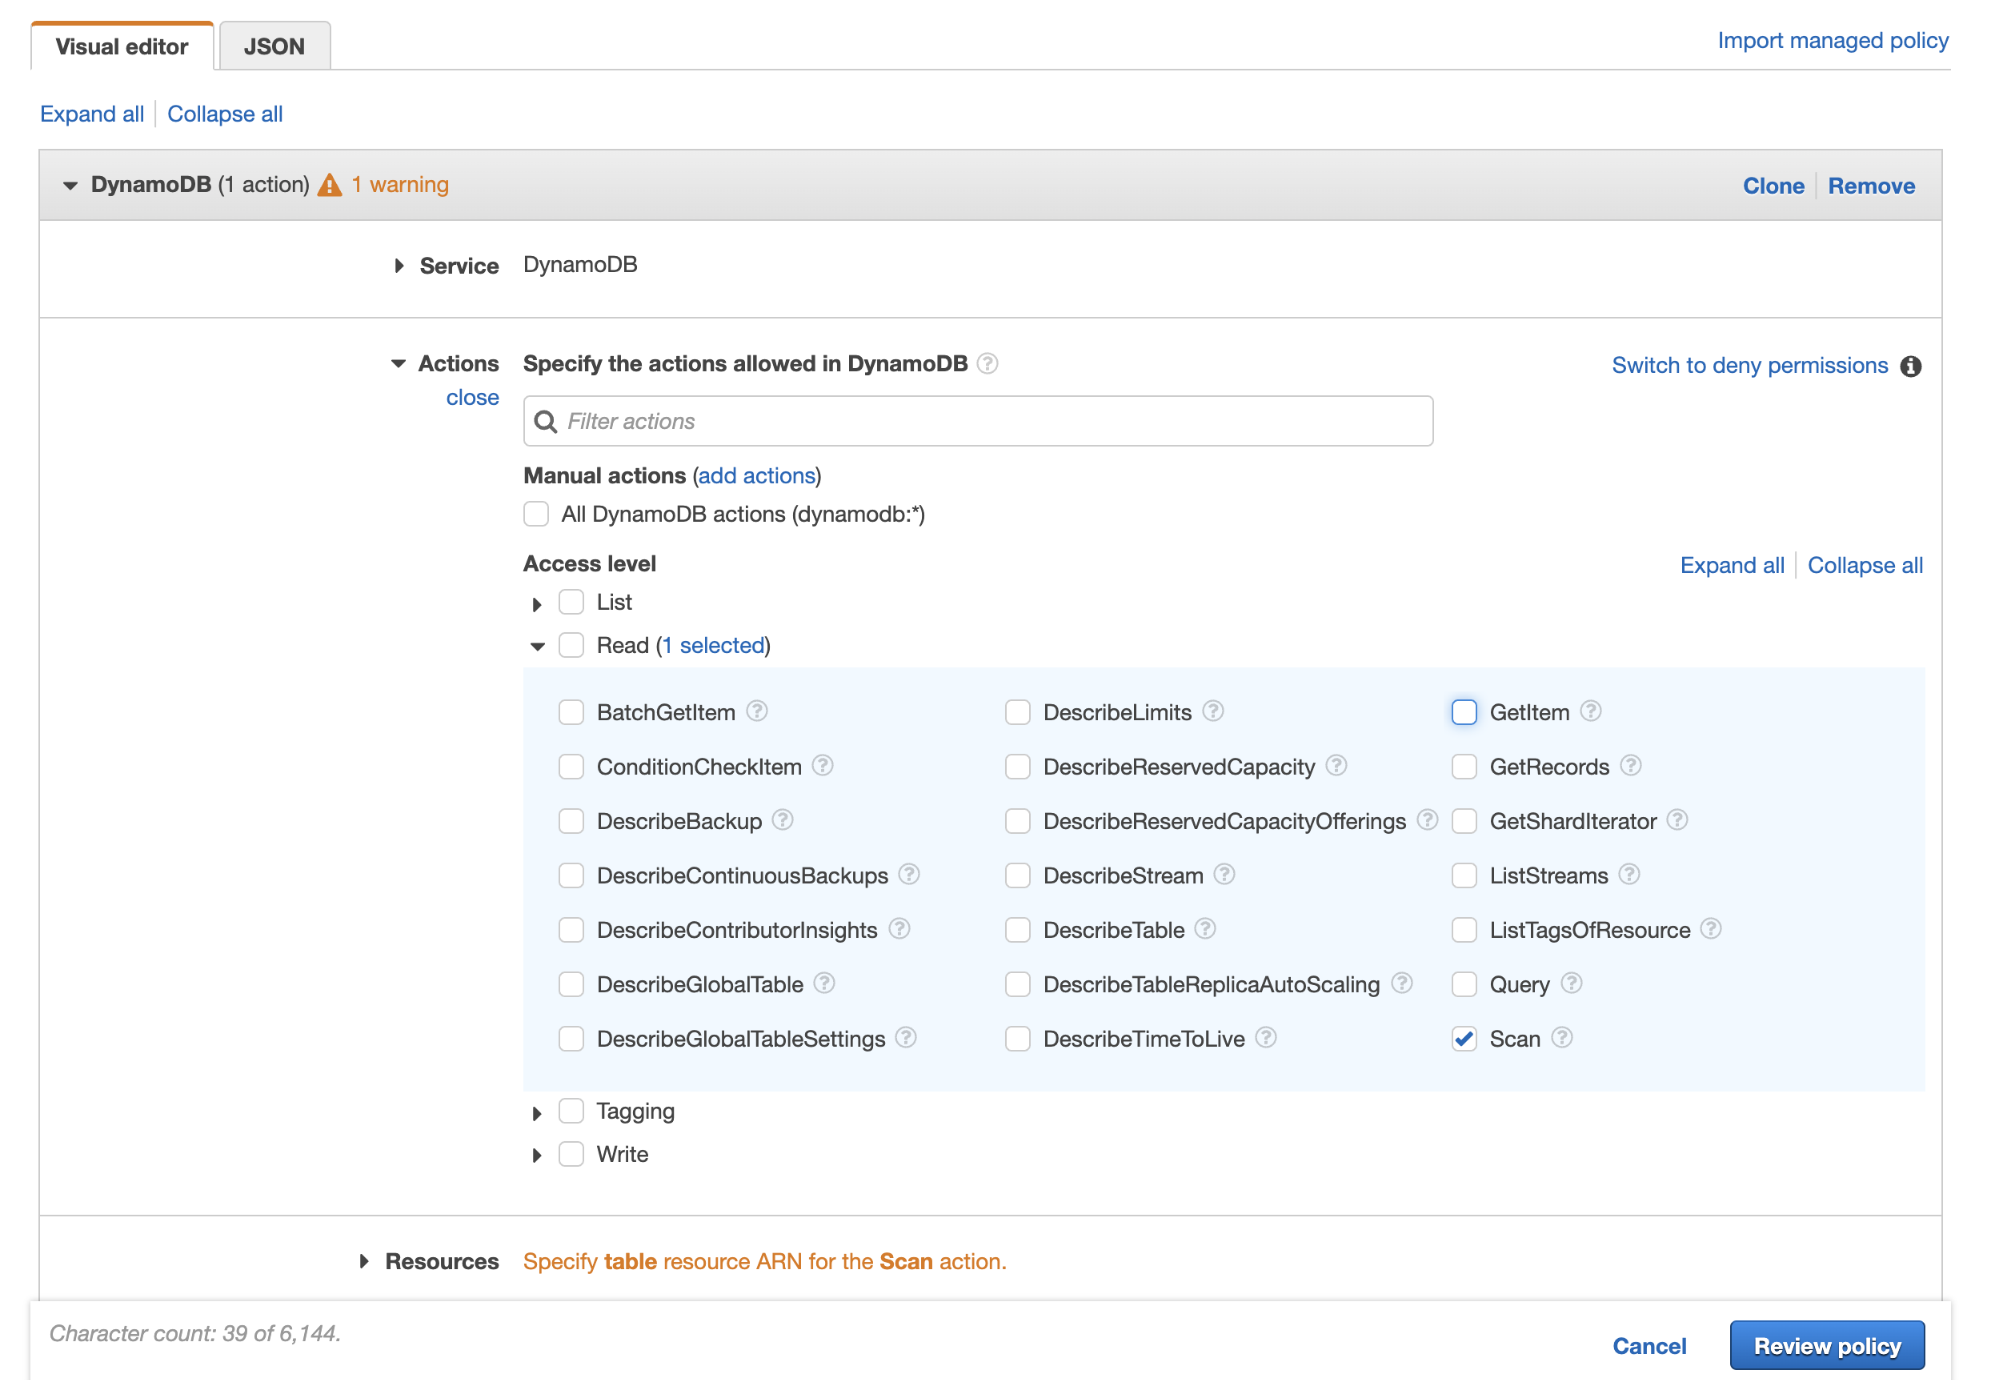
Next you’ll see a dropdown called “Resources”- for this entry you’ll need to open a new tab and go back to DynamoDB, click on the table, and lower down in the list in Table Details, you’ll see “Amazon Resource Name (ARN)” - copy that value and past that into resources. This will allow AWS to know particularly which table you are associating with the policy.
When you create the policy, I suggest you name them something related to their purpose, because you will collect a few of them over time. This specificity will be useful later, as you can easily traverse and navigate them.
Setting up our Lambda Function
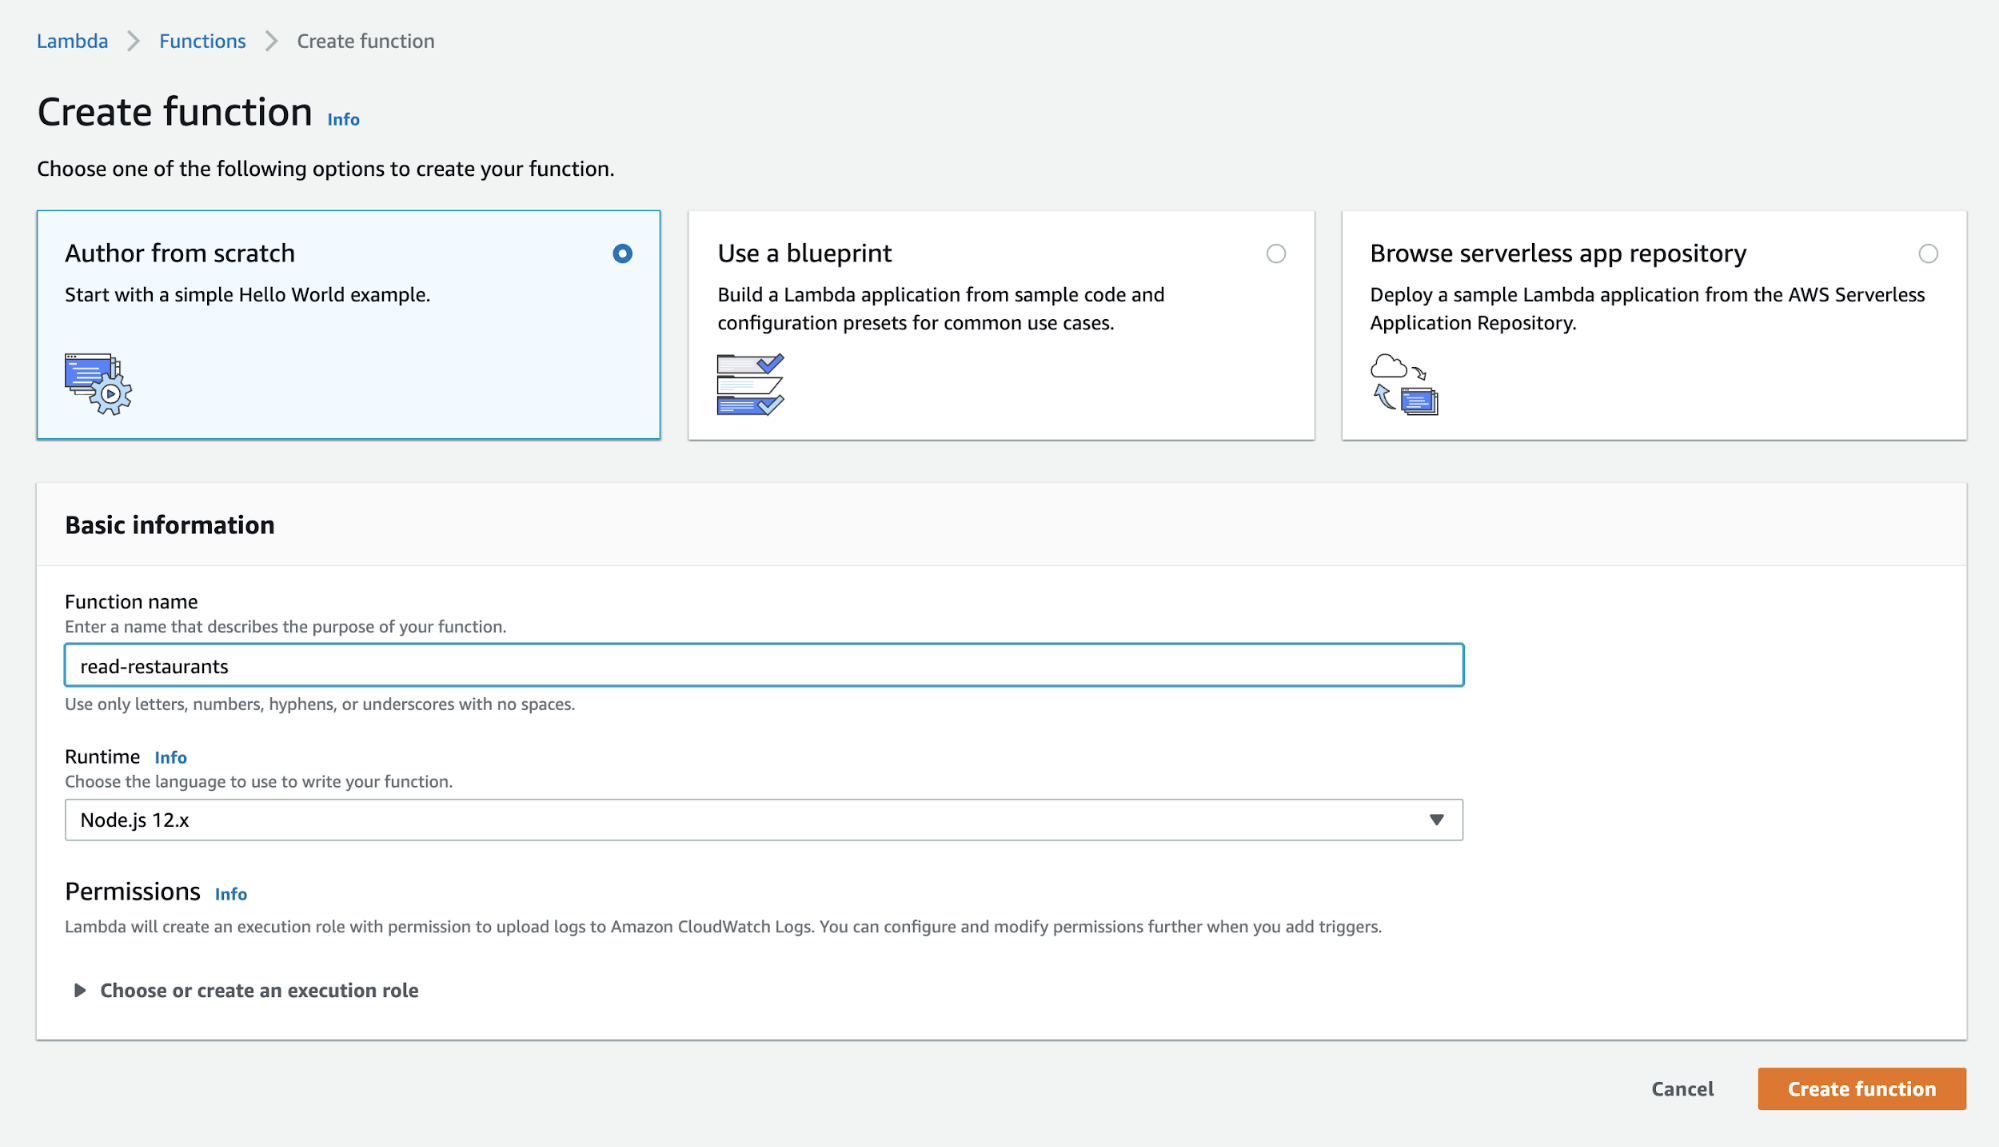
After creating an AWS account, search for Lambda in the console, and then click the button that says “Create Function.” We’re going to pick “Author from Scratch”, give it a name, I used songs-store-data, leave the default Node runtime, and click “Create function” again.
It will give you a default template that looks like this:
exports.handler = async (event) => { // TODO implement const response = { statusCode: 200, body: JSON.stringify('Hello from Lambda!'), }; return response;};This will take you to a new screen where you can configure some inputs. We’ll leave the default for now, and save the test name as something like restaurantstoretest:

Your output will look something like below:
Response:
{ "statusCode": 200, "body": "\"Hello from Lambda!\""}Along with the request ID, and some functions logs. You can get more extensive logs using AWS CloudWatch, but that’s out of the scope of this article.
Great! That output means we have the basics of our first lambda working. It’s worth mentioning that you can also write these functions in your editor locally, there is an option on the left side to add from zip, you can add it there. Or you can zip and add it from the command line:
zip functionReadRestaurants.zip readRestaurants.jsAnd then create the function with the create-function command (you need to replace the 123456789012 numbers here with your own account ID):
aws lambda create-function --function-name my-function \--zip-file functionReadRestaurants.zip --handler index.handler --runtime nodejs12.x \--role arn:aws:iam::123456789012:role/lambda-exIf you check your dashboard, you can see your function, test it, and hook into CloudWatch and other services just the same way! Working with functions in the UI is fine, though you may find that when you’re handling more logic, it becomes more comfortable to be working in your editor, with the workflows and tools you’re used to.
Now that we have a working function, we can start to build out what we need to access our DynamoDB store and also make sure it has the correct permissions.
Permissions and Connection to DynamoDB
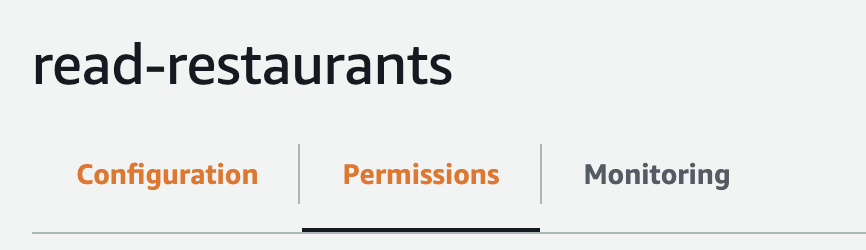
First, we need to give this Function the IAM permission we just created. When building and testing you are in the configuration tab, now let’s click on Permissions, and then Edit Basic Settings:
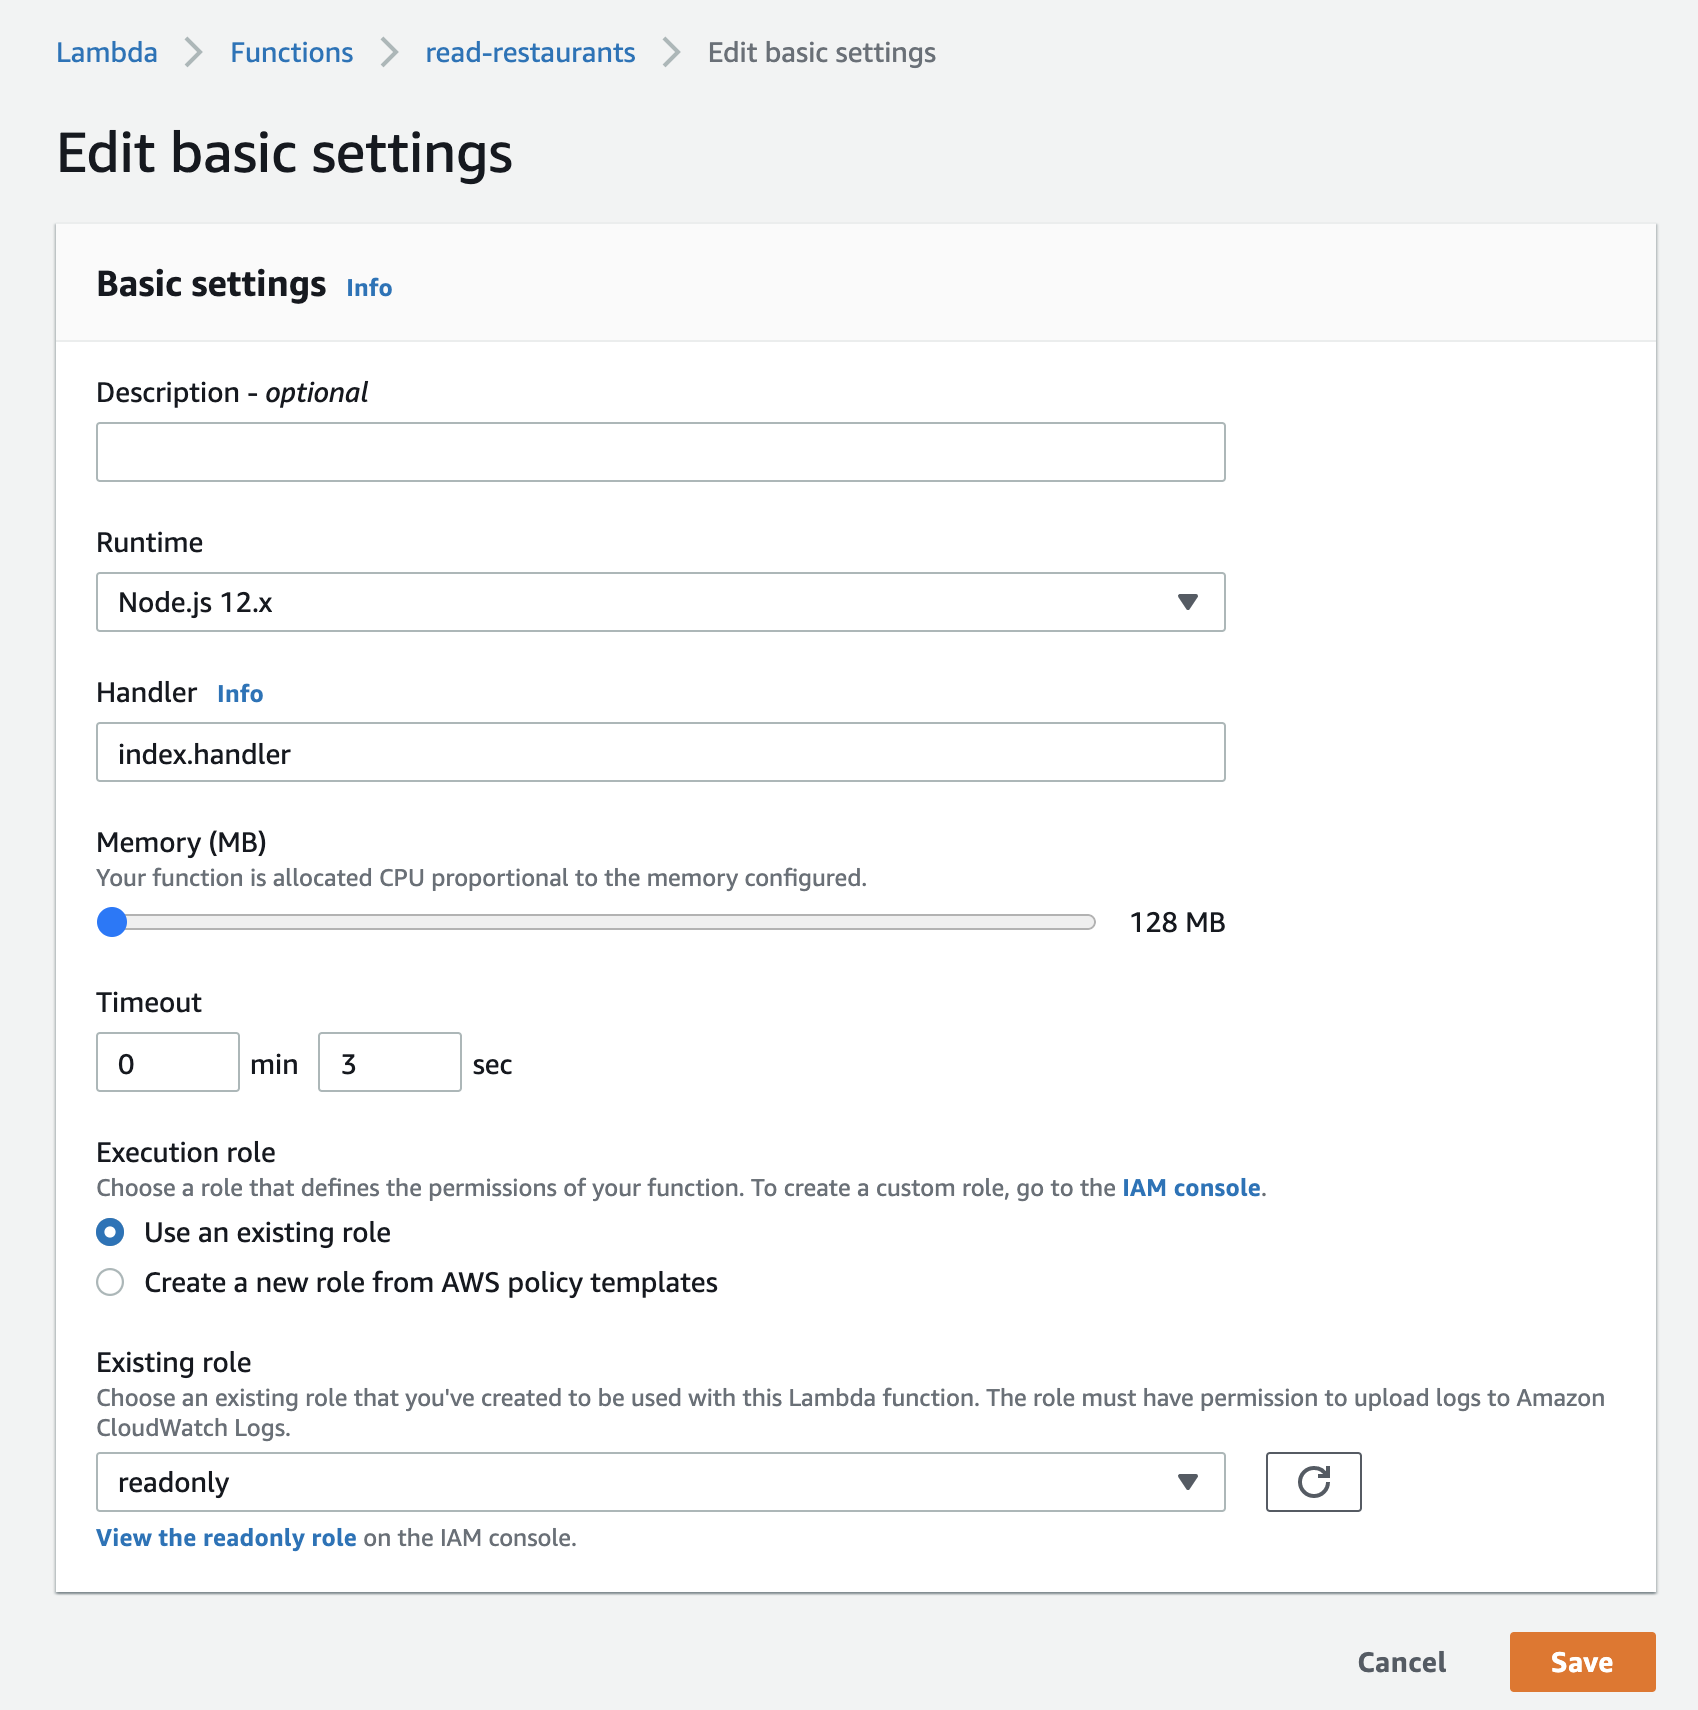
Under “Execution role”, click on “Use an existing role” and search for our IAM permission, which we named readonly. Save that to continue.
Now let’s write the function that will pull all our data from DynamoDB. In order to retrieve all of the data, we’ll use the scan property. You can peruse the rest of this documentation to find that there are so many other properties available to us. We could get a single item, post an item, update, it’s excellent because you have all the CRUD options you may want, and more functionality available to you.
https://docs.aws.amazon.com/AWSJavaScriptSDK/latest/AWS/DynamoDB.html#scan-property
Let’s go back to where we author the function in the configuration tab. The first thing we need to do at the top of the file is have Node install the AWS SDK. We then need to create a new AWS DynamoDB instance. Then, pass in our region (in my case, us-east-2, but yours might be different). Also pass in the API version, which will be ‘2012-08-10’ (this is the latest one, this will likely not be different).
When we call dynamoDB.scan, we’ll need to pass our table name in. Let’s also log our errors, and pass the data we retrieve to the callback if it’s successful.
const AWS = require('aws-sdk')const dynamoDB = new AWS.DynamoDB({ region: 'us-east-2', apiVersion: '2012-08-10' })
exports.handler = (event, context, cb) => {   const params = {       TableName: 'Restaurants'   }   dynamoDB.scan(params, (err, data) => {       if (err) {           console.log(err)           cb(err)       } else {           console.log(`Data is ${data}`)           cb(null, data)       }   })};
Which outputs something like this, you saw this type of format for JSON earlier when we talked about creating the table:
Response:
{ "Items": [ { "menu": { "L": [ { "M": { "description": { "S": "Whole shrimp in a translucent wrapper." }, "item": { "S": "Shrimp Dumplings" }, "img": { "S": "dimsum-shrimp.jpg" }, "id": { "S": "22672b93-2c65-4fd9-b151-683f7eb7df4a" }, "price": { "N": "6.49" }, "addOns": { "SS": [ "mango pudding", "none", "steamed sesame ball", "sweet tofu" ] } } }, { "M": { "description": { "S": "Dumplings filled with pork, crab meat and broth." }, "item": { "S": "Soup Dumplings" }, "img": { "S": "dimsum-soup.jpg" }, "id": { "S": "3a6da02c-2354-4eb8-af07-f9f2d26fa7c2" }, "price": { "N": "9.99" }, "addOns": { "SS": [ "mango pudding", "none", "steamed sesame ball", "sweet tofu" ] } } }, … }You can see that we’re now outputting all the values, but we’re also outputting the types as well. They’re denoted by the “S” and “N” and “SS”, which is not exactly what we would like because it will make it incredibly difficult to access when we’re writing our applications. The JSON isn’t that “clean”. Thankfully, now DynamoDB provides a method called “unmarshalled”:
https://docs.aws.amazon.com/AWSJavaScriptSDK/latest/AWS/DynamoDB/Converter.html#unmarshall-property
This is awesome! It means we don’t have to map over all the properties and convert them, which is a big pain (if you only have a couple of properties, a good ol’ .map() will do just fine). The usage is like this:
const AWS = require('aws-sdk')const dynamoDB = new AWS.DynamoDB({ region: 'us-east-2', apiVersion: '2012-08-10' })
exports.handler = (event, context, cb) => {    const params = {        TableName: 'Restaurants'    }    dynamoDB.scan(params, (err, data) => {        if (err) {            console.log(err)            cb(err)        }        else {            const unmarshalledData = data.Items.map(el => {                return AWS.DynamoDB.Converter.unmarshall(el)            })
            const response = {                "statusCode": 200,                "body": JSON.stringify(unmarshalledData),                "headers": {                    "Access-Control-Allow-Origin": "*",              "Access-Control-Allow-Credentials": true                }
            };
            console.log(response)            cb(null, response)        }    })};
And now our output is:
[  {
"name": "All that and Dim Sum", "id": "1f9500d2-fd27-422e-acc6-48198d0de5c2", "rating": 4.9, "deliveryTime": 35, "freeDelivery": true, "menu": [ { "description": "Whole shrimp in a translucent wrapper.", "item": "Shrimp Dumplings", "img": "dimsum-shrimp.jpg", "id": "22672b93-2c65-4fd9-b151-683f7eb7df4a", "price": 6.49, "addOns": [ "mango pudding", "none", "steamed sesame ball", "sweet tofu" ] }, …]API Gateway
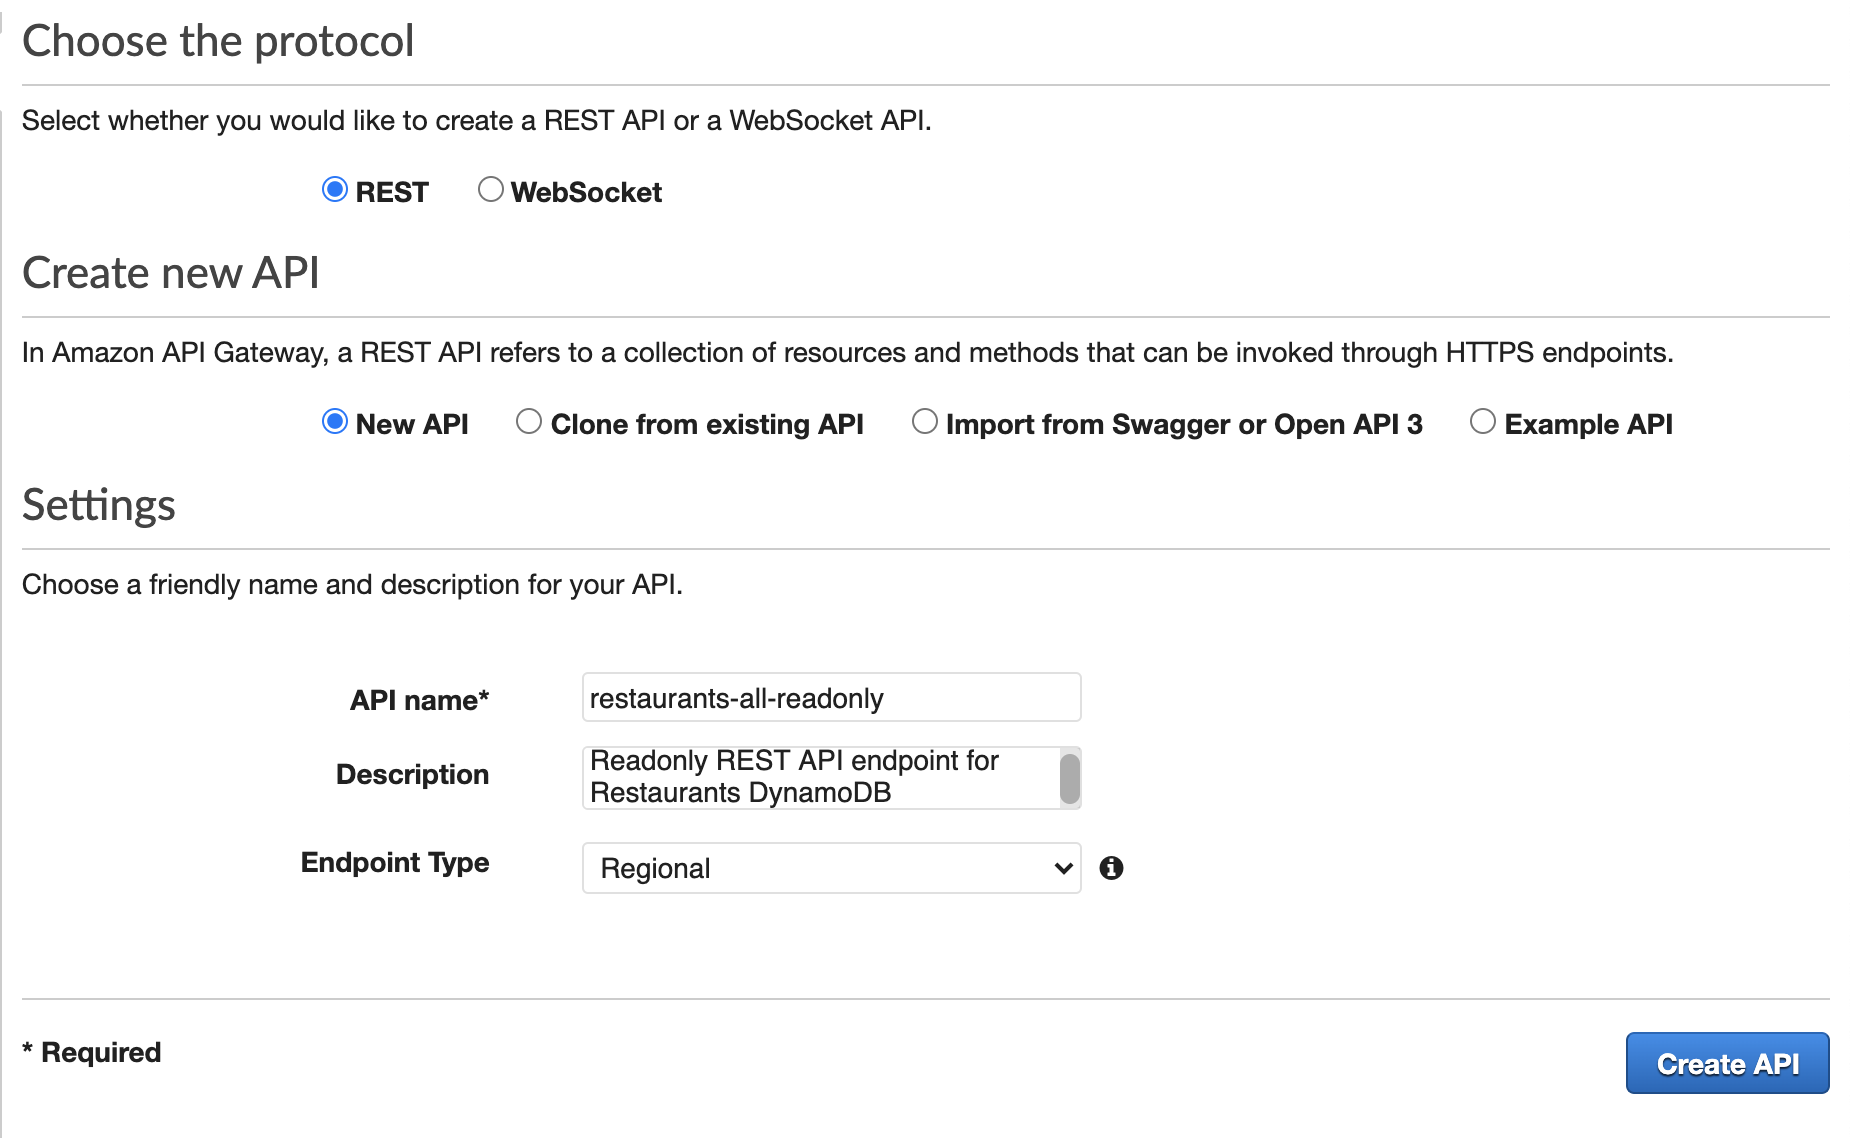
Search for API Gateway, click Create API. In the next screen select REST API and select ‘Build’.
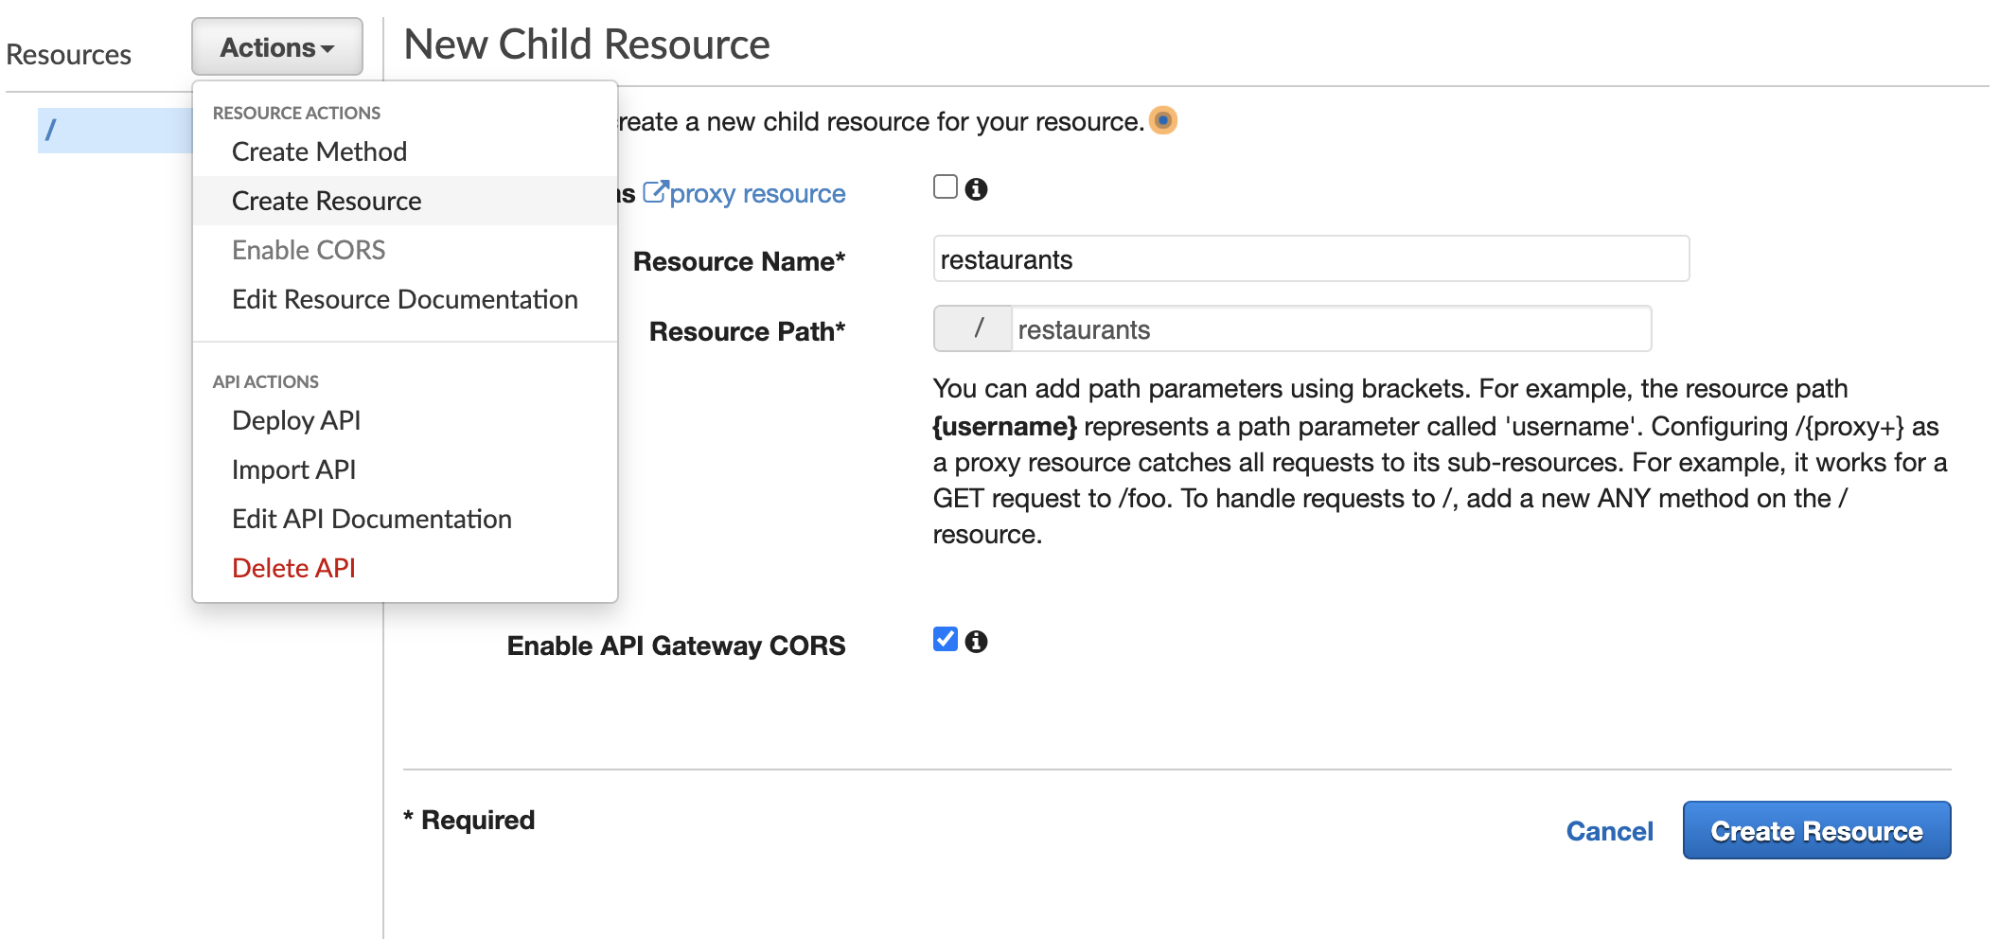
Then, in the Action dropdown, we’ll select “Create Resource”—a pane will come up titled “New Child Resource”. Fill the ‘resource name’ with a name (the path will auto-generate). Don’t forget to ‘Enable API Gateway CORS’ as well and then click “Create Resource”.
Now in that same “Actions” dropdown, you can select “Create Methods” and then “GET” and click the checkmark that will create it. This will take you to a screen to connect your API to a Lambda. We’ll select this option along with a few others. I use the default location for me which is us-east-2, but yours may be different and that’s fine.
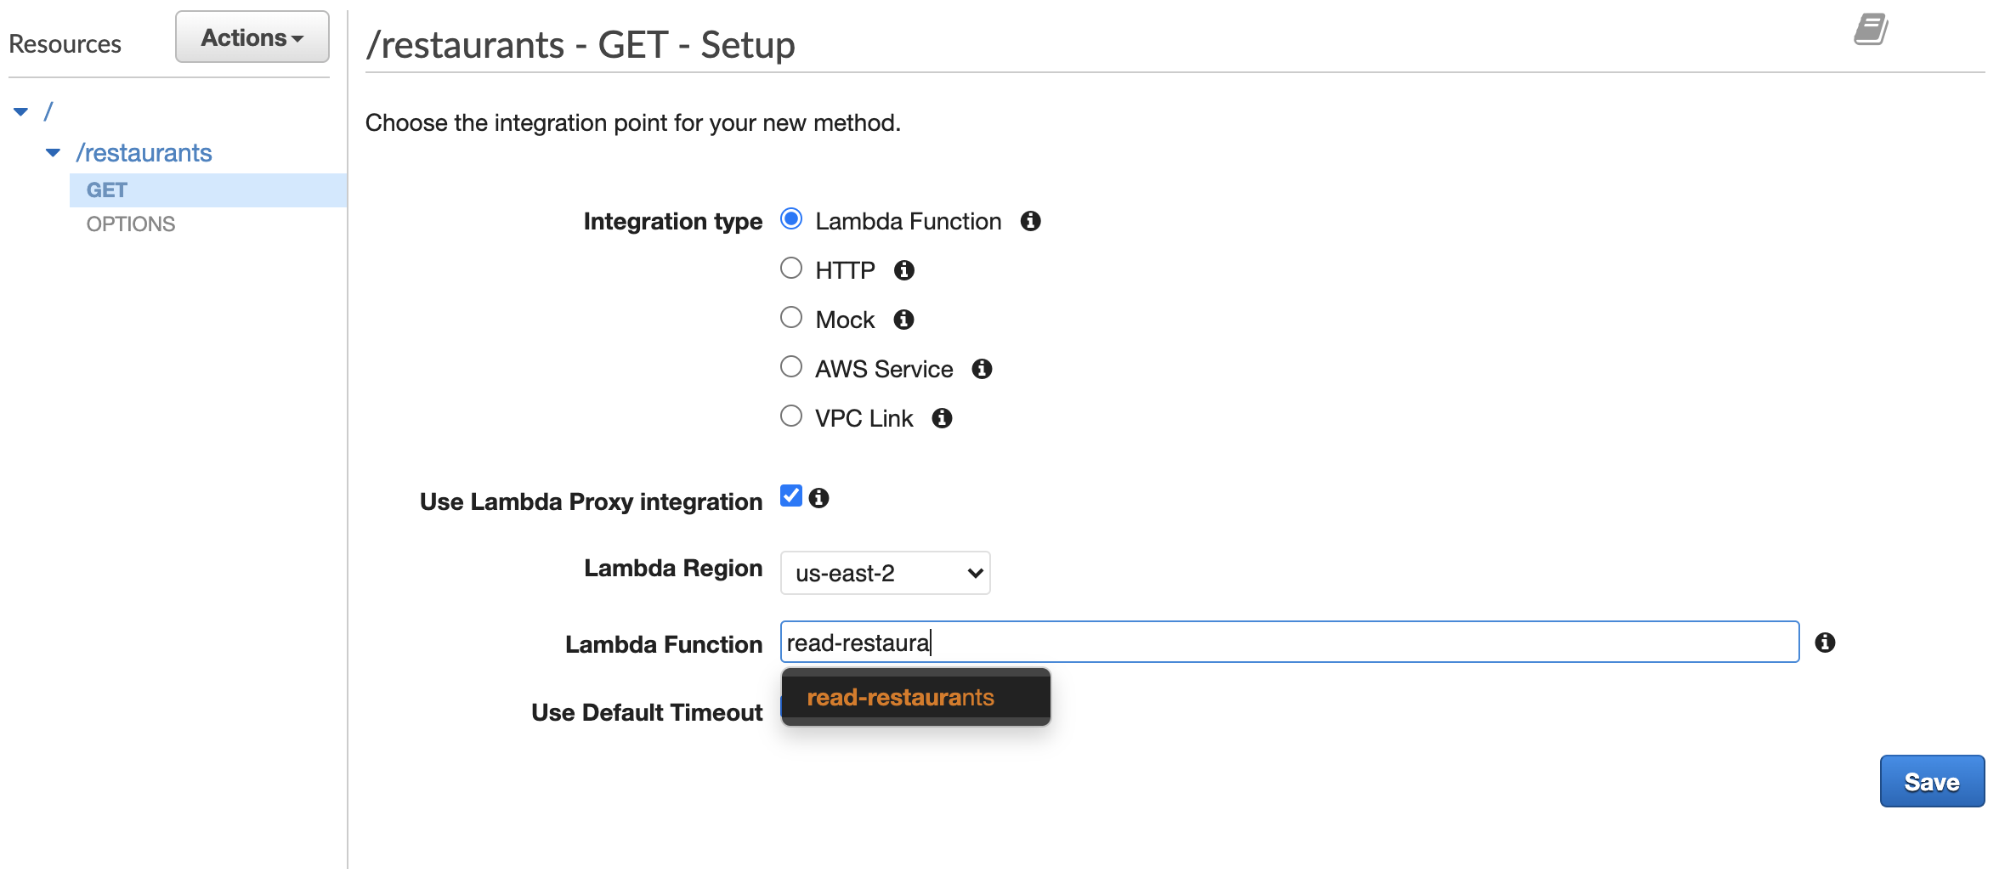
For simplicity’s sake, I’m going to check the box for ‘Use Lambda Proxy Integration’, which is a pretty quick and easy way to bring in your function. It will even auto-fill the function as you start typing, as you can see below. However, as you start to use it more, you might want to not check this as you so that you can retain the ability to configure an Integration Response (disabled for the proxy integration).
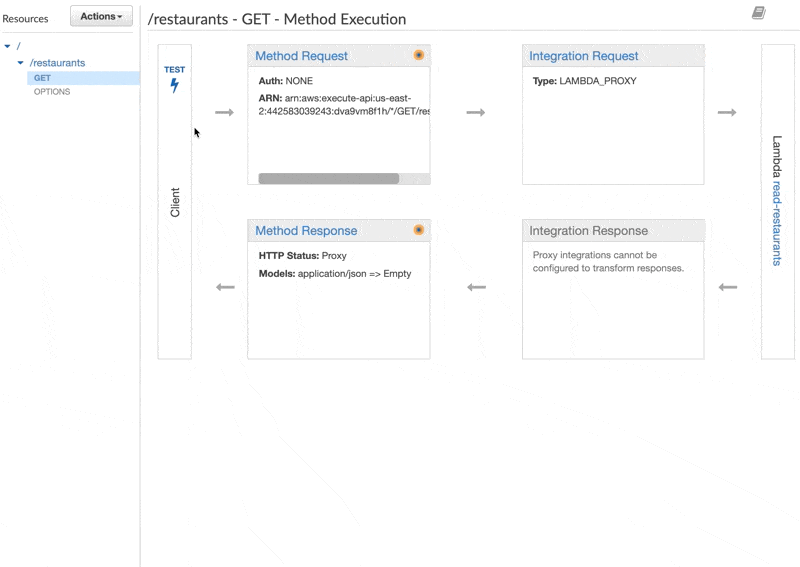
Now we’re coming to a screen that will look a little complex, but no worries, you’ll soon know you’re way around here pretty well!
- The Method Request: This is the part of your API exposed to your users. This includes auth, input body, headers, and query string params.
- Integration Request: This is what the API is integrating with to, well, create the API! It’s how the gateway communicates with Lambda.
- Method Response: This is similar to the Method Request, where you can define what the method can return.
- Integration Response: This is what we believe will be coming back from the integration (grayed out here, as mentioned, we don’t have access to it with the proxy integration).

Now, we’re going to select the Method Response (highlighted in red, above). If you click into it, you’ll see a 200 response. Open the dropdown, add “Access-Control-Allow-Origin” so that you don’t run into CORS errors.

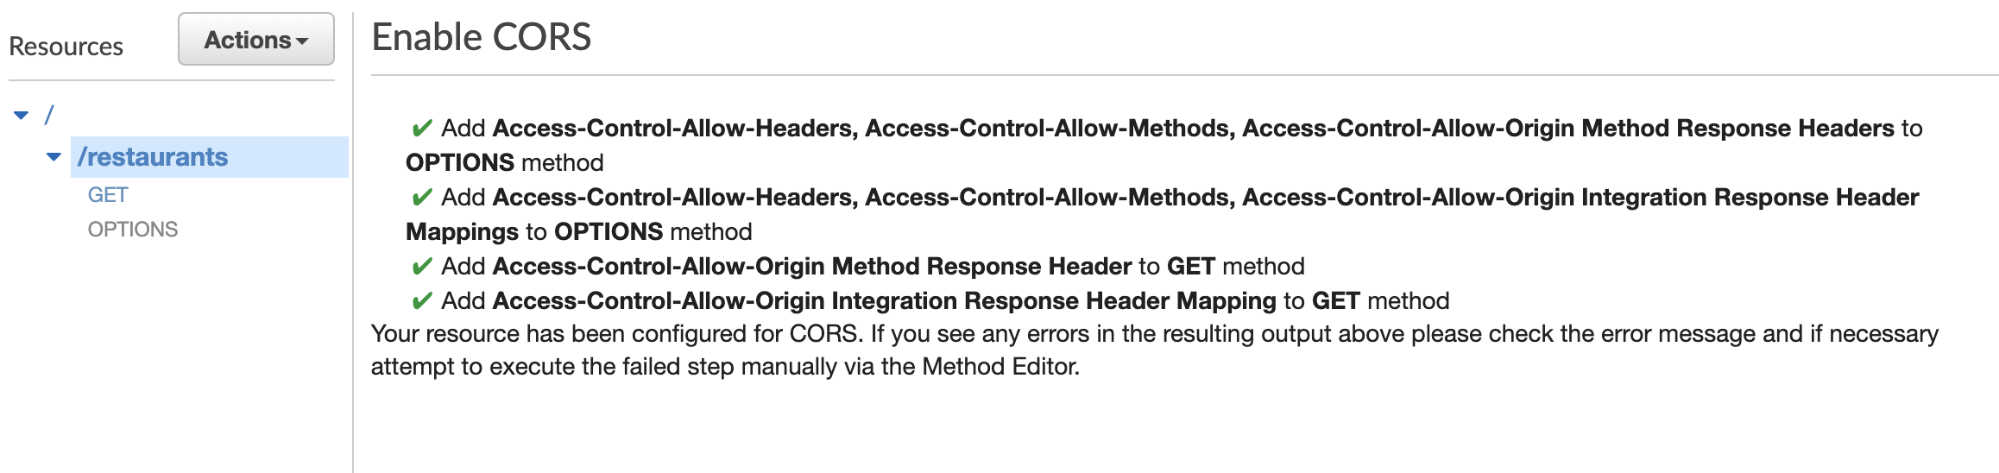
One more CORS-related thing: from /restaurants (or whatever the name of your resource is), click Actions, and then Enable CORS. Click the enable button at the bottom and you should see a screen like this:
Testing the API
Let’s click the test on the side of the GET Method Execution screen, and click the test button. You won’t need to pass any query parameters because we don’t need any in this case, but you can see how that would be handy if we did.
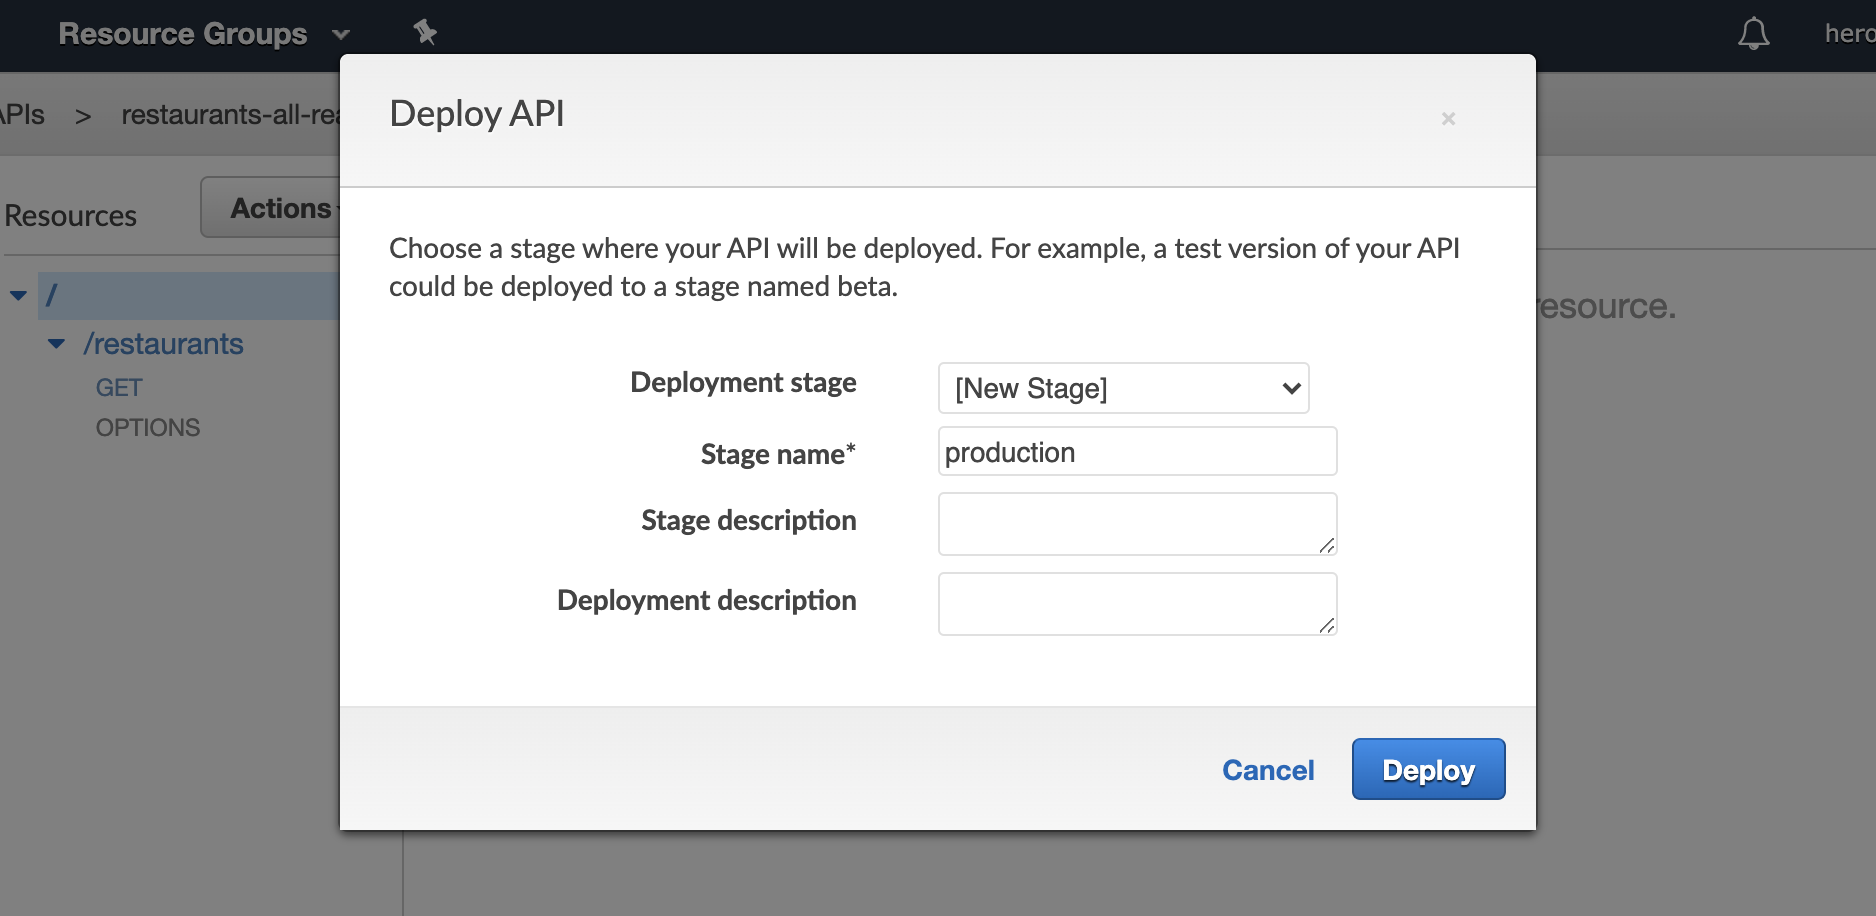
Let’s Deploy!
From the top-level of the Resources column (where you see the /), in the Actions dropdown, select “Deploy API”
From here you can create your deployment stage, we’re going to create a production stage, but you can also create things like “beta” and “dev”, etc.
This will give us a screen with an endpoint, let’s take that, append restaurants to the end of it, and check it in Insomnia (you can also use Postman or any other similar service):
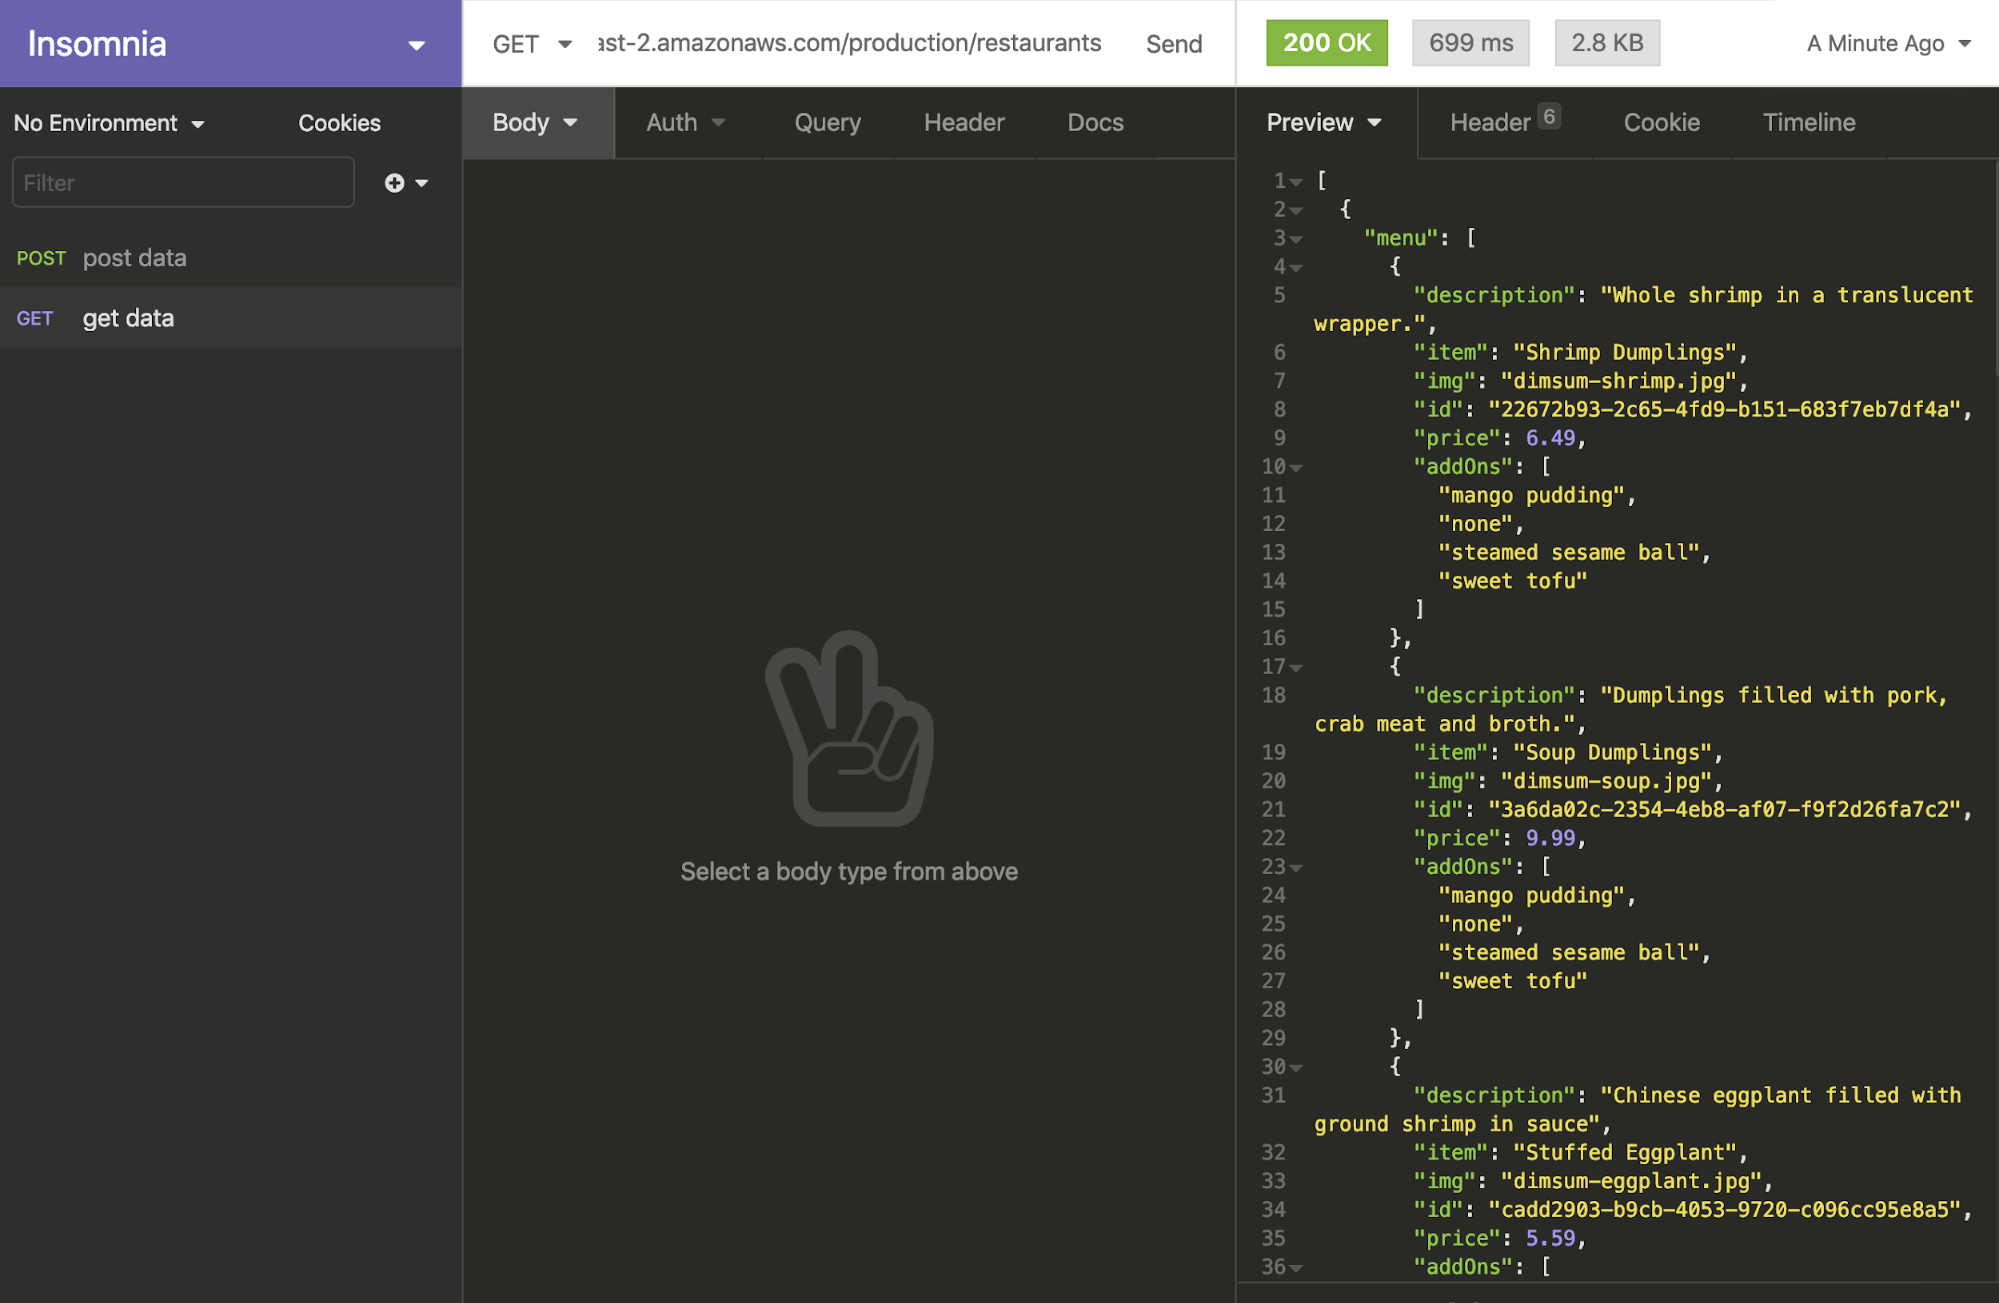
There’s our data! Now let’s put it into our app. I’m using Nuxt, and in an action in the Vuex store, I’ll hit that endpoint and populate some state:
export const actions = { async getFoodData({ state, commit }) { if (state.fooddata.length) return; try { await fetch( "https://dva9vm8f1h.execute-api.us-east-2.amazonaws.com/production/restaurants" ) .then((response) => response.json()) .then((data) => { console.log("Success:", data); commit("createFoodData", data); }); } catch (err) { console.log(err); } },};Now let’s turn this into a plugin so that it’s called when the site is built and the user doesn’t have to wait for it to populate on the client. I’m using the static method and deploying to Netlify, which is a new feature of Nuxt 2.14, and it’s great because I can do things like use the IDs I gave each item to generate unique pages for each of the items in the app. This is out of the scope of this article but I have an upcoming workshop where I’ll build it all from scratch if you’re interested in that part.
The plugin is called getFood.js and in the plugins directory:
export default async ({ store }) => { await store.dispatch("getFoodData");};And we’ll also make sure to register the plugin in nuxt.config.js:
plugins: [ "~/plugins/getfood.js"],Now we can use the API to populate the page!
Demo: https://nuxtfoodapp.netlify.app/
Now we can deploy the whole site to Netlify, use the API to populate the data, and respond to feedback from the user with Nuxt! You can see clearly how we might start to build out other CRUD pieces of this app with DynamoDB storage, creating APIs for POST, DELETE, and so on.
In order to deploy our Nuxt application, we will hook our GitHub or GitLab repo to our project by logging into Netlify, finding the repo and connecting it, and then selecting these options:
Build command:
yarn generatePublish directory:
distWe also want to be sure our application has static as the target. In nuxt.config.js:
export default { mode: "universal", target: "static", …}Creating an API Key and Usage Definitions
If you look at the sidebar in API Gateway, you see that we’re in the API section. There are a few other sections, including “Usage”. If you click on that and then the “Create” button, you’ll be brought to a screen called “Create Usage Plan”:
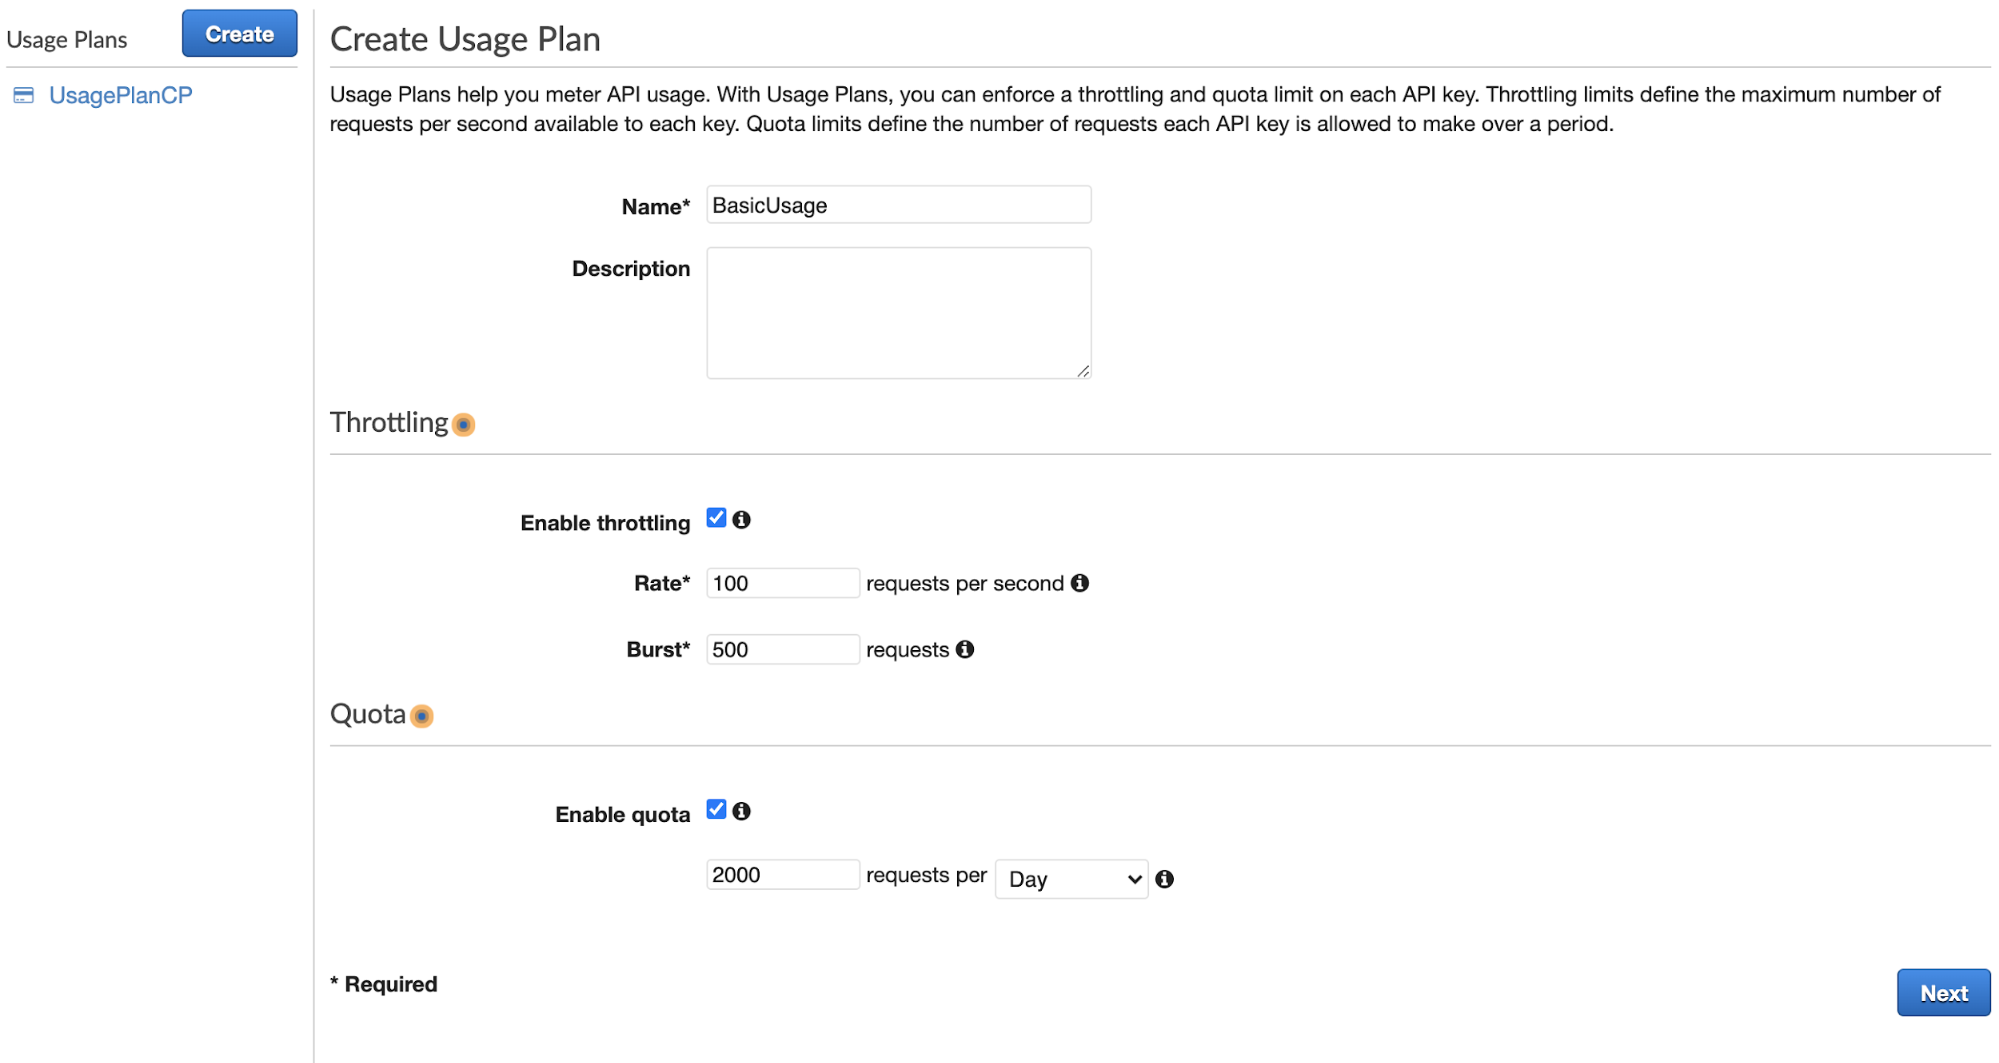
Let’s give your usage a name, and some defaults that you think are sensible.
Once you click ‘Next’, you will be taken to a screen that asks you to associate it with a particular stage. Here we’ll choose our restaurant-readonly API from the dropdown and add the stage production.
After clicking ‘Next’, we will be brought to a Usage Plan API Keys screen. We’ll select “Create API key and add to Usage Plan”
Now in the dialog, we will give it a name and description. We’ll choose auto-generate but you can also pick something.
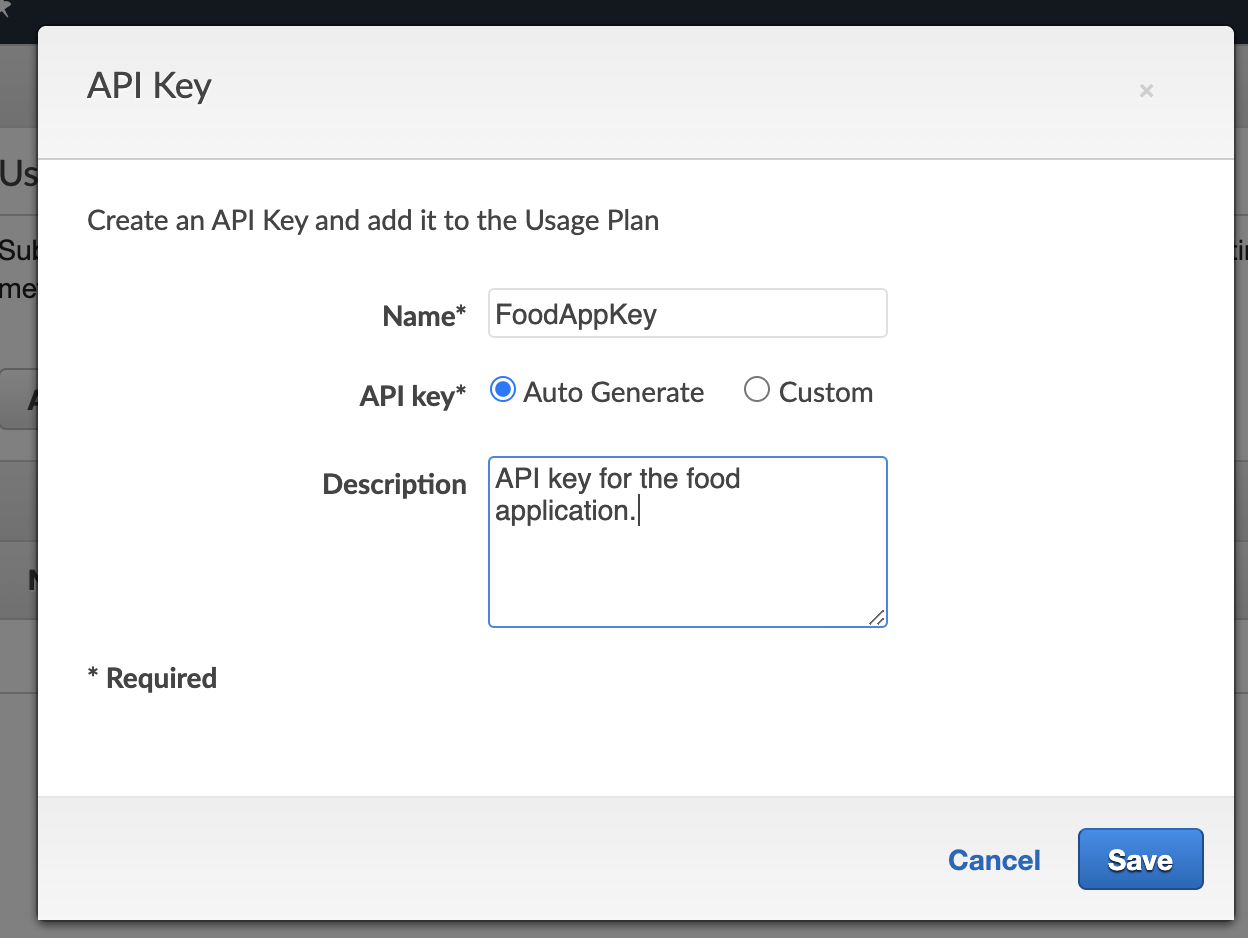
If you click done, you’ll be taken back to the first usage screen. You can go to the API Keys tab and see your API Key there. You can click on the key, and then “show” where it says API Key, and there it is! Your generated API key.
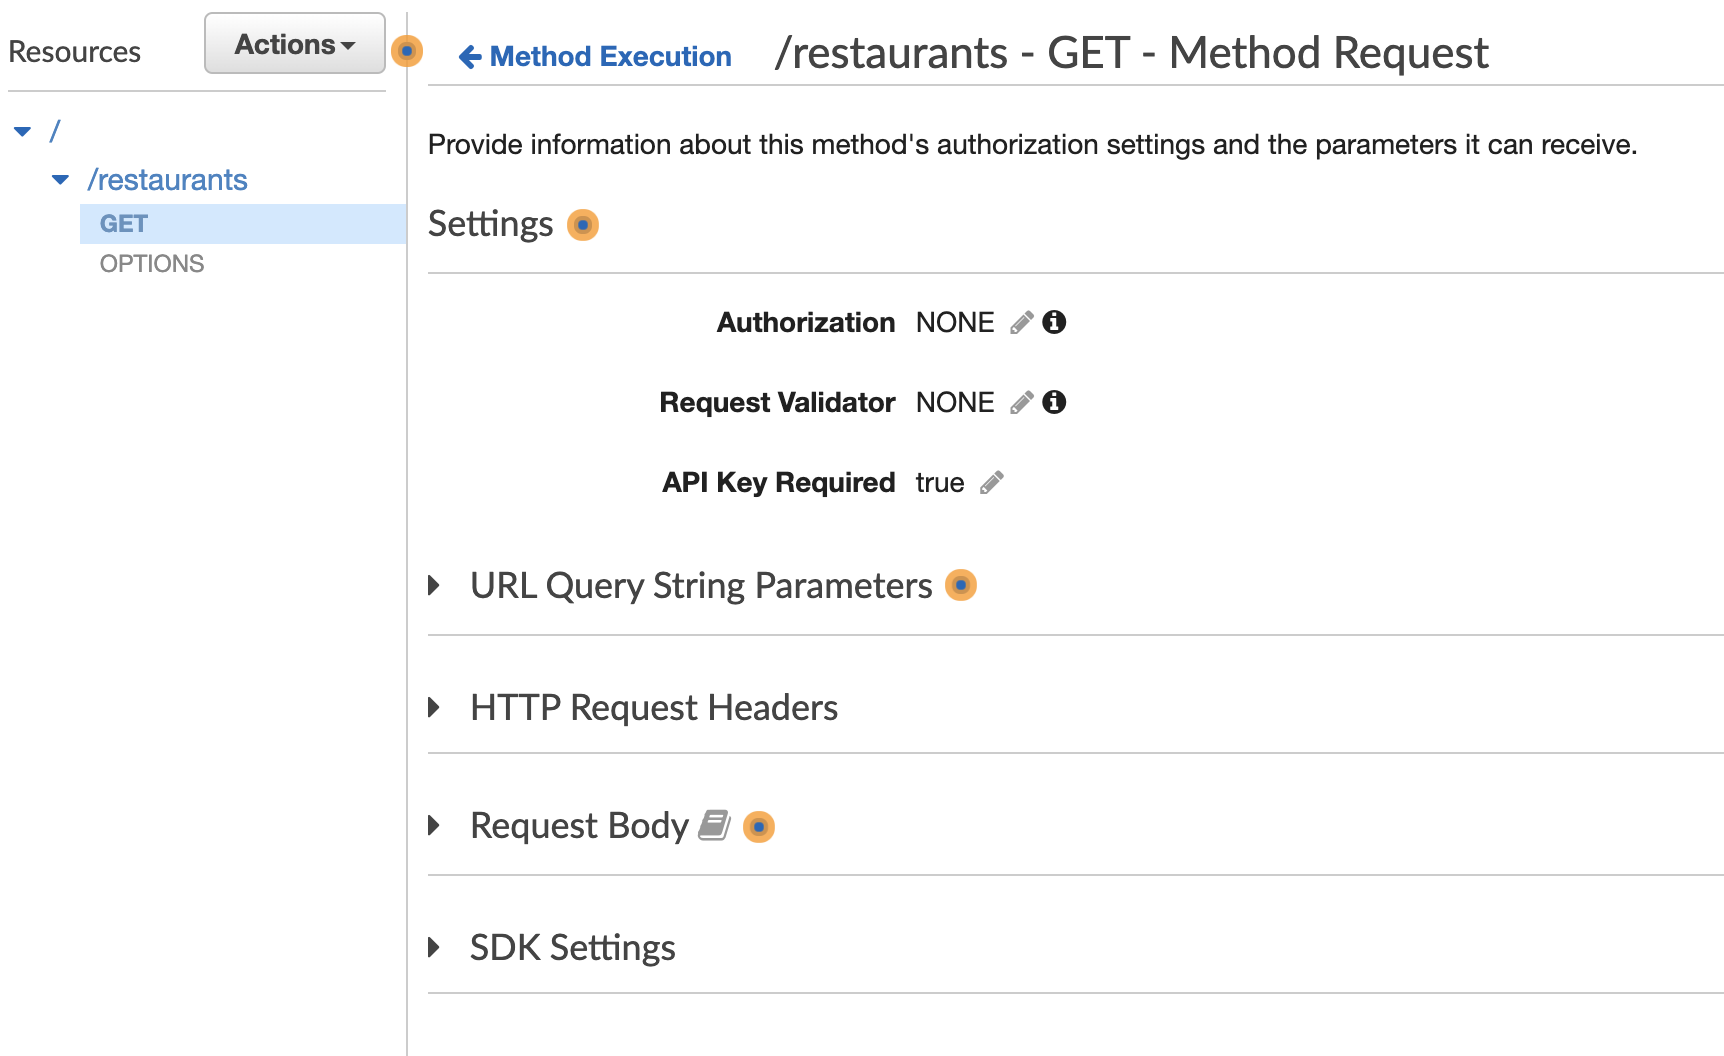
Now, the last step is requiring the key. Let’s go back to our API, and go to the GET method, and click on “Method Request”. There is a field called “API Key Required” in Settings, with a pencil icon. We’ll click on that to edit, and update it to “true”.
Now let’s deploy our API again, and then go back to Insomnia and test.
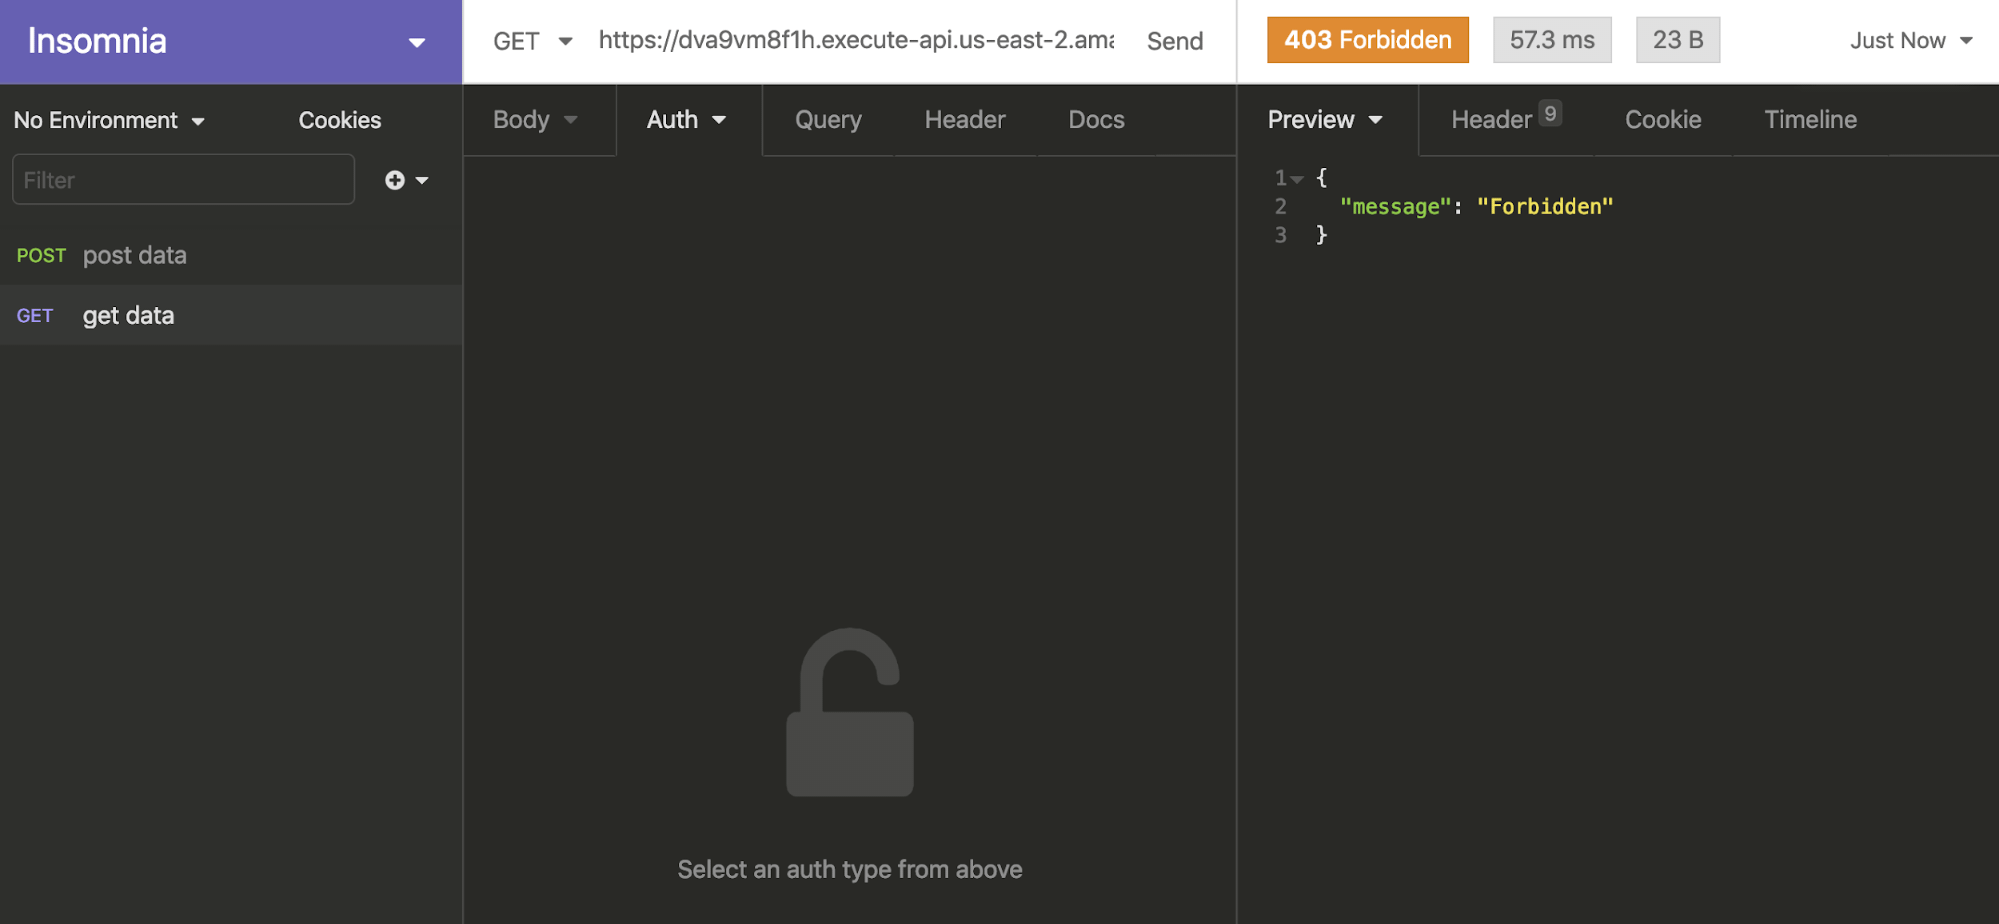
It will now give us a 403 code! Great, that’s just what we want. Now, here’s how we’ll try it with the API key. In the header, pass the key in as ‘x-api-key’, with the key that we retrieved from AWS.
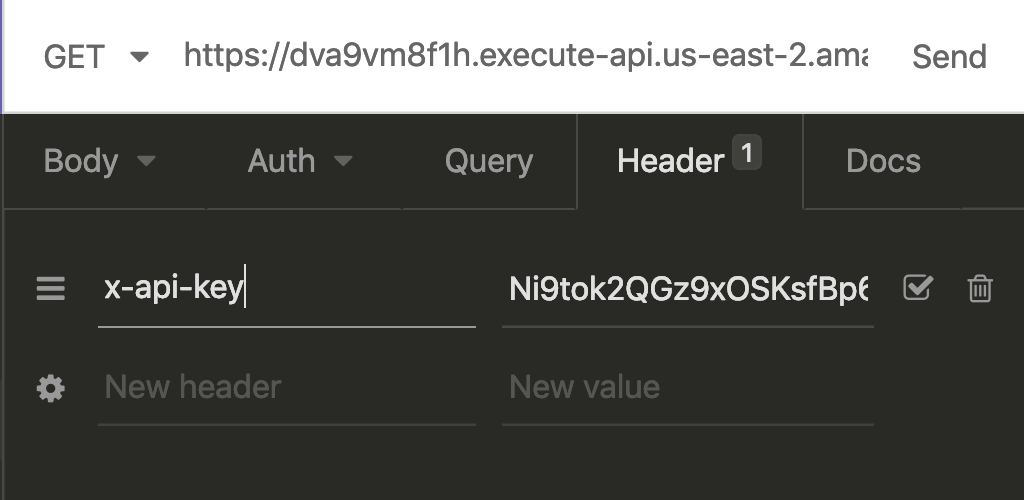
Our API is now returned, but also slightly more secure. Let’s make sure we’re passing this into our app.
Setting up Environment Variables with Nuxt and Netlify
Ok, now let’s let Nuxt know to use this key as an environment variable. First, we’ll create a file called .env at the base of the project. We’ll double-check that it’s listed in the .gitignore as well (it is as a default from the CLI, but check just in case).
Your .env file should look something like this, adding your API key after the equal sign:
AWS_API_KEY=addyourapikeyhereNow we’ll add some headers to our fetch request in the store, like this:
await fetch( "https://dva9vm8f1h.execute-api.us-east-2.amazonaws.com/production/restaurants", { headers: { "Content-Type": "application/json", "x-api-key": process.env.AWS_API_KEY, }, }) .then((response) => response.json()) .then((data) => { commit("createFoodData", data); });Now, finally, I’ll add the environment variable to Netlify, where I’m deploying the app. If I log in to the Netlify dashboard and navigate to my foodapp, I’ll click on Settings, the last tab on the right, and then ‘Build and Deploy’ > ‘Environment’ from the dropdown.
There I’ll see a section called Environment Variables. If I click Edit Variables, I’ll add the key with the exact name I used in .env.
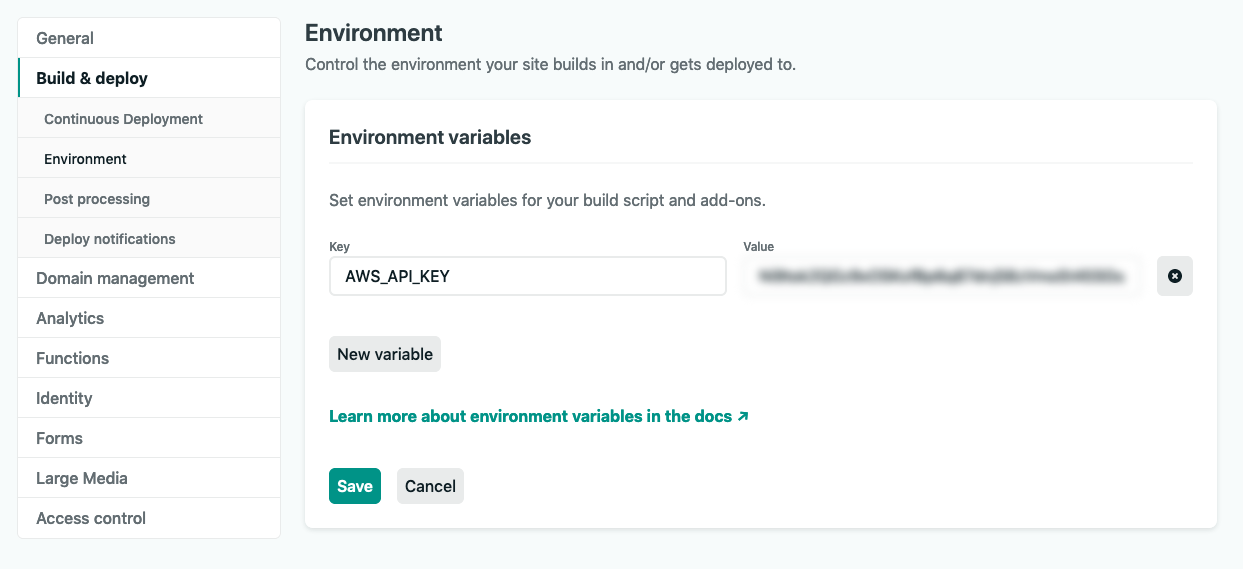
Hit ‘Save’, and now I can push my changes to git, with Netlify automatically redeploying the site.
Your site is rebuilt and your API is secure. Not only that, but the usage can’t be abused, saving you from exorbitant and unnecessary bills.
Optional: Define Models
This piece is not required, but what models let us do is define what inputs we’re expecting. Our function will work if we don’t do this, but this is best practice so that we can let users of the API (even if it’s ourselves) know that they have to fill out the required fields in order to use our API correctly. This way, we don’t end up with a DynamoDB table that is messy and ill-defined. We will also use some validation on the client, but this ensures that if we use the API with a different application without that validation, or someone else creates one, that they are working with the API correctly.
It’s particularly useful when we’re doing POST requests so that the data we’re sending is the shape we need for our API, so I’ll use an example from a different API where I have a POST request. Let’s click on Models in the far left sidebar. Once you’ve gone there, we’re going to create a new one.
When you click on Models, you’ll see “error” and “empty” and a blue button at the top that says Create. Click that button and you’ll fill out a model name (I’m going to use SongData), and Content Type, which I’ll state as “application/json” (really wish they’d have that as a default since you’re going to write that most of the time). You can also write a description.
In the large textbox, you will define the output you’d like to see. You can see a link to the JSON Schema it’s expecting at the top of the page, but it will look something like this:
{ "$schema": "https://json-schema.org/draft-04/schema#", "title": "SongData", "type": "object", "properties": { "songname": { "type": "string" }, "songartist": { "type": "string" }, "username": { "type": "string" }, "notes": { "type": "string" } }, "required": ["songname", "songartist", "username"]}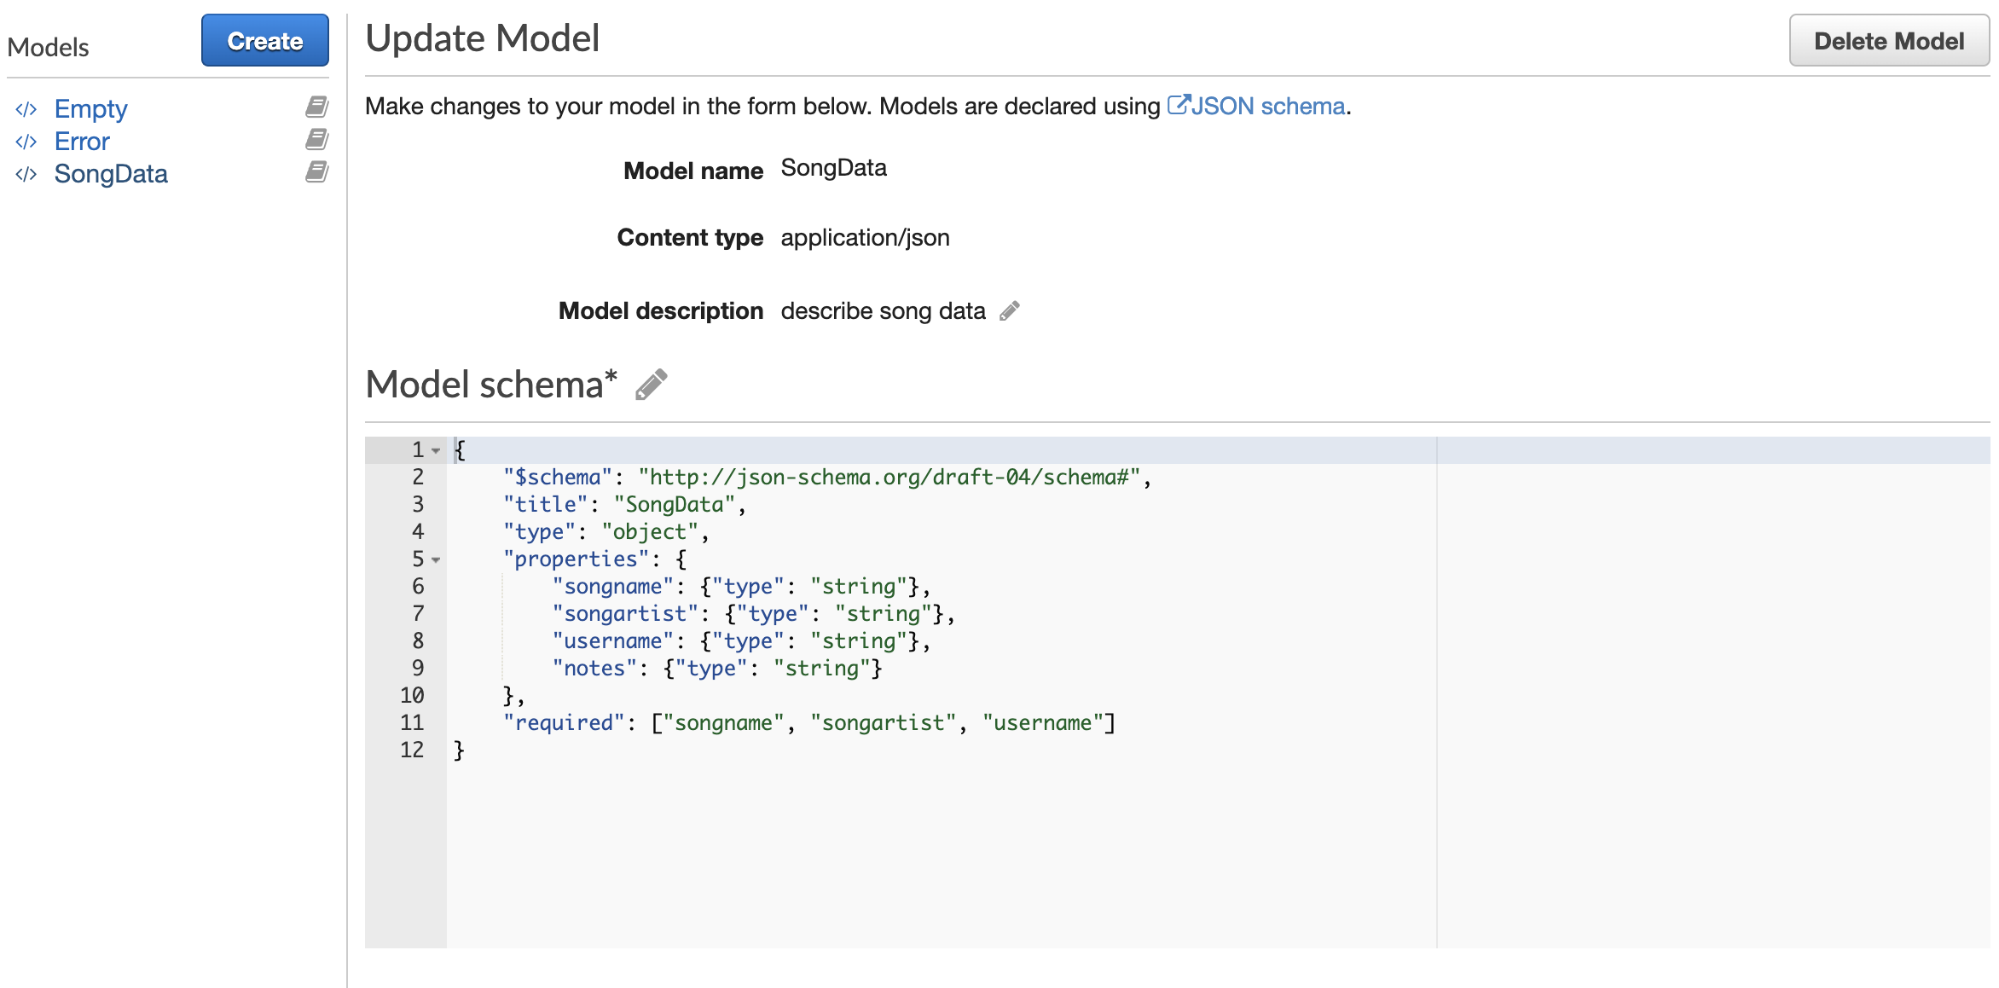
You might be able to guess what these fields mean. We have to state the draft of the schema we’re using, add the title, as we did above (this should match what you wrote in the model name. We’ll also state what kind of type this will be. In this case, it’s an object, but it could be an array, etc.
We can see here that we’ll always expect songname, songartist, and username, but that it is not required.
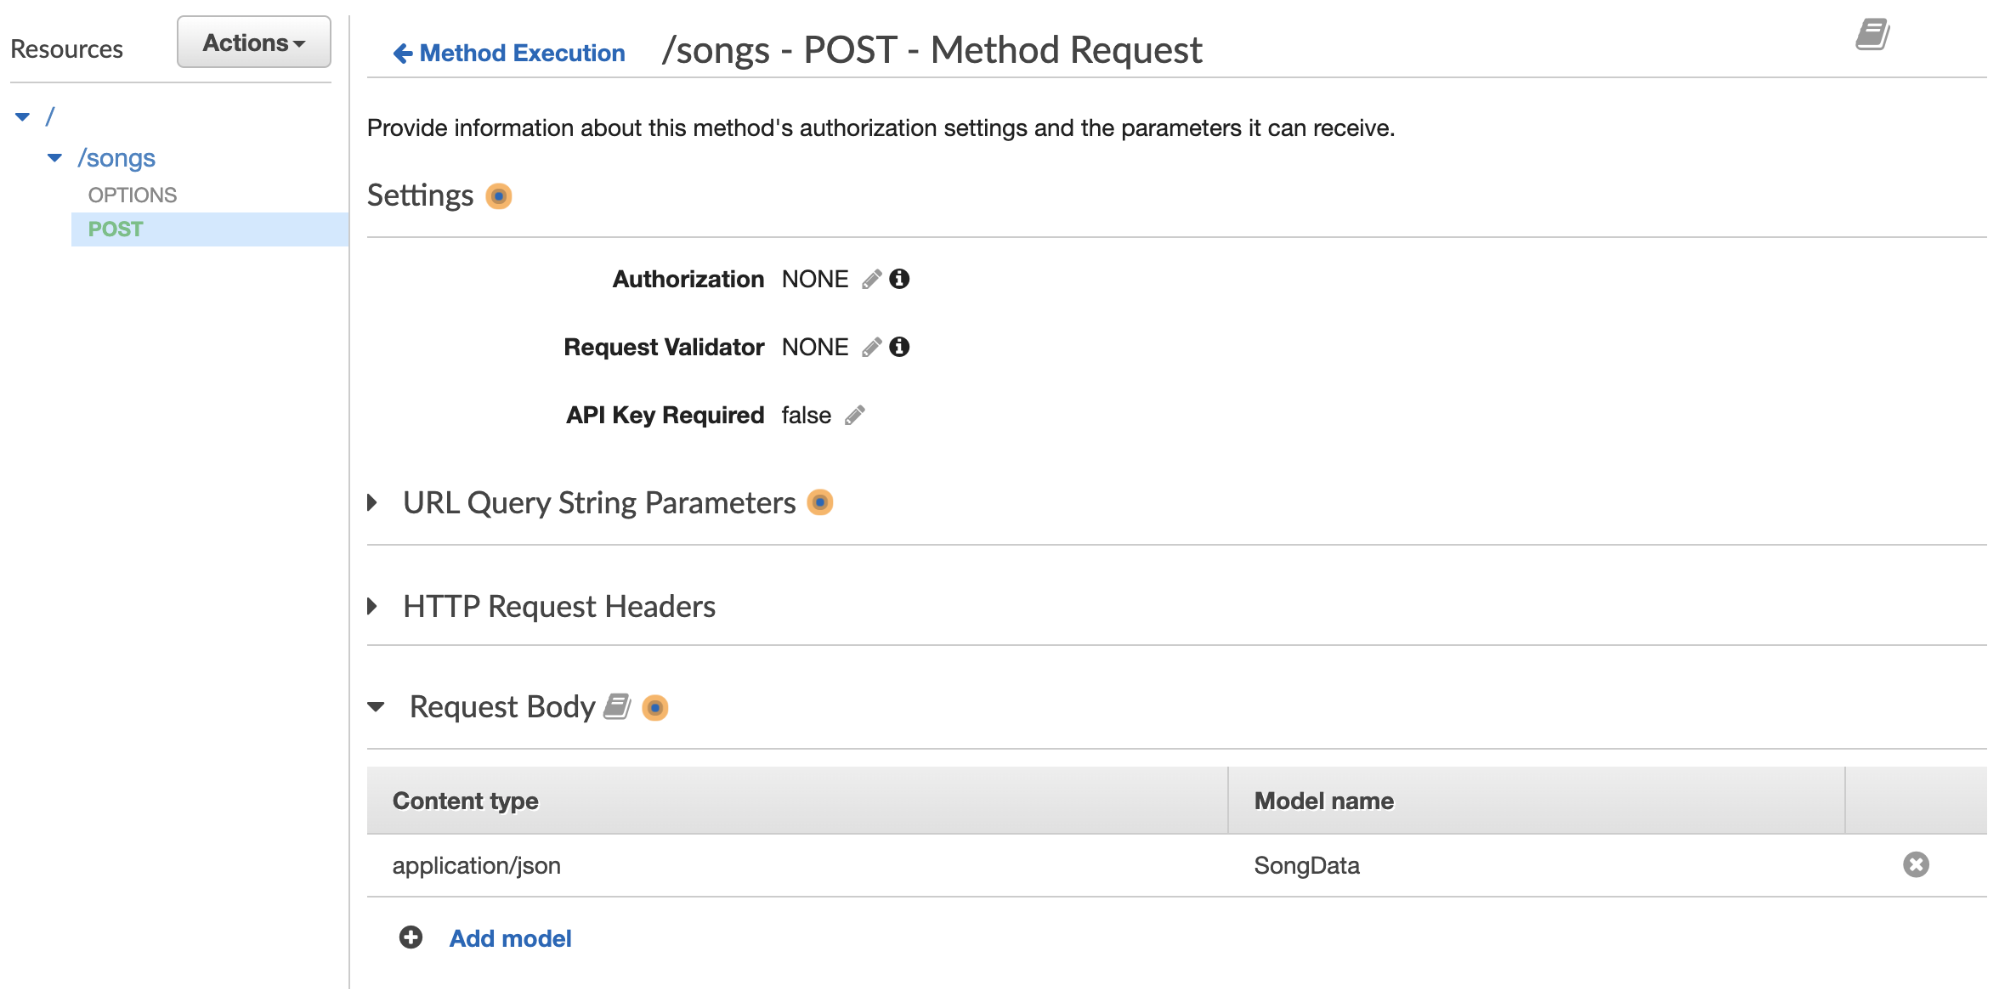
Then we will add our model to the Method Request. Go back to Resources, click on Method Request, scroll down to Request Body, and enter in application/JSON, and select the SongData model you just created.
Thanks for reading! That was really fun and really long, and we only hit the tip of the iceberg of what you can do with APIs on AWS. Happy building!